[phpBB Debug] PHP Warning: in file [ROOT]/includes/bbcode.php on line 483: preg_replace(): The /e modifier is no longer supported, use preg_replace_callback instead
[phpBB Debug] PHP Warning: in file [ROOT]/includes/bbcode.php on line 483: preg_replace(): The /e modifier is no longer supported, use preg_replace_callback instead
[phpBB Debug] PHP Warning: in file [ROOT]/includes/bbcode.php on line 483: preg_replace(): The /e modifier is no longer supported, use preg_replace_callback instead
[phpBB Debug] PHP Warning: in file [ROOT]/includes/bbcode.php on line 483: preg_replace(): The /e modifier is no longer supported, use preg_replace_callback instead
[phpBB Debug] PHP Warning: in file [ROOT]/includes/bbcode.php on line 483: preg_replace(): The /e modifier is no longer supported, use preg_replace_callback instead
[phpBB Debug] PHP Warning: in file [ROOT]/includes/bbcode.php on line 483: preg_replace(): The /e modifier is no longer supported, use preg_replace_callback instead
[phpBB Debug] PHP Warning: in file [ROOT]/includes/bbcode.php on line 483: preg_replace(): The /e modifier is no longer supported, use preg_replace_callback instead
[phpBB Debug] PHP Warning: in file [ROOT]/includes/bbcode.php on line 483: preg_replace(): The /e modifier is no longer supported, use preg_replace_callback instead
[phpBB Debug] PHP Warning: in file [ROOT]/includes/bbcode.php on line 483: preg_replace(): The /e modifier is no longer supported, use preg_replace_callback instead
[phpBB Debug] PHP Warning: in file [ROOT]/includes/bbcode.php on line 483: preg_replace(): The /e modifier is no longer supported, use preg_replace_callback instead
[phpBB Debug] PHP Warning: in file [ROOT]/includes/bbcode.php on line 483: preg_replace(): The /e modifier is no longer supported, use preg_replace_callback instead
[phpBB Debug] PHP Warning: in file [ROOT]/includes/bbcode.php on line 483: preg_replace(): The /e modifier is no longer supported, use preg_replace_callback instead
[phpBB Debug] PHP Warning: in file [ROOT]/includes/bbcode.php on line 483: preg_replace(): The /e modifier is no longer supported, use preg_replace_callback instead
[phpBB Debug] PHP Warning: in file [ROOT]/includes/bbcode.php on line 483: preg_replace(): The /e modifier is no longer supported, use preg_replace_callback instead
[phpBB Debug] PHP Warning: in file [ROOT]/includes/bbcode.php on line 483: preg_replace(): The /e modifier is no longer supported, use preg_replace_callback instead
[phpBB Debug] PHP Warning: in file [ROOT]/includes/bbcode.php on line 483: preg_replace(): The /e modifier is no longer supported, use preg_replace_callback instead
[phpBB Debug] PHP Warning: in file [ROOT]/includes/bbcode.php on line 483: preg_replace(): The /e modifier is no longer supported, use preg_replace_callback instead
[phpBB Debug] PHP Warning: in file [ROOT]/includes/bbcode.php on line 483: preg_replace(): The /e modifier is no longer supported, use preg_replace_callback instead
[phpBB Debug] PHP Warning: in file [ROOT]/includes/bbcode.php on line 483: preg_replace(): The /e modifier is no longer supported, use preg_replace_callback instead
[phpBB Debug] PHP Warning: in file [ROOT]/includes/bbcode.php on line 483: preg_replace(): The /e modifier is no longer supported, use preg_replace_callback instead
[phpBB Debug] PHP Warning: in file [ROOT]/includes/bbcode.php on line 483: preg_replace(): The /e modifier is no longer supported, use preg_replace_callback instead
[phpBB Debug] PHP Warning: in file [ROOT]/includes/bbcode.php on line 483: preg_replace(): The /e modifier is no longer supported, use preg_replace_callback instead
[phpBB Debug] PHP Warning: in file [ROOT]/includes/bbcode.php on line 483: preg_replace(): The /e modifier is no longer supported, use preg_replace_callback instead
[phpBB Debug] PHP Warning: in file [ROOT]/includes/bbcode.php on line 483: preg_replace(): The /e modifier is no longer supported, use preg_replace_callback instead
[phpBB Debug] PHP Warning: in file [ROOT]/includes/bbcode.php on line 483: preg_replace(): The /e modifier is no longer supported, use preg_replace_callback instead
[phpBB Debug] PHP Warning: in file [ROOT]/includes/bbcode.php on line 483: preg_replace(): The /e modifier is no longer supported, use preg_replace_callback instead
[phpBB Debug] PHP Warning: in file [ROOT]/includes/bbcode.php on line 112: preg_replace(): The /e modifier is no longer supported, use preg_replace_callback instead
[phpBB Debug] PHP Warning: in file [ROOT]/includes/bbcode.php on line 112: preg_replace(): The /e modifier is no longer supported, use preg_replace_callback instead
Resin Addict Forum • View topic - Project Log: Marauder Destroyer
ATTENTION: As of March 2017 the Resin Addict Forums are being wound down.
New members are no longer being accepted. Read more about it here.

Project Log: Marauder Destroyer

Discussion of modelling

Moderator: Wardens

Project Log: Marauder Destroyer

Postby BlueRonin » Sat Nov 27, 2010 8:40 am

I picked up a Marauder Destroyer at the Autumn 40k Throne of Skulls last weekend, and I guess it isn't much of a surprise that I got crackin' with it as soon as I got home from Warhammer World. It is one of three super-heavies destined for my Apocalypse army of Catachan Jungle Fighters (the other two being a couple of Stormlords loaded with a Platoon each), and I thought I'd share the build with you guys.

The first thing I did (after checking all the parts were there and in acceptable order), was to scrub them all with soapy water and rinse them well. Once they had air dried I used a model saw to cut off the larger excess bits of resin. Then I began planning the build, settling on getting started with the cockpit and the top gunner so that they were ready for hull assembly.

So far I've sunk about ten hours into the project, most of it prep and assembly work. I enjoy it, but it was still very satisfying to put paint to resin at this early stage! The internals are mostly done, just a few details and some light weathering to go before I can start assembling the hull around them. Just need to plan some added details before assembly, as I want some subtle shrines and icons to increase the "40k flavor" of the model.

Image

Image

Image

The final color scheme will be copied out of Imperial Armour, Volume 1, taken from the Marauder Destroyer shown in the jungle paint scheme (as it really ties in well with my army).

Image

Critiques, suggestions, and off-the-wall ideas are most welcome!! I "share to hear" so I can improve! :)
BlueRonin
User
 
Posts: 111
Joined: Tue Nov 23, 2010 11:24 pm

Re: Project Log: Marauder Destroyer

Postby mangozac » Sat Nov 27, 2010 10:23 am

Hi BlueRonin! First of all let me welcome you to RA and say thanks for sharing this project with us. The Marauder is a fantastic design and it's always great to see a build log for a FW model of this size ;)

Have you built many resin kits before? It seems like you know what you're doing with regards to the assembly process (washing, drying, removing the pour channels, etc.).

It's a bit early in the process for me to give much critique yet. Your painting seems solid. You mentioned adding some interior details but have you got any plans for additional exterior details/conversions?
Oh yeah I can make that....
User avatar
mangozac
Resin Addict Collaborator
 
Posts: 4271
Joined: Fri Oct 16, 2009 3:40 pm
Location: QLD, Australia

Re: Project Log: Marauder Destroyer

Postby BlueRonin » Sat Nov 27, 2010 6:06 pm

Thank you for the welcome - I met Arkangel the other weekend and he brought me in! :) I've worked a fair bit with resin by now (mostly with FW tank and renegade conversion kits), but this will be my first super-heavy build in resin. First of many, now that I finally have armies and opponents with collections large enough to venture into Apocalypse (i.e. I love the hobby, but Iove the game, so I need to balance both ends). :)

Last night I continued working on the gun turret. It is a tricky build, as the stages are intermingled. By that I mean the gun mount, cradle, and gunner need to be finished (as seen above) before inserting into the gun tower. However, the canopy needs a bit of green stuff work to fit properly with its base, so I needed to dry fit the whole assembly, paint the interior, glue the windshields (FW didn't include any clear film, so I cleaned and sliced up some blister packs I had lying around), and mask the windshields before actually starting the assembly.

The exposed gun mount and heavy bolters means that once assembled, I'll either have to go for an intense masking job, or forgo the air brush on this sub-assembly and hand paint the gun turret. Any thoughts on this? I'm pretty confident that I'll be able to hand paint diluted layers well enough for the section not to stand out from the airbrushed hull - but a keen eye will always notice such things.

As for conversion / detail plans I'll be looking at small things as I go along - mostly withe aim of subtle personalization. I am more than happy enough to master the basic build and I know there will be more builds in the future so I have no need to go crazy. On the other hand, if anybody spots something and thinks of a cool suggestion I'm happy to take in onboard for consideration. There are, however, a few practical things that I'll handle - such as making to sets of landing gear with magnets so I can choose between an airborne and landed configuration.
BlueRonin
User
 
Posts: 111
Joined: Tue Nov 23, 2010 11:24 pm

Re: Project Log: Marauder Destroyer

Postby blind pig » Sat Nov 27, 2010 10:40 pm

blind pig
Junkie
 
Posts: 581
Joined: Fri Feb 19, 2010 2:41 am
Location: Brisbane Australia

Re: Project Log: Marauder Destroyer

Postby Arkangel » Sat Nov 27, 2010 11:31 pm

And another joins the fold!! :twisted:
Alex thanks for posting this up. As I said over at: http://apocalypse40k.com/index.php?/index
I haven't seen anyone here have a crack at one of these and it's on my list! :mrgreen: So having you update here too will bring the guys at RA into the project and you should be able to get even more tips on finishing up or tweeking it here and there. Plus the wealth of knowledge here as well as on the Apoc forum should alow you to think about maybe some ideas you hadn't envisaged for the project.

Nice to have you on board mate I'm glad I met you guys that weekend! 8-)
Thanks for sharing

Dan
Hey do me a favour, point that thing somewhere else!

http://photobucket.com/Arkangel_bucket
User avatar
Arkangel
Habit
 
Posts: 316
Joined: Mon Oct 26, 2009 8:31 am
Location: UK

Re: Project Log: Marauder Destroyer

Postby BlueRonin » Sun Nov 28, 2010 12:22 am

Sounds great! I'm thrilled I had the chance to meet up with you and see some of your stuff as well!

Spent a couple hours working on prep and dry fitting today, and discovered another detail I'm going to modify - the Navigator and his instrument board sits mostly under a boring, featureless part of the canopy that simply covers over all that goodness, so I'm going to convert it so that it features three more portholes. Pictures to follow!
BlueRonin
User
 
Posts: 111
Joined: Tue Nov 23, 2010 11:24 pm

Re: Project Log: Marauder Destroyer

Postby Arkangel » Sun Nov 28, 2010 1:52 am

Fantastic Idea!!! :mrgreen:
I've modified one of my wso's/navigators for my second resin Valk with a head change just so he's different 8-)
Hey do me a favour, point that thing somewhere else!

http://photobucket.com/Arkangel_bucket
User avatar
Arkangel
Habit
 
Posts: 316
Joined: Mon Oct 26, 2009 8:31 am
Location: UK

Re: Project Log: Marauder Destroyer

Postby BlueRonin » Sun Nov 28, 2010 6:54 pm

BlueRonin
User
 
Posts: 111
Joined: Tue Nov 23, 2010 11:24 pm

Re: Project Log: Marauder Destroyer

Postby Vaaish » Mon Nov 29, 2010 1:12 am

Would it be possible to put the turret casing in place to paint without the interior in place and assemble it after the airbrushing is done?
-Vaaish
Vaaish
Junkie
 
Posts: 827
Joined: Sat Oct 31, 2009 7:55 am
Location: Greenville, SC

Re: Project Log: Marauder Destroyer

Postby BlueRonin » Mon Nov 29, 2010 2:08 am

It would be possible, but then the gapfilling would have to be done in such a way as to leave the option for disassembly (which would never be a perfect gap fill, obviously).

I'm thinking to glue the canopy in place, then perform the gap fill with green stuff, and then paint the exterior of the cuppola. I've been warming to the idea of liquid masking, so I figure I'll buy a bottle tomorrow and experiment a bit.

I'm wondering if there are liquid masks that leave clear plastics unaffected as well? Has anybody tried?
BlueRonin
User
 
Posts: 111
Joined: Tue Nov 23, 2010 11:24 pm

Re: Project Log: Marauder Destroyer

Postby blind pig » Mon Nov 29, 2010 11:24 am

That Maskol is (from the smell of it) latex with a bit of purple colouring. It brushes on (will destroy brushes if not washed off in soapy water immediately after use) and dries in less that 10 minutes. Use a few coats. It is clear canopy safe and rubs off afterwards with a thumb, blutack or with water.

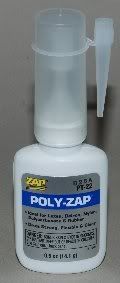
There is also this Superglue (CA glue) designed for gluing canopies. made by the same people as Zap-a-Gap, it dosen't "gass off" anyhwhere near as badly as normal CA glues. It will still mark clear canopies if you get it in the wrong place, but won't frost the canopy like normal CA does.

Image
blind pig
Junkie
 
Posts: 581
Joined: Fri Feb 19, 2010 2:41 am
Location: Brisbane Australia

Re: Project Log: Marauder Destroyer

Postby BlueRonin » Mon Nov 29, 2010 5:58 pm

I found a supplier of Maskol here in Norway, so I got one ordered up! :) Thanks for the tip, I'll give it a go!
BlueRonin
User
 
Posts: 111
Joined: Tue Nov 23, 2010 11:24 pm

Re: Project Log: Marauder Destroyer

Postby BlueRonin » Mon Nov 29, 2010 10:58 pm

Back off work, so had a couple hours to play around with the Marauder, continuing my work on the cockpit.

Image

Image

Next I'll be preparing and painting the inside of the canopy, so that when the Humbrol Maskol arrives (liquid masking agent I just ordered) I'll be ready for the assembly of the hull with these guys properly mounted inside!
BlueRonin
User
 
Posts: 111
Joined: Tue Nov 23, 2010 11:24 pm

Re: Project Log: Marauder Destroyer

Postby BlueRonin » Tue Nov 30, 2010 6:23 am

This evening I began working on the main canopy. Using clear plastic from more GW Blister Packs, I carefully cut out shapes for each side of the canopy. Sizing and fitting them wasn't a problem, but the cast of the canopy's inside was so uneven that the clear plastic didn't sit flush with the spars, and the spars themselves were pockmarked. That alone didn't look too bad, really; but I got some 'smoking' from the superglue as well. The more I looked at it the more I knew it was a detail that would bother me so tomorrow I'm going to spend the time to carefully greenstuff a lining around each viewpane, making a flush join and covering up the vast majority of the white 'smoke'.

This evening I spent carefully sanding down the canopy and the new attachments and making sure they fit the main hull smoothly. I'll have to use some green stuff there are well, but that will be a far more easy gap to fill.

Image

What I learned from this evening is that my next Marauder (or similar resin canopy) will receive a lot more sanding and filing treatment before I start fitting the 'glass'.

You can also notice the top turret in the back. It looks really white, but actuality it is just a light dusting of skull white undercoat. Once the Maskol will get here I'll get those guns masked up and attach its canopy to the copula base. This way I'll be able to airbrush it as well and keep the paintjob uniform (thanks for the tip ;) ).

So far I've sunk about 13-14 hours into the project.
BlueRonin
User
 
Posts: 111
Joined: Tue Nov 23, 2010 11:24 pm

Re: Project Log: Marauder Destroyer

Postby mangozac » Tue Nov 30, 2010 7:04 am

The canopy glass is looking great and adding a bead of putty will really make it look top notch. Like Blind Pig suggested, I would get some non-gassing superglue to use on any clear pieces - the front quarter panel is looking a little too hazed at the moment.

Keep up the great work!
Oh yeah I can make that....
User avatar
mangozac
Resin Addict Collaborator
 
Posts: 4271
Joined: Fri Oct 16, 2009 3:40 pm
Location: QLD, Australia

Next

Return to Modelling

Who is online

Users browsing this forum: No registered users and 16 guests