[phpBB Debug] PHP Warning: in file [ROOT]/includes/bbcode.php on line 483: preg_replace(): The /e modifier is no longer supported, use preg_replace_callback instead
[phpBB Debug] PHP Warning: in file [ROOT]/includes/bbcode.php on line 483: preg_replace(): The /e modifier is no longer supported, use preg_replace_callback instead
[phpBB Debug] PHP Warning: in file [ROOT]/includes/bbcode.php on line 483: preg_replace(): The /e modifier is no longer supported, use preg_replace_callback instead
[phpBB Debug] PHP Warning: in file [ROOT]/includes/bbcode.php on line 483: preg_replace(): The /e modifier is no longer supported, use preg_replace_callback instead
[phpBB Debug] PHP Warning: in file [ROOT]/includes/bbcode.php on line 483: preg_replace(): The /e modifier is no longer supported, use preg_replace_callback instead
[phpBB Debug] PHP Warning: in file [ROOT]/includes/bbcode.php on line 483: preg_replace(): The /e modifier is no longer supported, use preg_replace_callback instead
[phpBB Debug] PHP Warning: in file [ROOT]/includes/bbcode.php on line 483: preg_replace(): The /e modifier is no longer supported, use preg_replace_callback instead
[phpBB Debug] PHP Warning: in file [ROOT]/includes/bbcode.php on line 483: preg_replace(): The /e modifier is no longer supported, use preg_replace_callback instead
[phpBB Debug] PHP Warning: in file [ROOT]/includes/bbcode.php on line 483: preg_replace(): The /e modifier is no longer supported, use preg_replace_callback instead
[phpBB Debug] PHP Warning: in file [ROOT]/includes/bbcode.php on line 483: preg_replace(): The /e modifier is no longer supported, use preg_replace_callback instead
[phpBB Debug] PHP Warning: in file [ROOT]/includes/bbcode.php on line 483: preg_replace(): The /e modifier is no longer supported, use preg_replace_callback instead
[phpBB Debug] PHP Warning: in file [ROOT]/includes/bbcode.php on line 483: preg_replace(): The /e modifier is no longer supported, use preg_replace_callback instead
[phpBB Debug] PHP Warning: in file [ROOT]/includes/bbcode.php on line 483: preg_replace(): The /e modifier is no longer supported, use preg_replace_callback instead
[phpBB Debug] PHP Warning: in file [ROOT]/includes/bbcode.php on line 483: preg_replace(): The /e modifier is no longer supported, use preg_replace_callback instead
[phpBB Debug] PHP Warning: in file [ROOT]/includes/bbcode.php on line 483: preg_replace(): The /e modifier is no longer supported, use preg_replace_callback instead
[phpBB Debug] PHP Warning: in file [ROOT]/includes/bbcode.php on line 483: preg_replace(): The /e modifier is no longer supported, use preg_replace_callback instead
[phpBB Debug] PHP Warning: in file [ROOT]/includes/bbcode.php on line 483: preg_replace(): The /e modifier is no longer supported, use preg_replace_callback instead
[phpBB Debug] PHP Warning: in file [ROOT]/includes/bbcode.php on line 483: preg_replace(): The /e modifier is no longer supported, use preg_replace_callback instead
[phpBB Debug] PHP Warning: in file [ROOT]/includes/bbcode.php on line 483: preg_replace(): The /e modifier is no longer supported, use preg_replace_callback instead
[phpBB Debug] PHP Warning: in file [ROOT]/includes/bbcode.php on line 483: preg_replace(): The /e modifier is no longer supported, use preg_replace_callback instead
[phpBB Debug] PHP Warning: in file [ROOT]/includes/bbcode.php on line 483: preg_replace(): The /e modifier is no longer supported, use preg_replace_callback instead
[phpBB Debug] PHP Warning: in file [ROOT]/includes/bbcode.php on line 483: preg_replace(): The /e modifier is no longer supported, use preg_replace_callback instead
[phpBB Debug] PHP Warning: in file [ROOT]/includes/bbcode.php on line 483: preg_replace(): The /e modifier is no longer supported, use preg_replace_callback instead
[phpBB Debug] PHP Warning: in file [ROOT]/includes/bbcode.php on line 483: preg_replace(): The /e modifier is no longer supported, use preg_replace_callback instead
[phpBB Debug] PHP Warning: in file [ROOT]/includes/bbcode.php on line 483: preg_replace(): The /e modifier is no longer supported, use preg_replace_callback instead
[phpBB Debug] PHP Warning: in file [ROOT]/includes/bbcode.php on line 483: preg_replace(): The /e modifier is no longer supported, use preg_replace_callback instead
[phpBB Debug] PHP Warning: in file [ROOT]/includes/bbcode.php on line 379: preg_replace(): The /e modifier is no longer supported, use preg_replace_callback instead
[phpBB Debug] PHP Warning: in file [ROOT]/includes/bbcode.php on line 112: preg_replace(): The /e modifier is no longer supported, use preg_replace_callback instead
Resin Addict Forum • View topic - Project Log: Superheavy Assault Walker
Page 4 of 5

Re: Project Log: Superheavy Assault Walker

PostPosted: Fri Mar 04, 2011 5:04 am
by BlueRonin
Woot, our three Tau S.A.W.s showed up today - so awesome! I'm so looking forward to getting started with these kits! I'll be asking tons of questions for sure, though! LOL

Re: Project Log: Superheavy Assault Walker

PostPosted: Fri Mar 04, 2011 6:21 am
by mangozac
Awesome! I was going to ask you if they had arrived yet!

I've been in a decidedly non-hobby state of mind over the last week. I've just got too many other things going on and in the rare 5 minutes of downtime I've had I haven't had the motivation to sit at the hobby desk. It will return soon enough, I'm sure - hopefully I'll do some major groundwork on the SAW base on the weekend...

Re: Project Log: Superheavy Assault Walker

PostPosted: Sun Jul 03, 2011 4:08 pm
by mangozac
Can you believe it's been four months since my last post on this!?!

I've got a very small update today:

SAW_base_plinth.JPG

As you can see the base is completed, having been primed, sanded, primed again, sprayed black (around the edge) and then hit with a couple of coats of acrylic clear (automotive stuff hence the high gloss). It's come up quite nicely. I've also hot glued on a 20mm layer of foam onto which the previously shown foam fill was glued. This will allow me to give a gradient to the entire base rather than having it abruptly stop at the edge of the foam hill piece.

The next step before I get excited with plaster and groundwork will be to make the clean edge which will run around much of the side of the foam. The clean edge will be painted black also to indicate that it is where the scene has been "cut from the ground" before being shrunk into a diorama. Normally one would just make the clean edges from some timber/balsa, however because this one's round it's not quite as easy. I'll buy some thin plastic sheet from the newsagent to use (I would use some 0.25mm styrene, but I don't want to waste it), and will probably laminate two layers together into the curve shape.

In terms of groundwork have any of you military guys got a good pic showing what it's like on an arid hill in Afghanistan/Iraq anywhere middle east? I'm going to have to collect some small stones to use as rocks and buy some static grasses, etc. to use.

In terms of the snipers and their gear, I've pulled my plans right back and will simply cast up the few buts I've already created for them. It will simply take too much extra time having to sculpt up more gear.

Re: Project Log: Superheavy Assault Walker

PostPosted: Sun Mar 11, 2012 2:05 pm
by mangozac
We have progress! Since I've been waiting for a friend to do some sculpting for the pilot blank for my Centurion project, I figured I'd do some work on my SAW vignette (although the pilot has been completed late this week so I'll be going back to the Centurion this week).

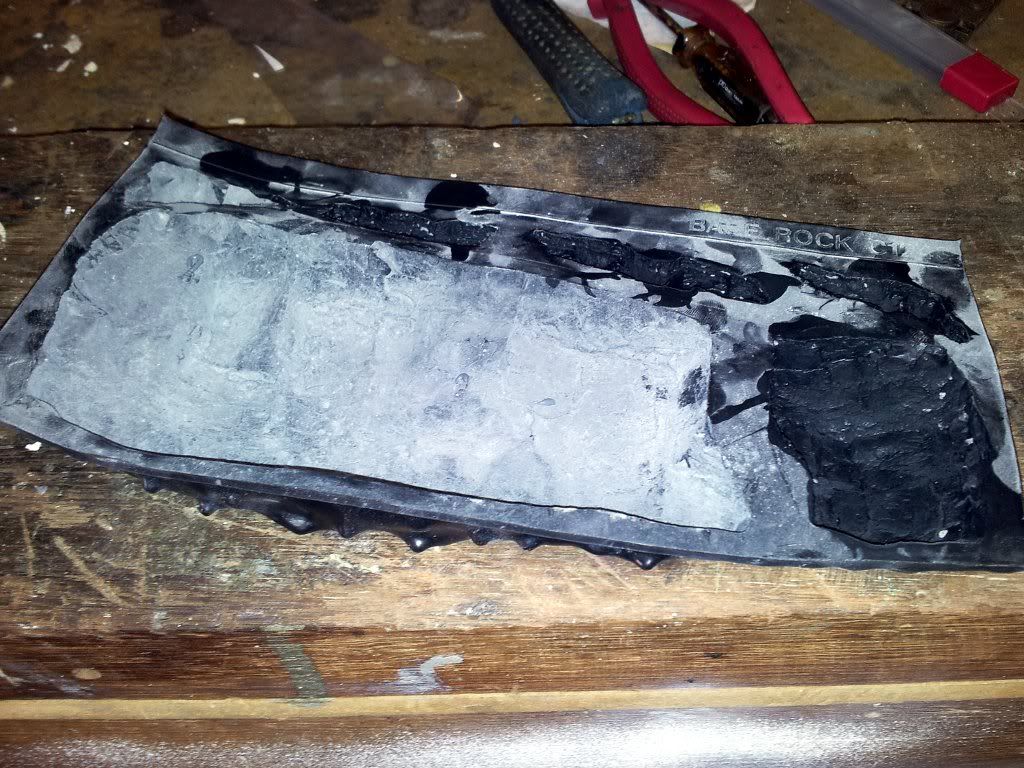
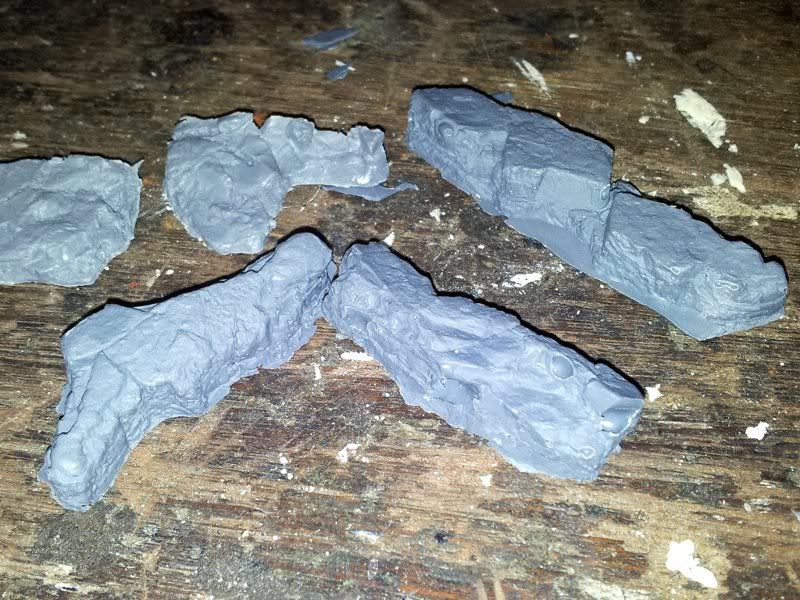
Recently I caught up with my friend Jas and decided to show him the progress I had made and ask for his advice on where to take it. I explained that I wanted to represent the edge of a cliff in an arid Afghan style landscape. He gave me the perfect answer: . So I had a browse and ordered a . Postage was stupidly slow for some reason (probably because it was so cheap) but then this week, after a month in transit, it finally arrived. I hit the mould with some release spray and mixed up a 4PU resin (tinted grey) and talc (as a filler so not to waste resin) combination, which was then sloshed around in the mould until it gelled. The idea being to cast the rocks "hollow" (even though they are single sided).

Image

Image

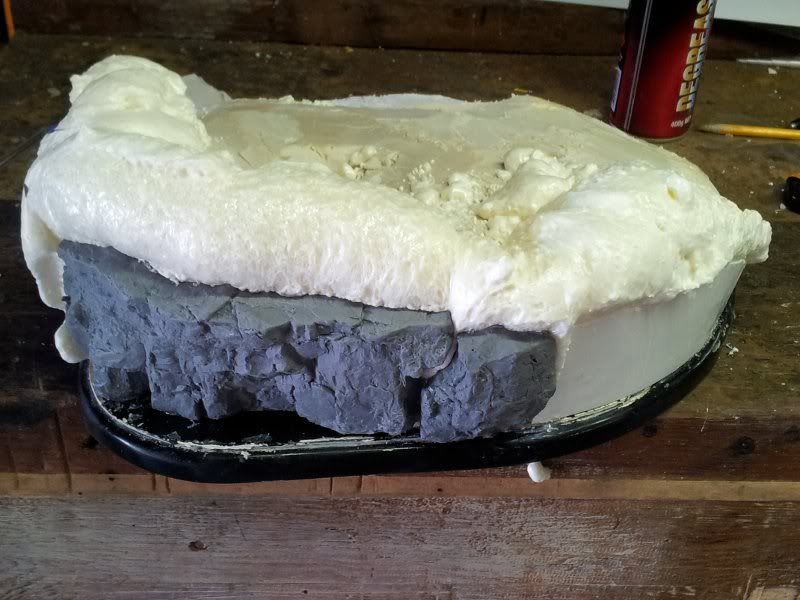
I had built up the base with another layer of foam since previous pics I'd posted, and these were the perfect height for the large rock mould parts. So I hacked off part of the foam and hot glued the rocks in place. The edges of the base that represent where the base had been "cut from the earth" I wanted to be flat and painted black so I glued in some styrene sheets and used a heat gun to curve them around.

With all this done the last step was to attack the base with expanding foam to fill all of the gaps and level things out. Man the expanding foam really expands! That brings us to the current state as of 11:30 this morning:

Image

Image

Next step will be to trim the foam back and then I can start looking at the ground cover mix. The bush out the back of my work has provided a perfect sand/gravel mixture that I have washed and dried in preparation for the base. The legs and pelvis are all ready to go, so soon I will be ready to drill the holes into the base for the bolts that will screw into the feet to hold it in place.

That's all for now - don't expect too frequent updates on this (I'll be back to the Centurion now) but it will be nice to have some slow progress!

Re: Project Log: Superheavy Assault Walker

PostPosted: Sun Mar 11, 2012 3:44 pm
by paulson games
There's two types of that foam, regular and low expansion. The standard stuff really increases in volume and having used it in construction I've f*cked up at least two door jams with it. If it's in a confined space it just keeps expanding and puts a lot of pressure on stuff which will warp neighboring 2x4s and drywall etc. It's also very tough to cut, your best route is to use a hot foam cutter or a saws all, standard knives will be a nightmare.

The low expansion stuff work 10 times better and it's a lot easier to control.

I dropped a can of the standard foam once it landed right on the cap and caused the whole can to explode all over me, ruined my clothes and I had to cut some of the chunks out of my hair. I also never could get all of it off my workboots. It works well but I hate the stuff.

Re: Project Log: Superheavy Assault Walker

PostPosted: Sun Mar 11, 2012 4:30 pm
by mangozac

Re: Project Log: Superheavy Assault Walker

PostPosted: Tue Mar 13, 2012 5:17 am
by Kennui
This is going to be epic.

Re: Project Log: Superheavy Assault Walker

PostPosted: Fri Mar 16, 2012 6:47 pm
by mangozac
It's Friday night update time! Not that Friday night updates will be regular or anything...

So each night this week I've been gradually adding putty and sanding the blank sides of the base in an effort to get them nice and smooth. They will be painted a glossy black once I get the sand/gravel applied on the top - which may well happen as early as tomorrow!

BUT before the sand mix can be applied I first have to work out where the feet will be so that I can both mount the leg fixing bolts and create the impressions that the feet create in the ground due to the huge weight of the machine (which is an important step for diorama work like this - nothing looks worse than a model "floating" on the ground). The bolt will just be countersunk phillips heads in something like M6 size. They will be threaded both into the base itself and the feet in order to prevent the feet from compressing the foam too much.

The feet will have a hole drilled that I will tap by hand with my wonderful (seriously that store has excellent quality at good prices - I've ordered a lot from them for both personal and work stuff).

Anyway in order to know where to drill for the feet the model has been posed. Originally I had planned to have a mid-stride pose one leg in the air) but decided against it for the more static "just arrived and ready to vaporise the enemy" pose:


Any comments?

Re: Project Log: Superheavy Assault Walker

PostPosted: Fri Mar 16, 2012 8:58 pm
by Deadmeat30
zac, that is looking sooo mighty fine! Go on, battle damage, you know you want too ;)

Re: Project Log: Superheavy Assault Walker

PostPosted: Sat Mar 17, 2012 1:52 am
by Seb
Bad ass and great to see the diorama underway again. :o

Love the sniper team setting up below; giant walker overhead? Meh, they're cool as ice killers. :D

Re: Project Log: Superheavy Assault Walker

PostPosted: Sat Mar 17, 2012 6:12 am
by factor40
Man, that thing is gigantic. Very cool!

Re: Project Log: Superheavy Assault Walker

PostPosted: Sat Mar 17, 2012 8:27 am
by mangozac
Thanks guys! Yeah having the sniper team below has turned out quite nicely. Although I am going to modify the pose a bit so that both front legs are facing forward more like it's bracing to take a shot.

Re: Project Log: Superheavy Assault Walker

PostPosted: Sun Mar 18, 2012 9:39 am
by mangozac
I made a lot of progress on the SAW yesterday. The legs are all pinned (which took ages to do!) and are now ready for painting. I'm tossing up whether to glue the legs to the pelvis prior to painting or not. Each "hip" ball joint has two pins inserted from the outside so if I paint first it means I will then need to putty up the holes and patch up the paint in those spots once I do assemble them...

Anyway I also got the foot to base mounting points sorted, which meant that I could finally do the initial sand/gravel layer:


As is the sand coating is a bit ordinary. It's a mix of sand, small rocks, plaster, PVA glue and water. I tried "patting" down the mixture after application but it still left a far too uneven effect (I know a degree of unevenness is good, but this is a bit false looking). Then I remembered I had saved, which recommends the use of acrylic gel medium. So I'm going to do a second, thinner coat over the top of the current groundwork, which should even things out a bit. I'm thinking I might pick up a tube of rather than muck around with the plaster/PVA recipe again. I didn't tint the first coat although the dirt I've used is probably pretty close to the kind of colour I want anyway!

Re: Project Log: Superheavy Assault Walker

PostPosted: Thu Mar 29, 2012 9:38 pm
by mangozac
Well things are coming together! The legs have been epoxied and pinned to the pelvis. The sides of the base have been painted gloss black. M5 threaded rods have been screwed into the base and the feet drilled and tapped to accept the rods. So finally the walker is connected to the base!

It's not sitting as tightly against the ground as it should in the following pics - that's because I need to cut a tiny bit of length off the threaded rods. Also, because I glued and pinned the hip joints before fixing it to the base, I screwed up and one of the rear legs is sitting about 15mm off the ground. So I'm going to have to build up that area with some foam before I do the final basing layer. Oh and one of the mounting rods for the front legs ended up miles off course, so I'll just stick with three mounting points rather than try drilling and tapping another one.

The dirt, plaster and PVA mix for the groundwork actually seems to have worked really well. If I hadn't already bought the gel medium I'd try another layer of just that mix to get the ground appropriately even. Hopefully this will happen over the weekend.

Anyway here's some pics for now. Note that the front cliff is partially covered in masking tape.


Re: Project Log: Superheavy Assault Walker

PostPosted: Thu Mar 29, 2012 11:05 pm
by Fleafa
Dude, that is looking great!