[phpBB Debug] PHP Warning: in file [ROOT]/includes/bbcode.php on line 483: preg_replace(): The /e modifier is no longer supported, use preg_replace_callback instead
[phpBB Debug] PHP Warning: in file [ROOT]/includes/bbcode.php on line 483: preg_replace(): The /e modifier is no longer supported, use preg_replace_callback instead
[phpBB Debug] PHP Warning: in file [ROOT]/includes/bbcode.php on line 483: preg_replace(): The /e modifier is no longer supported, use preg_replace_callback instead
[phpBB Debug] PHP Warning: in file [ROOT]/includes/bbcode.php on line 483: preg_replace(): The /e modifier is no longer supported, use preg_replace_callback instead
[phpBB Debug] PHP Warning: in file [ROOT]/includes/bbcode.php on line 483: preg_replace(): The /e modifier is no longer supported, use preg_replace_callback instead
[phpBB Debug] PHP Warning: in file [ROOT]/includes/bbcode.php on line 483: preg_replace(): The /e modifier is no longer supported, use preg_replace_callback instead
[phpBB Debug] PHP Warning: in file [ROOT]/includes/bbcode.php on line 483: preg_replace(): The /e modifier is no longer supported, use preg_replace_callback instead
[phpBB Debug] PHP Warning: in file [ROOT]/includes/bbcode.php on line 483: preg_replace(): The /e modifier is no longer supported, use preg_replace_callback instead
[phpBB Debug] PHP Warning: in file [ROOT]/includes/bbcode.php on line 483: preg_replace(): The /e modifier is no longer supported, use preg_replace_callback instead
[phpBB Debug] PHP Warning: in file [ROOT]/includes/bbcode.php on line 483: preg_replace(): The /e modifier is no longer supported, use preg_replace_callback instead
[phpBB Debug] PHP Warning: in file [ROOT]/includes/bbcode.php on line 483: preg_replace(): The /e modifier is no longer supported, use preg_replace_callback instead
[phpBB Debug] PHP Warning: in file [ROOT]/includes/bbcode.php on line 483: preg_replace(): The /e modifier is no longer supported, use preg_replace_callback instead
[phpBB Debug] PHP Warning: in file [ROOT]/includes/bbcode.php on line 483: preg_replace(): The /e modifier is no longer supported, use preg_replace_callback instead
[phpBB Debug] PHP Warning: in file [ROOT]/includes/bbcode.php on line 483: preg_replace(): The /e modifier is no longer supported, use preg_replace_callback instead
[phpBB Debug] PHP Warning: in file [ROOT]/includes/bbcode.php on line 483: preg_replace(): The /e modifier is no longer supported, use preg_replace_callback instead
[phpBB Debug] PHP Warning: in file [ROOT]/includes/bbcode.php on line 483: preg_replace(): The /e modifier is no longer supported, use preg_replace_callback instead
[phpBB Debug] PHP Warning: in file [ROOT]/includes/bbcode.php on line 483: preg_replace(): The /e modifier is no longer supported, use preg_replace_callback instead
[phpBB Debug] PHP Warning: in file [ROOT]/includes/bbcode.php on line 483: preg_replace(): The /e modifier is no longer supported, use preg_replace_callback instead
[phpBB Debug] PHP Warning: in file [ROOT]/includes/bbcode.php on line 483: preg_replace(): The /e modifier is no longer supported, use preg_replace_callback instead
[phpBB Debug] PHP Warning: in file [ROOT]/includes/bbcode.php on line 483: preg_replace(): The /e modifier is no longer supported, use preg_replace_callback instead
[phpBB Debug] PHP Warning: in file [ROOT]/includes/bbcode.php on line 483: preg_replace(): The /e modifier is no longer supported, use preg_replace_callback instead
[phpBB Debug] PHP Warning: in file [ROOT]/includes/bbcode.php on line 483: preg_replace(): The /e modifier is no longer supported, use preg_replace_callback instead
[phpBB Debug] PHP Warning: in file [ROOT]/includes/bbcode.php on line 483: preg_replace(): The /e modifier is no longer supported, use preg_replace_callback instead
[phpBB Debug] PHP Warning: in file [ROOT]/includes/bbcode.php on line 483: preg_replace(): The /e modifier is no longer supported, use preg_replace_callback instead
[phpBB Debug] PHP Warning: in file [ROOT]/includes/bbcode.php on line 483: preg_replace(): The /e modifier is no longer supported, use preg_replace_callback instead
[phpBB Debug] PHP Warning: in file [ROOT]/includes/bbcode.php on line 483: preg_replace(): The /e modifier is no longer supported, use preg_replace_callback instead
Resin Addict Forum • View topic - DKoK Grenadier with stubber
ATTENTION: As of March 2017 the Resin Addict Forums are being wound down.
New members are no longer being accepted. Read more about it here.

DKoK Grenadier with stubber

Discussion of painting

Moderator: Wardens

DKoK Grenadier with stubber

Postby Dominus Ex Machina » Mon Jan 04, 2010 10:36 am

Hi all, this is my first project posted here.

I've been trying to get some painting done over christmas but noticed a severe lack of skill with the brushes. When I came to think about it I realised that I haven't painted anything since early July last year! So I decided to do something small to get me back in to the game again.

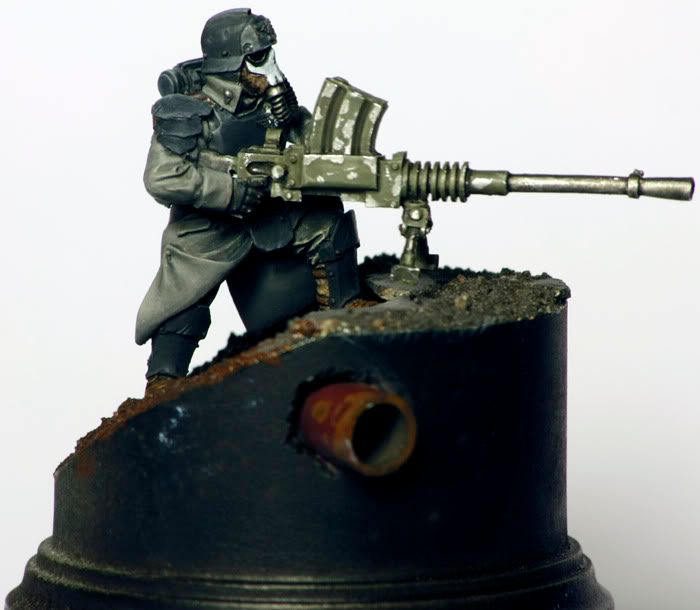
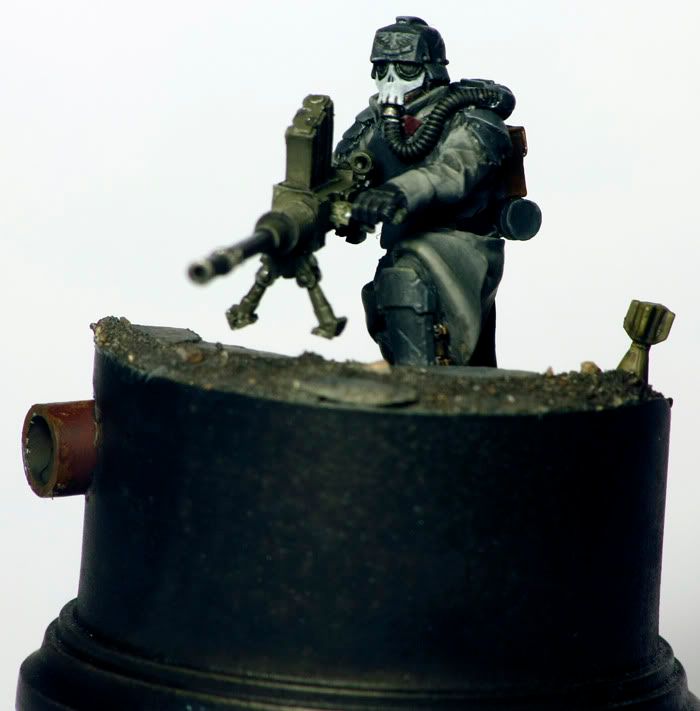
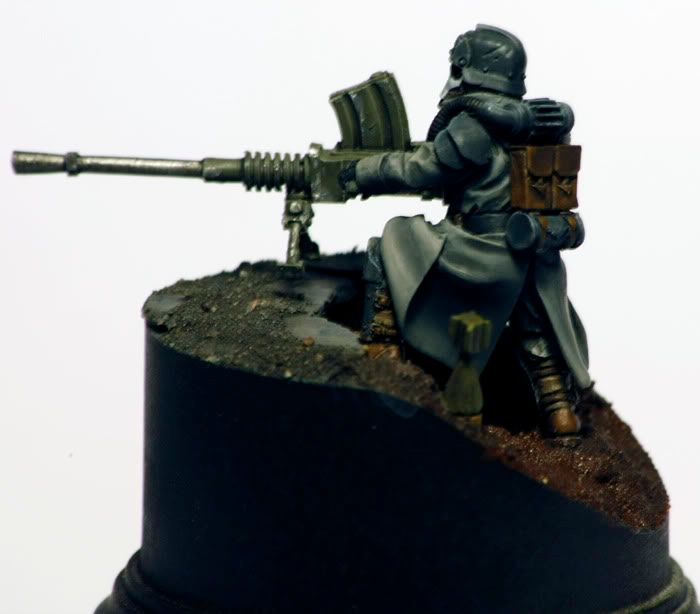
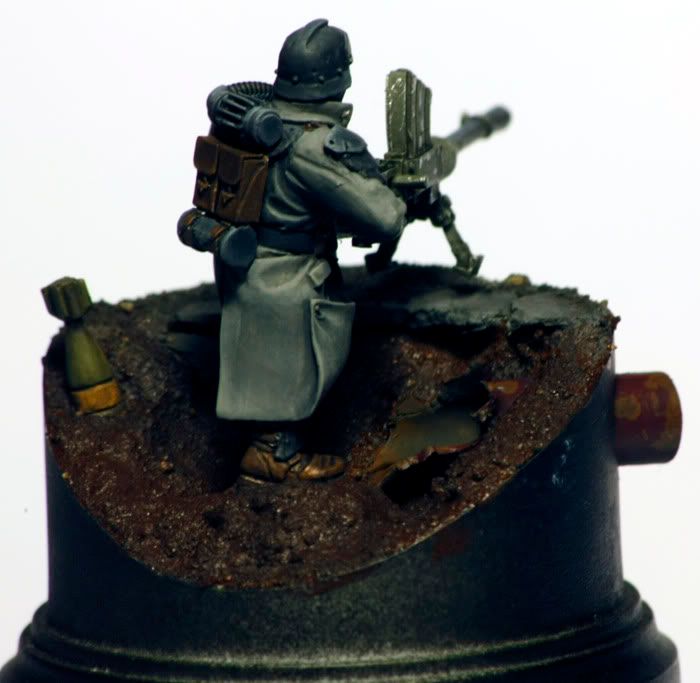
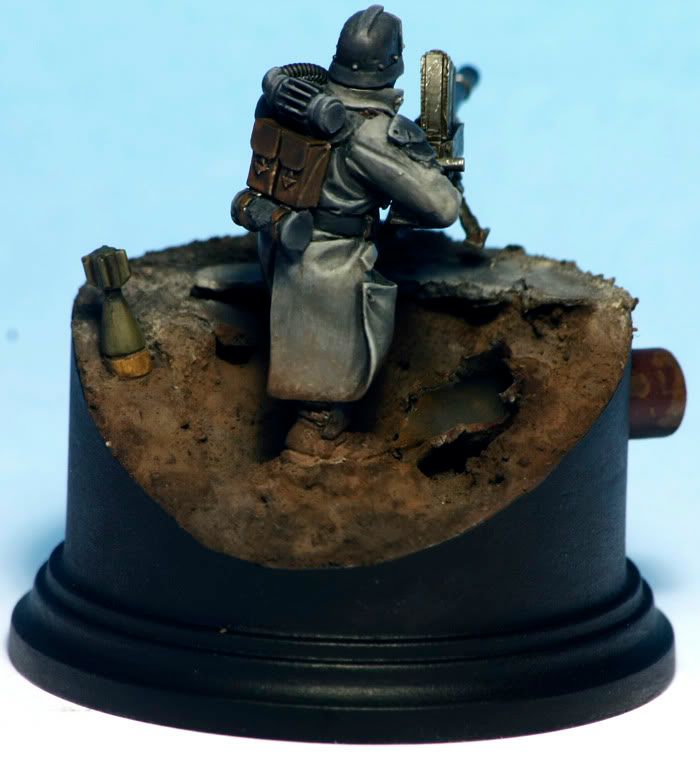
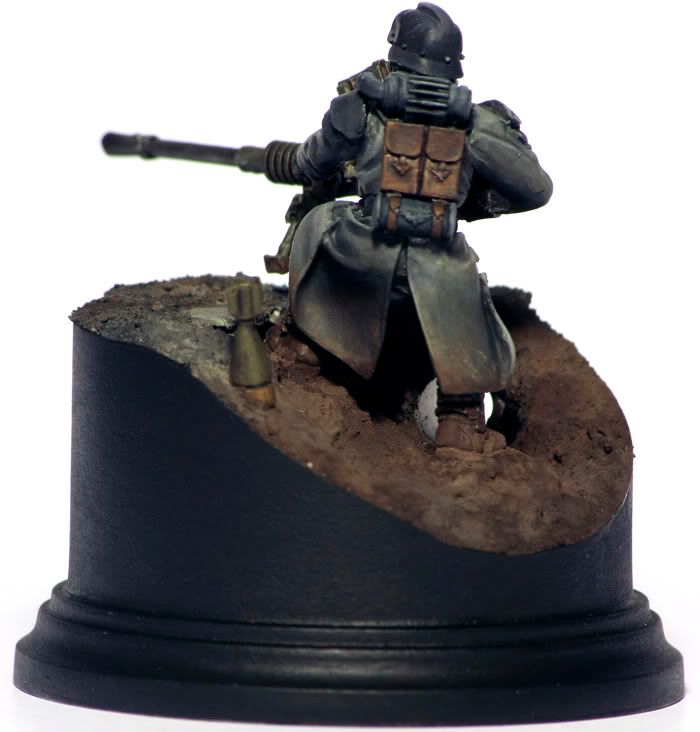
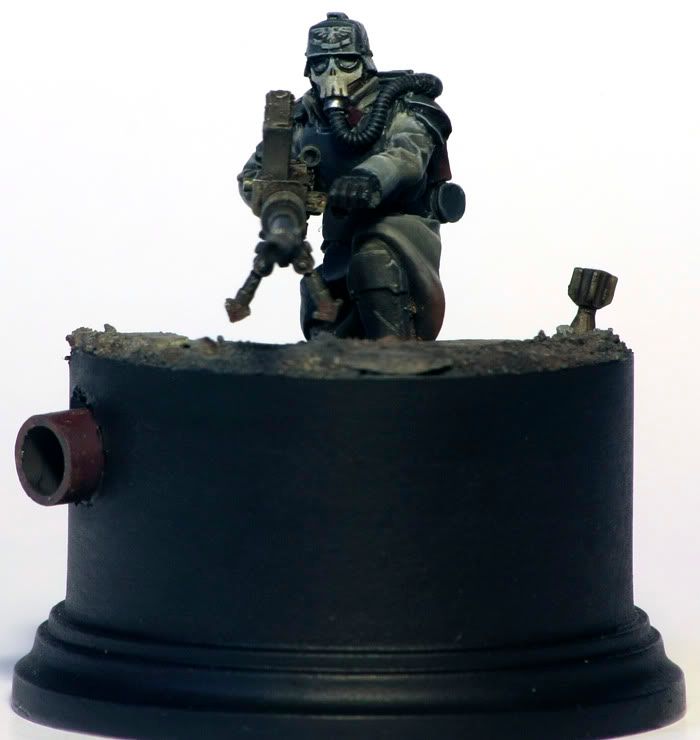
Looking through my riddicolously large supply of accuired models I found some Death Korps of Krieg Grenadiers that I had bought second hand really cheap. I had striped them from paint but the primer was still on, a rather thick black undercoat. I descided that it wouldn't matter too much if I ruined any of these and converted this fellow:

Image
Image

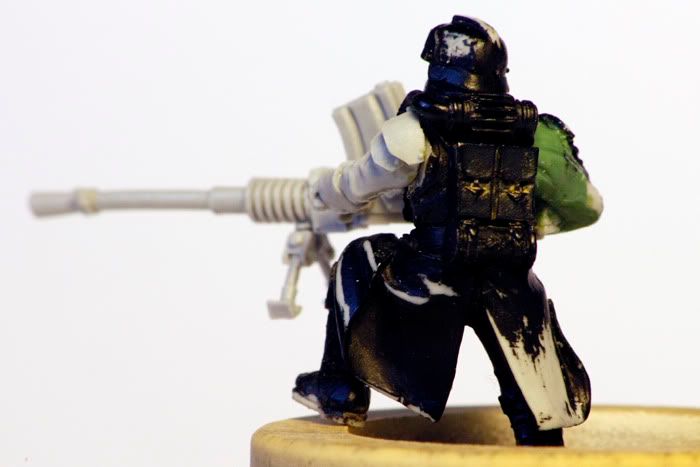
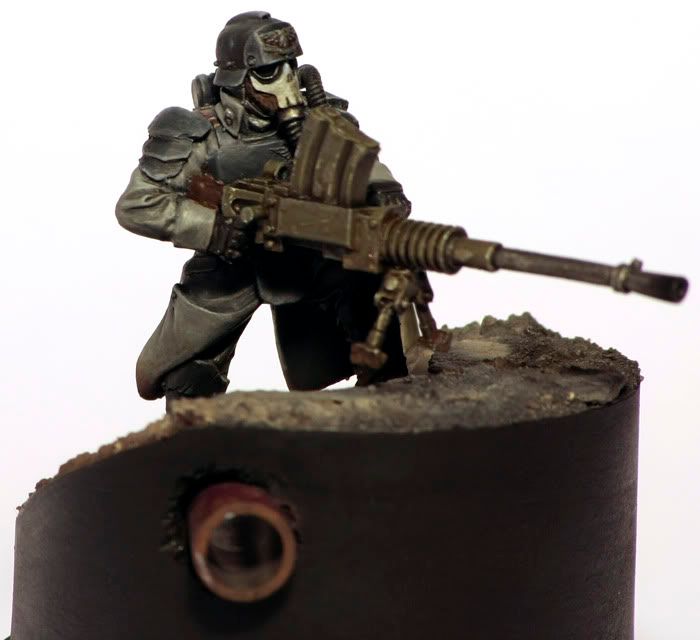
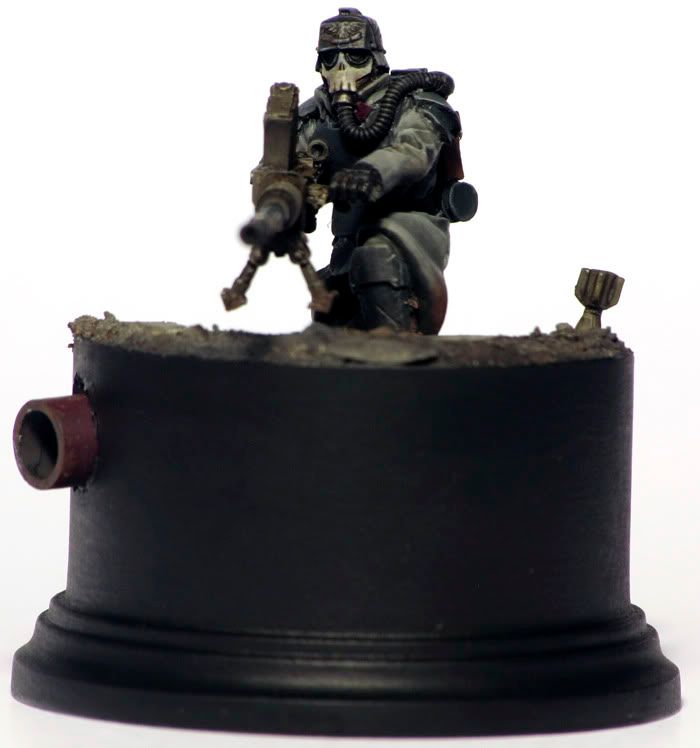
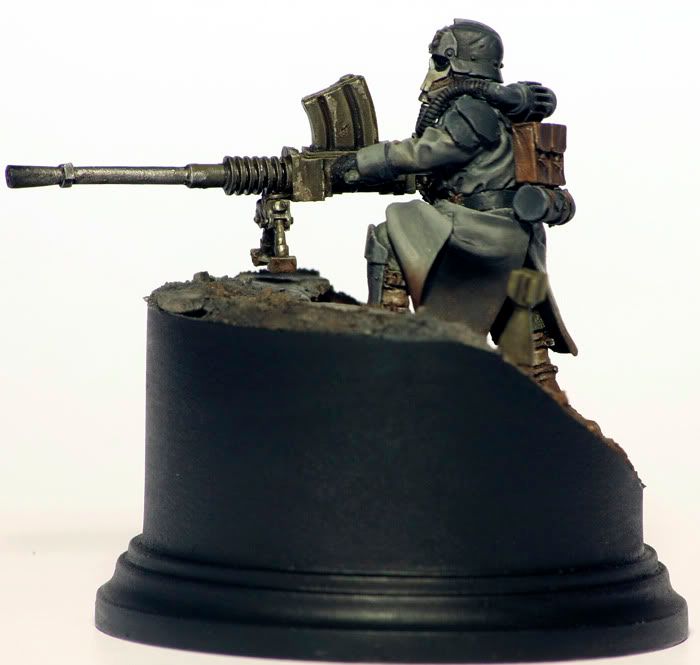
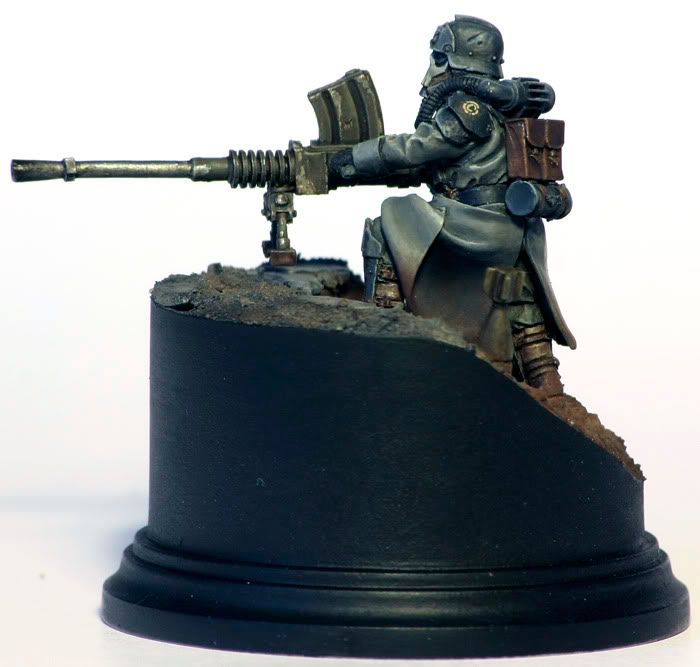
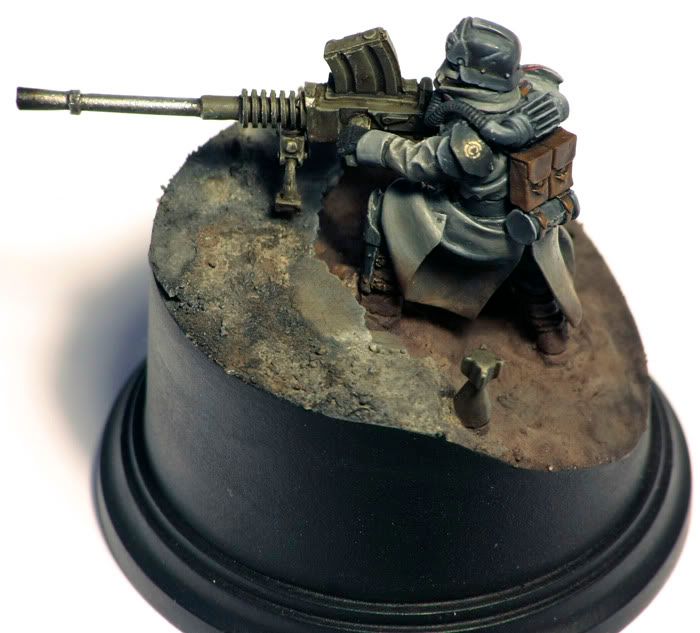
I wanted him to carry the machine gun with the stock under his arm for extra stability which meant I had to convert that arm. I usualy try to use as little Green Stuff as possible as I am quite frankly not a very talented sculptor. But in this case I found it more or less unavoidable. The hand and sleeve are both from the original arm that goes with the stubber, the main arm piece is from a regular grenadier scavanged for parts. The left arm is from my bits box, I think it's from a DKoK squad at ease kit but I'm not sure, it had nothing in its hand. It fit perfectly once I had moved the handle of the machine gun back a little and turned the hand around.

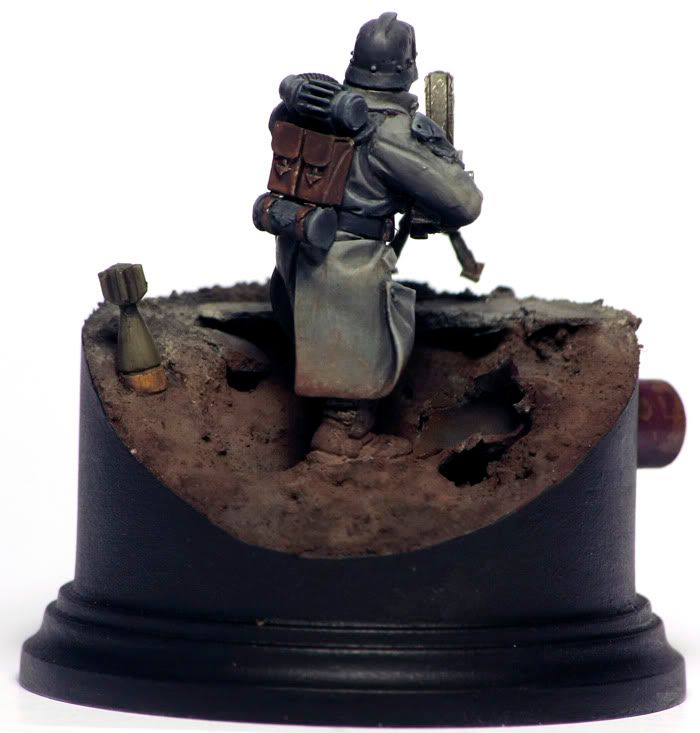
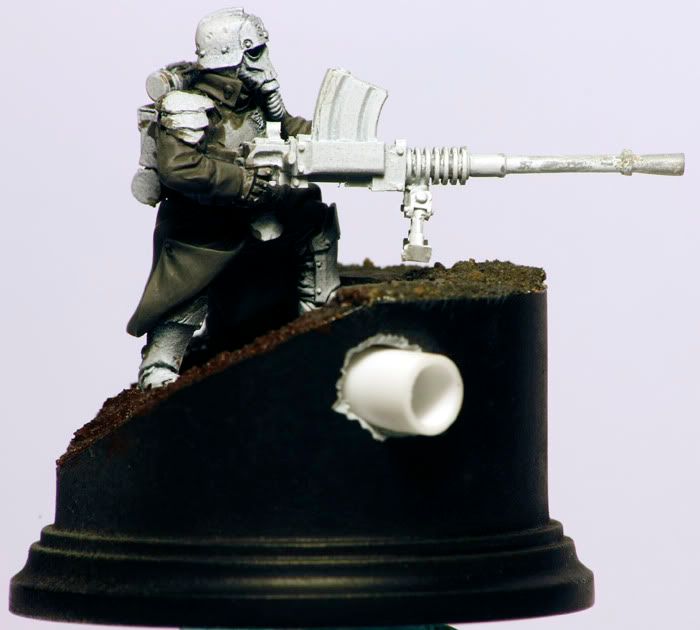
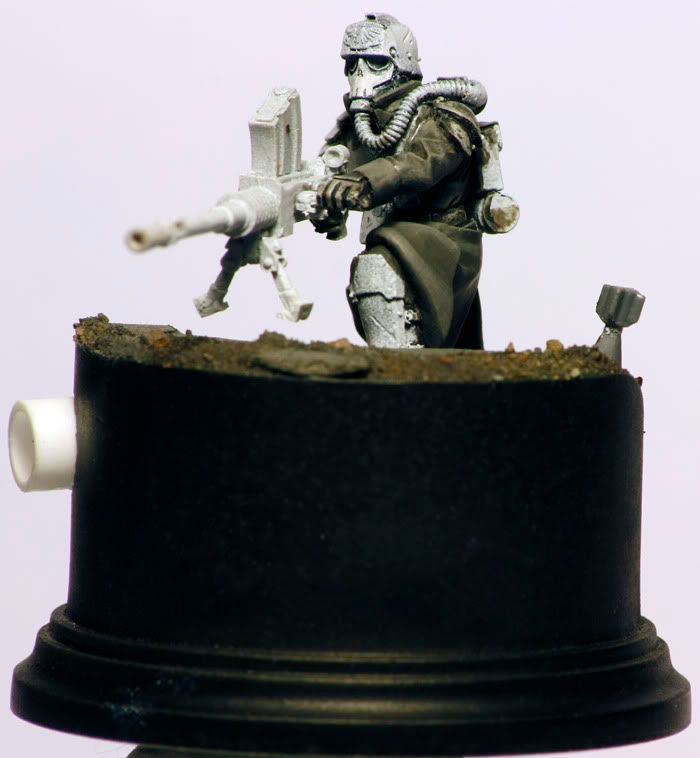
Here he is as he currently stands:

Image
Image
Image
Image

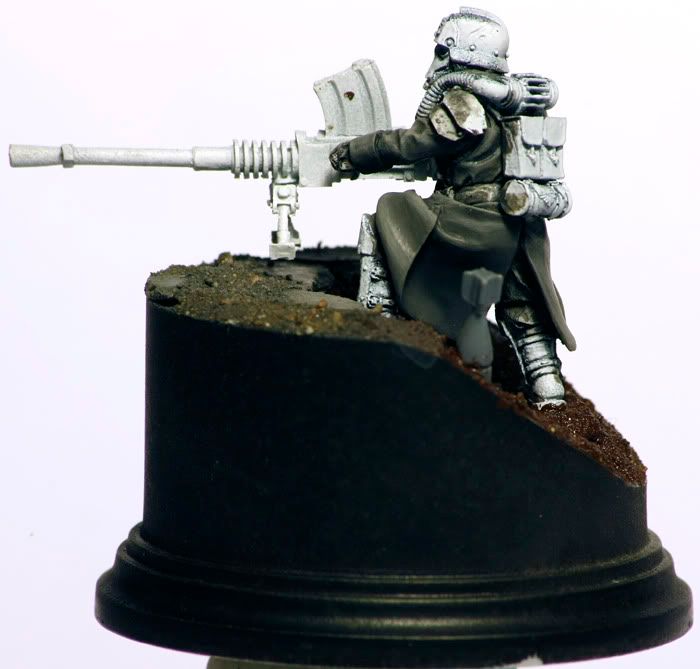
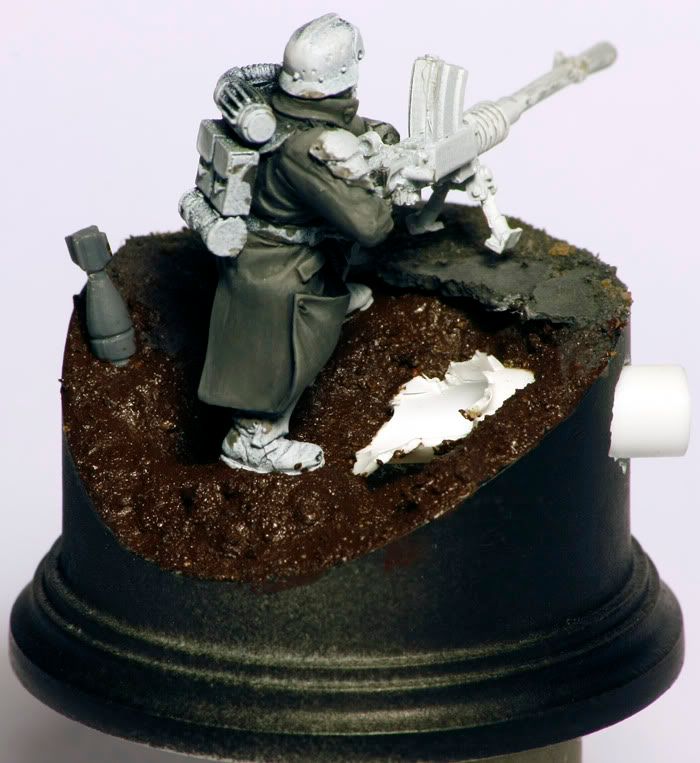
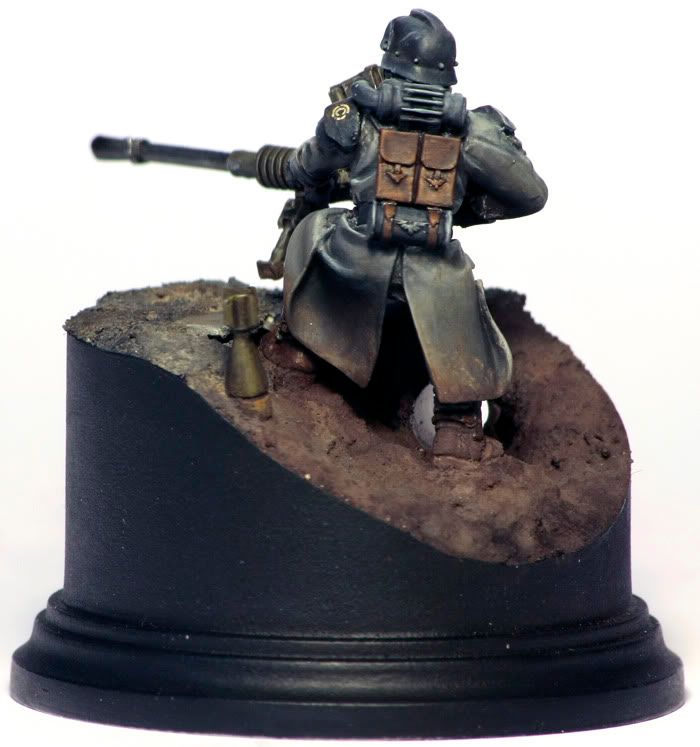
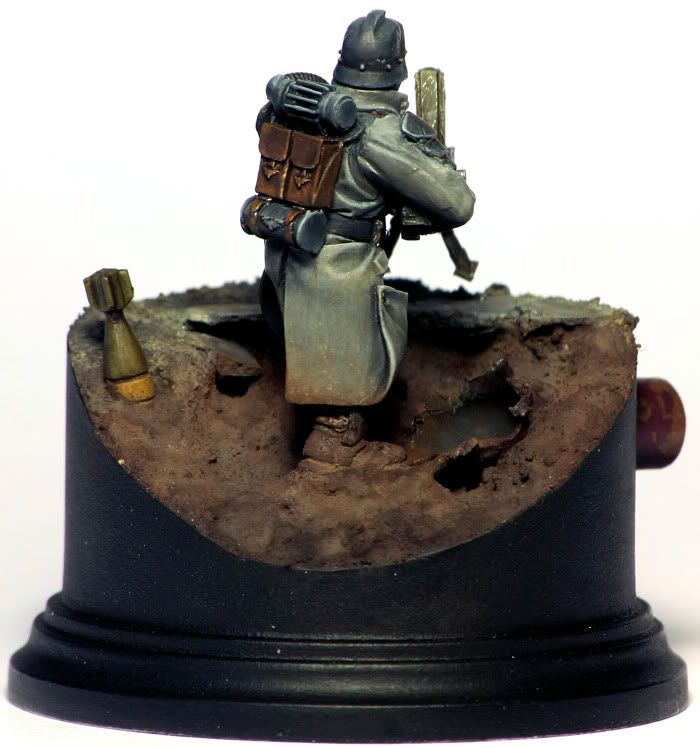
The idea here is that he is emerging from a crater blasted in a road or perhaps inside a building. The earth will be much more dry-looking once I'm done with it, this is just the color of the mix I used to build up the earth. I'm not entirely sure about the mortar shell, I might lay it down and cover it up a little to make it a bit less obvious but we'll see, that can easily be done without too much work so I'll leave it as it is for now.

I've applied some basecoats to the base and some basic highlights and shades to his coat (will work a lot more on those). I was looking at some pictures of "helghast" soldiers from a game called killzone 2 for reference, but now it resembles the original DKoK scheme as done by Mark Bedford on the Forge World site. We'll see where I take him in the end.

I'll post any progress here over the next couple of days, don't think it will take too long to finish this guy. Any comments and criticism is greatly appreciated.

Cheers!
User avatar
Dominus Ex Machina
Casual
 
Posts: 25
Joined: Mon Nov 02, 2009 5:16 pm
Location: Sweden, Skåne

Re: DKoK Grenadier with stubber

Postby mangozac » Mon Jan 04, 2010 5:17 pm

Wow he's looking fantastic for a "disposable test mini"! ;)

I'm most impressed with the base - that bit of piping adds some fantastic, interesting detail. The colour on the trench coat so far is looking nice and unfortunately I can't really offer anything constructive...
Oh yeah I can make that....
User avatar
mangozac
Resin Addict Collaborator
 
Posts: 4271
Joined: Fri Oct 16, 2009 3:40 pm
Location: QLD, Australia

Re: DKoK Grenadier with stubber

Postby Dominus Ex Machina » Tue Jan 05, 2010 11:09 am

Cheers Mangozac! I'm especially glad you liked the base as I like to always spend some extra time on making them :) EDIT: the plinths I use are bought from dragonforge.com, http://www.dragonforge.com/Painting%20s ... linths.htm

Here are the latest progress pics, they aren't great as they're taken at night with only one source of light, but they show what I've done today:

Image
Image
Image
Image

I'm almost done with the painting now. I've got some touching up to do here and there and I will work some more on the shades and highlights around some folds on his coat, but other than that he is pretty much done. All I need to do then is dirty him (and particularly the base) up, I will use pigments and oilpaint for this.

Oh, and I also need to paint his pants, as it is they are merely stained from the coat painting process, suggestions regarding color are most welcome.

Cheers
Last edited by Dominus Ex Machina on Tue Jan 05, 2010 8:46 pm, edited 1 time in total.
User avatar
Dominus Ex Machina
Casual
 
Posts: 25
Joined: Mon Nov 02, 2009 5:16 pm
Location: Sweden, Skåne

Re: DKoK Grenadier with stubber

Postby mangozac » Tue Jan 05, 2010 1:48 pm

This makes figure painting look so much more fun than army painting! Especially with how characterful the DKOK minis are. I might have to get myself one for just this purpose.

I realise it's a bit late now but I agree with your previous comment regarding the mortar shell. It feels like it should be a bit deeper in the ground/laying down further...

Will part of the weathering work include the gun? It still feels a bit plain and one-dimensional as is.
Oh yeah I can make that....
User avatar
mangozac
Resin Addict Collaborator
 
Posts: 4271
Joined: Fri Oct 16, 2009 3:40 pm
Location: QLD, Australia

Re: DKoK Grenadier with stubber

Postby Dominus Ex Machina » Tue Jan 05, 2010 8:44 pm

Cheers, it has been descided then, I will change the mortar shell before the weathering. I will also remove some of the chipping on the magazine seen in the first pic as I think it's just too much, and yes, the gun will be weathered as well :)

I think I'll actually manage to finish this guy today.
User avatar
Dominus Ex Machina
Casual
 
Posts: 25
Joined: Mon Nov 02, 2009 5:16 pm
Location: Sweden, Skåne

Re: DKoK Grenadier with stubber

Postby Warhound » Wed Jan 06, 2010 1:07 am

LOVE IT!

This is by far your best piece to date... tidy, neat, characterful, great tonal work- you had better win a trophy this year!!! (shakes fist!) :lol:

Seriously though- you are getting good man!!!

Got to Love Jeff's bases and got to love Vallejo flat greys and blacks;-P

cheers
WARHOUND
My work: http://s198.photobucket.com/albums/aa19 ... und_photo/
My winners: http://demonwinner.free.fr/peintre.php?id_peintre=274
Superglue runs through my veins- what have you ever done for society?
User avatar
Warhound
Resin Addict Collaborator
 
Posts: 230
Joined: Wed Oct 21, 2009 4:13 pm
Location: Peterborough-UK

Re: DKoK Grenadier with stubber

Postby paulson games » Wed Jan 06, 2010 4:33 am

I really like this the base is great and really adds to the piece. Is it something you built on a lathe? or is it a pre-made item that you bought. I'd like to find some simular bases they look great.

The painting is really clean and makes me sad as I can't paint even 1/10th that well ;)
User avatar
paulson games
Resin Addict Collaborator
 
Posts: 940
Joined: Wed Oct 21, 2009 8:09 pm

Re: DKoK Grenadier with stubber

Postby Dominus Ex Machina » Thu Jan 07, 2010 12:12 am

@Warhound
haha, cheers for you comment, you know I value your feedback. If I can I will definately attend GDUk this year, but I don't regard winning a trophy as realistic, I'm not really quite that good.

@Paulson
The plinth itself was bought at dragonforge.com, I posted a link in the previous update. It comes with a flat top so all modifications and basing was done by myself.


Now I'm pretty much finished I think, I took a series of pictures but for resons beyond my comprehension they all turned out bad, except for this one. I'll take pics from other angles later. But this one shows the base nicely:
Image

The mud is made using MiG pigments "dark mud" and "russian earth". When dry I used oilpaints (burnt umber and flat black) to create some variation in the tones and color.
User avatar
Dominus Ex Machina
Casual
 
Posts: 25
Joined: Mon Nov 02, 2009 5:16 pm
Location: Sweden, Skåne

Re: DKoK Grenadier with stubber

Postby Dominus Ex Machina » Thu Jan 07, 2010 2:22 am

Ok, here we are, feedback is greatly appreciated:

Image
Image
Image
Image
Image
Image
User avatar
Dominus Ex Machina
Casual
 
Posts: 25
Joined: Mon Nov 02, 2009 5:16 pm
Location: Sweden, Skåne

Re: DKoK Grenadier with stubber

Postby mangozac » Thu Jan 07, 2010 6:56 am

It's looking great but I have one complaint. In the first picture (looking perpendicularly at the side of the gun), the gun's metal chipping looks a bit odd. It still looks like the ships are just mainted on metallics. I'm guessing it would look better if they were painted first using something like black represent exposed primer and then the metallic over the top of that.

Other than that your painting is quite superb and makes me a little brush itchy!
Oh yeah I can make that....
User avatar
mangozac
Resin Addict Collaborator
 
Posts: 4271
Joined: Fri Oct 16, 2009 3:40 pm
Location: QLD, Australia

Re: DKoK Grenadier with stubber

Postby Dominus Ex Machina » Thu Jan 07, 2010 8:25 am

I see what you mean, it doesn't show all that well in the pictures but as far as realism goes you can't really beat this method. I first paint the entire gun metal, then I apply liquid mask where I want the chips and then paint the gun as normal. Afterwards you scrub of the liquid mask and you have actual chips in the paint. When you examine it closely you can see this, but as I said, in the pics it doesn't show that well (I used the same method on the pipe, except I had the rust painted underneath, not metal). I did accidentaly make the chips a bit larger than I had intended though...

I'll try to apply a wash to the chips, as it will pool around the edges of them naturaly, I think this might give them a more 3d look, even in the pictures :) Thanks for the suggestion!
User avatar
Dominus Ex Machina
Casual
 
Posts: 25
Joined: Mon Nov 02, 2009 5:16 pm
Location: Sweden, Skåne

Re: DKoK Grenadier with stubber

Postby mangozac » Thu Jan 07, 2010 10:25 am

Ahhh yes the wash sounds a fantastic idea. Indeed it seems that the 3D effect of the liquid mask did not photograph well and the wash will probably help bring it out a little more. That would explain why I only really noticed it when looking perpendicular to the chips.
Oh yeah I can make that....
User avatar
mangozac
Resin Addict Collaborator
 
Posts: 4271
Joined: Fri Oct 16, 2009 3:40 pm
Location: QLD, Australia

Re: DKoK Grenadier with stubber

Postby paulson games » Fri Jan 08, 2010 5:17 am

I agree with the chips looking a bit flat. One of the things I've been wanting to try is adding battle damage and chipping without use of a mask or cutting into the model.

A good number of the privateerpress models have some excellent wear and chipping effects, particuarly the dwarf/rhullic warjacks.

There's a couple articles on painting that style in their no quarter magazine and also on the brush thralls website (http://www.brushthralls.com) Basically they paint the main surface then go back and add wear areas on black and work up to the exposed metals using a combination of white and black edging to give it a 3-d effect. I think it's a pretty impressive technique, although I haven't been able to pull it off myself.


Edit:
Couldn't find the chipping article on brushtralls so I dug out my magazine here:
User avatar
paulson games
Resin Addict Collaborator
 
Posts: 940
Joined: Wed Oct 21, 2009 8:09 pm

Re: DKoK Grenadier with stubber

Postby Warhound » Fri Jan 08, 2010 7:54 pm

Right Pete....(cracks knuckles).....

I have waited until the piece was finished before giving some true feedback (and the better shots help!) and as such, hopefully it should help you get better than a pin badge this year!

I actually disagree to the main extent with the guys in regards to the stubber chipping. I can see exactly what you have tried to achieve here and on the main, the 'flatness' of the green works very well.... however, I think that when one is painting such small areas and wants to achieve the chipping effect, the best way is to 'retro paint' them in. I don't know if you ever got the WD with Sebs ork warboss tutorial in it, but it had a great example, and I shall try to explain here:

Green base coat, highlight and shade as normal (treat as a box for zenithal application)
Take the edge highlight, add a further 25% of the lighter tone colour and dapple on in small random areas to mark out the chipped zones.

Take Vermin brown/ scorched or whatever brown you prefer and after thinning, dapple within the the lines of the highlight 'splodges', leaving an erratic line around the edge.

You guessed it... then apply the metals within the brown, leaving a further erratic line.

This process allows for further control, no over spill like a sponge and gives instant results!

Onto the rest of the model...
The cloak, while in areas could be a tad smoother, is very nice.. as I have said in the past, I like how you paint drapery! (also your base work is flawless!)
However... you say this is finished>? Really?

I disagree (I say with a sergeant major tone!)... There are various areas that you have neglected to even run a brush over....

3 imperial eagles on the back pack.
Rebreather filter bars on back pack
Helmet studs.
Collar skull.
Helmet eagle
Coat button (holding leg area back)
Lenses for goggles
Shoulder straps for chest armour
Knee plates

Now this may seem harsh and it does not necessarily mean that each of these areas needs to be painted, but my eyes are drawn to detail areas and these seem void at the moment. Surely some studs would be chipped leaving exposed metal for example?

Finally, while your 'black' areas are very well painted, they seem to have lost some definition/ separation from the darker areas of the underlying cloak.. I would address this by running a deep terracota wash around the edges perhaps? (see the right shoulder pad for example)

I hope that this helps and look forward to any adjustments that you make?

cheers
WARHOUND
My work: http://s198.photobucket.com/albums/aa19 ... und_photo/
My winners: http://demonwinner.free.fr/peintre.php?id_peintre=274
Superglue runs through my veins- what have you ever done for society?
User avatar
Warhound
Resin Addict Collaborator
 
Posts: 230
Joined: Wed Oct 21, 2009 4:13 pm
Location: Peterborough-UK

Re: DKoK Grenadier with stubber

Postby Dominus Ex Machina » Sat Jan 09, 2010 7:42 am

Right Mark *swings brush*

Hahaha. Mark, let's just say there's a reason this hasn't been posted in the "Solitary" section yet ;) I was wishing for, and expecting, something like that from you :lol:

I addressed some of the "issues". I hope you're not getting too tired of looking at this one 'cause here are some more pictures:

Image
Image
Image
Image
Image
Image
Image

What have I done?
- Painted the eagles on the cylinder-thing on his backpack and helmet (the two others you mention I don't think are aquilas, they are simply where the straps attach to the pouches. And talking of straps I highlighted the ones I had already painted for his armor a bit)
- Highlighted the black further, and also shaded it some more by mixing black with red (it works!)
- Added a red stripe with the number "5" on his right shoulder pad and a "c" (actually the copyright c for games workshop on the waterslide transfers sheet that comes with the IG infantry box) to his left shoulder. (you may or may not have noticed that I had already painted his left collar tip red, the platoon in which I currently serve has red as it's platoon color so that's why, the number five and the "c" are just for visual interest)
- Worked even more on the shades and highlights of the coat, especially added some lighter extreme highlights on the upper body and sharp edges in the folds, also tidied up some areas (in response to the "some areas could be smoother" remark ;) ) And painted the buttons ;)
- I added a hint of brown to the muzzle of the gun. I also reworked the stock and the area around it.
- It doesn't show too well in the pics, but I did paint the lenses (not the easiest thing to do), I added some grey in an attempt to make it look like glass
- Highlighted the collar skull (and other metals)

I'm still considering adding more dirt, perhaps to his kneepads at least to make them more interesting, what do you guys think of that? I’m not sure what you want me to do with the rebreather filterbars on his backpack either

this "mini project" has now taken up much more time and effort than intended but heck, having taken it this far I can just as well go all the way so tell me what you think and don’t hesitate to give any suggestions for improvement!
User avatar
Dominus Ex Machina
Casual
 
Posts: 25
Joined: Mon Nov 02, 2009 5:16 pm
Location: Sweden, Skåne

Next

Return to Painting

Who is online

Users browsing this forum: No registered users and 4 guests