Mark; as I said, I'm not sure on the texture of the Mr 500 - the 1000 stuff was smooth as so perhaps I didn't use enough thinners for the hot weather. I might post the pic over on the Fichtenfoo forums and ask them. It is indeed sandable - I cleaned it up yesterday using some 1200 grit.
Jon; nope, only a single vacuum stage. The mixed resin is poured into the mould and then the mould placed into the pressure pot. The pressure pot has been modified with two sets of fittings to allow both the vacuum pump and compressor to be connected simultaneously (and selected through the use of some valves). Vacuum is then applied and released (to force the resin into all of the voids) and then pressure is applied (but in my experiment above the pressure stage was skipped).
If you look at the ankle joint parts they have quite a large volume sprue (similar to the volume of the actual parts)and I use this as the resevoir. In reality the resevoir does not have to waste much silicone or resin: the silicone only needs to be a few mm thick around the resevoir. And the sprue doesn't need to be filled with so much resin - I just had exrta mixed up.
I'm told resin is only supposed to expand to around double its volume under vacuum (as opposed to silicone which does more than 3 times).
The pump I'm using is the type a Refrigeration or air conditioning mechanic would use. It probably takes a minute for it to take my pressure pot to full vacuum. Another trick that the caster told me is to fill up your pressure pot with uncompressible crap so that the volume of air that needs to be moved is lowered (and thus vacuum is quicker).
I'm going to pick up the final fittings I need for the simultaneous setup today but won't get a chance to try it out until tomorrow night.
ATTENTION: As of March 2017 the Resin Addict Forums are being wound down. New members are no longer being accepted. Read more about it here.
Resin Addict Forum
A place to talk about your addiction
Superheavy Assault Walker
Moderator: Wardens
-

mangozac - Resin Addict Collaborator
- Posts: 4271
- Joined: Fri Oct 16, 2009 3:40 pm
- Location: QLD, Australia
Re: Superheavy Assault Walker
![]() by paulson games » Tue Dec 08, 2009 7:01 am
by paulson games » Tue Dec 08, 2009 7:01 am
I'm not entirely certain as to why you'd need a double system, if the vacuum degasses the resin while also pulling the the air out of the mold what exactly is the pressure stage doing?
From experience the pressure system works ok but needs a fair amount of air channels in order to get solid clean casts. From what I've been seeing through reading is that the vacuum lets you get away with using simpler molds with fewer air channels. Not sure what the combined vacuum/pressure does above and beyond the vaccum stage itself.
I'm curious what the FW process is, I've suspected that they are using a spinner after degassing but after looking at the parts you vacuum cast a spinner may not be needed and they could just be using straight up vacuum. I'm really interested in finding out how FW does their pieces with only a single sprue branch to the part and no additional air channels.
Also what type of negative pressure are you generating? I'm looking at a few pumps online and I have no idea which ones might be suitable. I'm going to also have to figure out how to adapt it to take compression fittings so I can connect it to my pressure pot.
I found a somewhat local place that has pumps would any of these work?
-

paulson games - Resin Addict Collaborator
- Posts: 940
- Joined: Wed Oct 21, 2009 8:09 pm
Re: Superheavy Assault Walker
![]() by mangozac » Tue Dec 08, 2009 7:53 am
by mangozac » Tue Dec 08, 2009 7:53 am
From my experiments the vacuum didn't remove the really small bubbles and was only suitable for getting the resin into all of the voids. The pressure will then compress any bubbles the vacuum misses. The split moulds do not have any nice air channels so with just pressure it's hard to force the resin into all of the cavities.
I will still use pressure only for my two part moulds but as you say it's important to have good air channels. Mark is good mates with some of the GW insiders - surely he can find out exactly what process they're using.
OK You need as close as you can to a full vacuum, which is -29 inches of mercury, or -14PSI. I get to about -28 after a minute of pumping but anything under -27 is probably fine.
This is the style of pump I'm using, although mine doesn't have a handle for portability and is a bit heavier duty:
Basically you want the CFM (Cubic Feet per Minute) characteristic to be as high as possible, as that will mean it can evacuate your pressure pot more quickly.
The pumps in that catalogue you linked to would work I suppose. You would be best to discuss your requirements with them.
Oh yeah I can make that....
-
mangozac - Resin Addict Collaborator
- Posts: 4271
- Joined: Fri Oct 16, 2009 3:40 pm
- Location: QLD, Australia
Re: Superheavy Assault Walker
![]() by paulson games » Fri Dec 11, 2009 3:40 pm
by paulson games » Fri Dec 11, 2009 3:40 pm
I think I found a pump I can use. What I'm uncertain about is if it'll be strong enough to vacate the air in my compression chamber quickly enough.
Here's the auction link
and here's the user manual with stats, I don't understand the technical bits, do you have any better insight?
I think I'd need to get a negative pressure guage as well as a compression fittings and hose, not sure what else.
Here's the auction link
and here's the user manual with stats, I don't understand the technical bits, do you have any better insight?
I think I'd need to get a negative pressure guage as well as a compression fittings and hose, not sure what else.
-
paulson games - Resin Addict Collaborator
- Posts: 940
- Joined: Wed Oct 21, 2009 8:09 pm
Re: Superheavy Assault Walker
![]() by mangozac » Fri Dec 11, 2009 5:23 pm
by mangozac » Fri Dec 11, 2009 5:23 pm
Yeah that looks pretty good to me. There are two vital stats: ultimate vacuum and air displacement speed.
That pump lists an ultimate vacuum of 0.02mBar. Using I converted that to a unit we all know and love: 0.02mBar = 0.00029 PSI. But hang on, that's a pathetic positive pressure. I want some hard core vacuum! Stress not because that's actually with reference to 1 atmosphere, which is just under 14.7 PSI. So to get the actual vacuum we subtract one from the other to give -14.69971 PSI. A smack on full vacuum is -14.695949 PSI so that pump is definitely doing a good job. Anything better than -14PSI will probably do the job.
Air displacement for this pump is 2.73 CFM. That's 2.73 Cubic Feet per Minute. If you're using a 10L pressure pot like myself then it has a volume of about 0.353 Cubic Feet (once again from ). Calculating this out gives (0.353/2.73) = 0.129 minutes = 7.758 seconds to evacuate the tank. My pump takes probably 3 times that so this one sounds fantastic.
Also, on the topic of evacuation speed, you can increase it by placing solid objects into the pressure pot undeneath the moulds. This will reduce the volume of air which the pump has to remove.
Even though it's on eBay it's not dirt cheap, but that said it does seem pretty decent and the price isn't bad. I'm just lucky as I got mine for free
Still, I'd say give it another couple of weeks until I've done more experiments and got the technique sussed. I picked up the last of my fittings new fittings today so I'm planning to do some casting experiments tomorrow. And hopefully make some more moulds for the joint cover disc and upper leg.
Oh yeah I can make that....
-
mangozac - Resin Addict Collaborator
- Posts: 4271
- Joined: Fri Oct 16, 2009 3:40 pm
- Location: QLD, Australia
Re: Superheavy Assault Walker
![]() by mangozac » Wed Dec 23, 2009 7:26 pm
by mangozac » Wed Dec 23, 2009 7:26 pm
OK just a quick update. I'm still fighting a head cold (which is very frustrating in the middle of summer) which slows progress, but I'm slowly getting there.
I made moulds for the foot and joint cover disc yesterday but both were failures (air pockets obscuring details) and have been chopped up to fill in areas of the new moulds. After much deliberation I decided to do the upper leg as a two part mould so this afternoon I poured the first half of this, along with the new joint cover disc and railgun rotator split moulds.
Was also doing some final cleanup on the lower leg and realised that the upper section is in need of some panel lines. So I quickly sketched some in:
It will be asymmetrical so the lines on the other side won't include the circle.
I'm pretty happy with it but can't help but feel that it's a bit Eldar looking. Thoughts?
Oh yeah I can make that....
-
mangozac - Resin Addict Collaborator
- Posts: 4271
- Joined: Fri Oct 16, 2009 3:40 pm
- Location: QLD, Australia
Re: Superheavy Assault Walker
![]() by Warhound » Wed Dec 23, 2009 10:22 pm
by Warhound » Wed Dec 23, 2009 10:22 pm
Not at all, and even if there was a touch of Eldar to it- this would not be an issue:-)
Get on with it- LOL!!!!;-)
Cheers
WARHOUND
Get on with it- LOL!!!!;-)
Cheers
WARHOUND
My work: http://s198.photobucket.com/albums/aa19 ... und_photo/
My winners: http://demonwinner.free.fr/peintre.php?id_peintre=274
Superglue runs through my veins- what have you ever done for society?
My winners: http://demonwinner.free.fr/peintre.php?id_peintre=274
Superglue runs through my veins- what have you ever done for society?
-

Warhound - Resin Addict Collaborator
- Posts: 230
- Joined: Wed Oct 21, 2009 4:13 pm
- Location: Peterborough-UK
Re: Superheavy Assault Walker
![]() by mangozac » Sat Dec 26, 2009 12:26 pm
by mangozac » Sat Dec 26, 2009 12:26 pm
I hope everyone had a great Christmas!
It's boxing day here in Oz (the day after Christmas - I don't know if any other countries have that?) so I'm doing some serious hobby work. I just scribed up the panel lines I drew in my last post and did some priming, but more excitingly I tried out my latest batch of moulds.
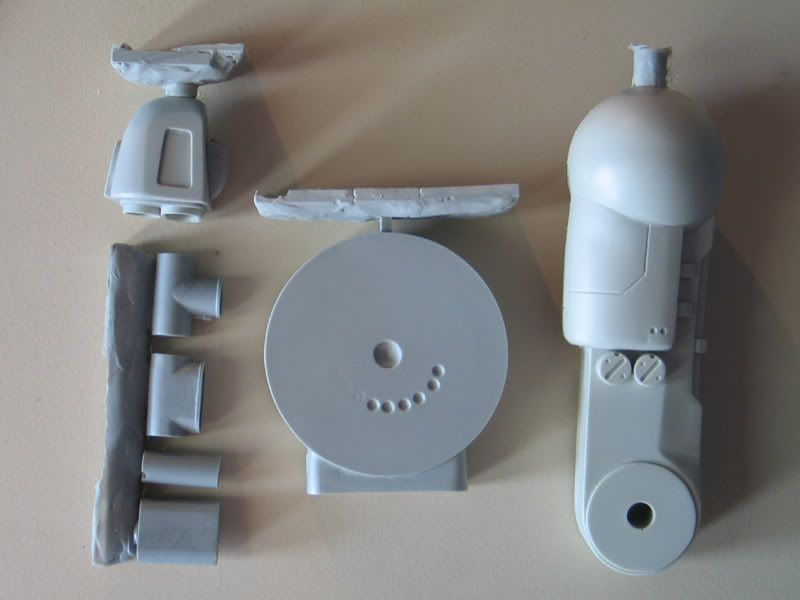
Completed moulds I now have include:
- Foot
- Ankle pistons
- Upper leg
- Joint cover disc
- Railgun rotator.
This afternoon I'm planning to completely finish the lower leg so that I can start on its mould tomorrow. It will take 3 days to make as it's going to be a 3 part mould.
In the meantime, here's a shot of the current cast parts (bar the joint cover disc). These moulds still have a couple of tiny flaws, but they're mainly in spots that don't matter so it's no big deal.
It's boxing day here in Oz (the day after Christmas - I don't know if any other countries have that?) so I'm doing some serious hobby work. I just scribed up the panel lines I drew in my last post and did some priming, but more excitingly I tried out my latest batch of moulds.
Completed moulds I now have include:
- Foot
- Ankle pistons
- Upper leg
- Joint cover disc
- Railgun rotator.
This afternoon I'm planning to completely finish the lower leg so that I can start on its mould tomorrow. It will take 3 days to make as it's going to be a 3 part mould.
In the meantime, here's a shot of the current cast parts (bar the joint cover disc). These moulds still have a couple of tiny flaws, but they're mainly in spots that don't matter so it's no big deal.
Oh yeah I can make that....
-
mangozac - Resin Addict Collaborator
- Posts: 4271
- Joined: Fri Oct 16, 2009 3:40 pm
- Location: QLD, Australia
Re: Superheavy Assault Walker
![]() by paulson games » Sun Dec 27, 2009 4:00 am
by paulson games » Sun Dec 27, 2009 4:00 am
These are looking really nice. Are these cast with the vacuum applied first then pressure?
How much does the resin expand under vacuum and how large did you make the pour area/intake on the molds?
Now that I have a vacuum pump I'm going to making some new molds but wasn't sure if I could use the old ones or if I'd end up spilling tons of the resin out if I applied the vacuum to the older molds. Trying to get a rough idea of how much exspansion room I may need.
The parts you cast look nice and clean are they done as a split mold or did you do them as a traditional 2 part with the clay?
-
paulson games - Resin Addict Collaborator
- Posts: 940
- Joined: Wed Oct 21, 2009 8:09 pm
Re: Superheavy Assault Walker
![]() by mangozac » Sun Dec 27, 2009 8:08 am
by mangozac » Sun Dec 27, 2009 8:08 am
OK the upper leg was done using a two-part mould, the rest are split moulds. That's why the upper leg has no reservoir. Only the split moulds have vacuum then pressure. I was told that resin expands to roughly double its volume so I made the reservoirs around that size. The railgun rotator reservoir is probably only about 2/3 the volume of the part and hasn't seemed to overflow yet (in the two test casts I've done  ).
).
I found it better to apply the vacuum for as long as possible (effectively the pump was on for about a minute and it took about 30 seconds to evacuate the chamber). I half filled my pressure pot with sand so that the evacuation would be quicker. But I'm using 5 minute work life resin so I can afford that amount of time.
Even using the reservoir technique it's still important to have the gate appropriately sized in relation to the part. Large parts need a lot more resin to flow into them and thus a bigger gate is better.
To be honest I'm still experiencing a little trial and error but I'm gradually getting there.
Lower leg is done so today I start on it's 3 part mould along with the railgun rotator end pieces. And I'll do a second joint cover disc mould because I need to pump out 10 of those things per kit!
Oh yeah I can make that....
-
mangozac - Resin Addict Collaborator
- Posts: 4271
- Joined: Fri Oct 16, 2009 3:40 pm
- Location: QLD, Australia
Re: Superheavy Assault Walker
![]() by mangozac » Tue Dec 29, 2009 1:15 pm
by mangozac » Tue Dec 29, 2009 1:15 pm
Update time!
Well I've just poured the second part of the 3-part lower leg mould. I may pour the third part tonight so that it's all finished by the morning. I'm very anxious to see how this has turned out!
Also completed is the left railgun rotator end piece mould. It was done as a single split mould but I may do the other one as a two part mould for easier demoulding. Sure the split mould are quick and easy to do, but I do wonder about the effect of the extra stress put on them during demoulding.
Next to be moulded will probably be the weapons sprue (railgun, capacitors, burst cannon and rotator axle) and single miscellany (hatches and markerlight turret). At this stage I'll probably do both in two part moulds.
In the meantime I've been doing some priming. First up we have the 99.9% completed rear chassis. Note the final panel line that I agonised so much over. I think it's turned out quite nicely. It just needs some final cleanup sanding and she's ready to mould!
I've also been revisiting the pelvis of late. I've had to hold myself back from redoing big chunks of it like I did the lower leg - the aim now is just to get this thing finished! You can see here the rebuild rear - the antenna was replaced and the inset details rebuilt using koto bits:
I've also rebuilt the side areas. The details that were supposed to represent locking clamps were especially poor, so I hacked them off and built some inset details. Admittedly they still don't look much like locking clamp points but they at least look kind of cool. It will need some light panel lining around there before it's finished.
Well that's all I've got for today. More updates will come when I've got some casts to show from the new moulds.
Oh yeah I can make that....
-
mangozac - Resin Addict Collaborator
- Posts: 4271
- Joined: Fri Oct 16, 2009 3:40 pm
- Location: QLD, Australia
Re: Superheavy Assault Walker
![]() by mangozac » Sun Jan 03, 2010 3:24 pm
by mangozac » Sun Jan 03, 2010 3:24 pm
Steadily progressing through the moulds! I've just poured the second half of the new weapons sprue mould and the first half of the rear chassis mould. All that's left is the front chassis and pelvis!
Here's a leg completely assembled. Ignore the different resin colours - in the final kit all parts will be the same grey as the lower leg.
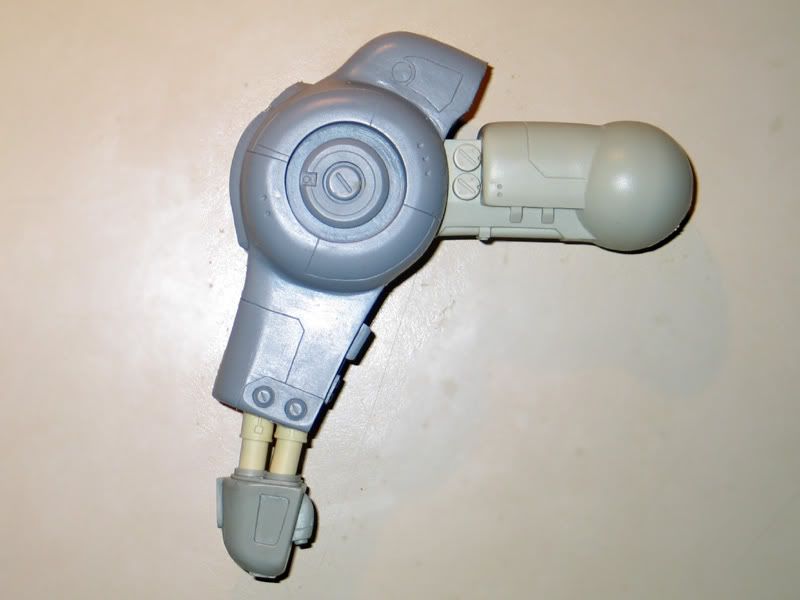
All moulds have turned out pretty perfectly, except for the lower leg mould. It's got a couple of voids in the silicone which cause some warped areas on the cast (due to pressure casting). I'm going to try a modified casting technique to see if I can't let it set without pressure but ultimately I will run this mould as it's $30 in silicone (and not taking into account the time required to make a 3-part mould).
Here's a leg completely assembled. Ignore the different resin colours - in the final kit all parts will be the same grey as the lower leg.
All moulds have turned out pretty perfectly, except for the lower leg mould. It's got a couple of voids in the silicone which cause some warped areas on the cast (due to pressure casting). I'm going to try a modified casting technique to see if I can't let it set without pressure but ultimately I will run this mould as it's $30 in silicone (and not taking into account the time required to make a 3-part mould).
Oh yeah I can make that....
-
mangozac - Resin Addict Collaborator
- Posts: 4271
- Joined: Fri Oct 16, 2009 3:40 pm
- Location: QLD, Australia
Re: Superheavy Assault Walker
![]() by mangozac » Sun Jan 03, 2010 6:43 pm
by mangozac » Sun Jan 03, 2010 6:43 pm
It's my forum and I can triple-post if I want to 
Just doing some final cleanup on the chassis front and need to decide on panel lines on the left side. You can see here the left side of the chassis as it currently stands:
The question is, should the left side have the horizontal panel line as seen halfway down on the right side (between the half-smartie and railgun rotator):
Thoughts?
Oh yeah I can make that....
-
mangozac - Resin Addict Collaborator
- Posts: 4271
- Joined: Fri Oct 16, 2009 3:40 pm
- Location: QLD, Australia
Re: Superheavy Assault Walker
![]() by paulson games » Sun Jan 03, 2010 7:02 pm
by paulson games » Sun Jan 03, 2010 7:02 pm
Here was my thought on the scribe line?

-
paulson games - Resin Addict Collaborator
- Posts: 940
- Joined: Wed Oct 21, 2009 8:09 pm
Re: Superheavy Assault Walker
![]() by Warhound » Sun Jan 03, 2010 9:00 pm
by Warhound » Sun Jan 03, 2010 9:00 pm
oLA!
And back in the room... great work Zac! The lower body/ pelvis and other clean up work that you have completed are bang on the button! In answer to the initial question, yes, I think matching horizontal line will fit the bill beautifully!
I would be interested to see how the 3 part mould looks, as I have never seen this attempted before?
cheers
WARHOUND
My work: http://s198.photobucket.com/albums/aa19 ... und_photo/
My winners: http://demonwinner.free.fr/peintre.php?id_peintre=274
Superglue runs through my veins- what have you ever done for society?
My winners: http://demonwinner.free.fr/peintre.php?id_peintre=274
Superglue runs through my veins- what have you ever done for society?
-
Warhound - Resin Addict Collaborator
- Posts: 230
- Joined: Wed Oct 21, 2009 4:13 pm
- Location: Peterborough-UK
Return to Sculpting and Scratchbuilding
Who is online
Users browsing this forum: No registered users and 11 guests