I think this project has been coming out amazing. It's what first got me on the ATT forum I was looking for Tau ideas and happened acorss the WIP shots a long way back and I've been watching ever sicne then as it's a truly epic project, especially given that it's your first major effort at scrtach building.
As I said on IM it looks very smooth and tight from the pics, I know there some areas in need of fine sanding but it really does look killer. I honestly can't provide too many suggestions in regards to final changes as I'm simply in love with the work you've done.
ATTENTION: As of March 2017 the Resin Addict Forums are being wound down. New members are no longer being accepted. Read more about it here.
Resin Addict Forum
A place to talk about your addiction
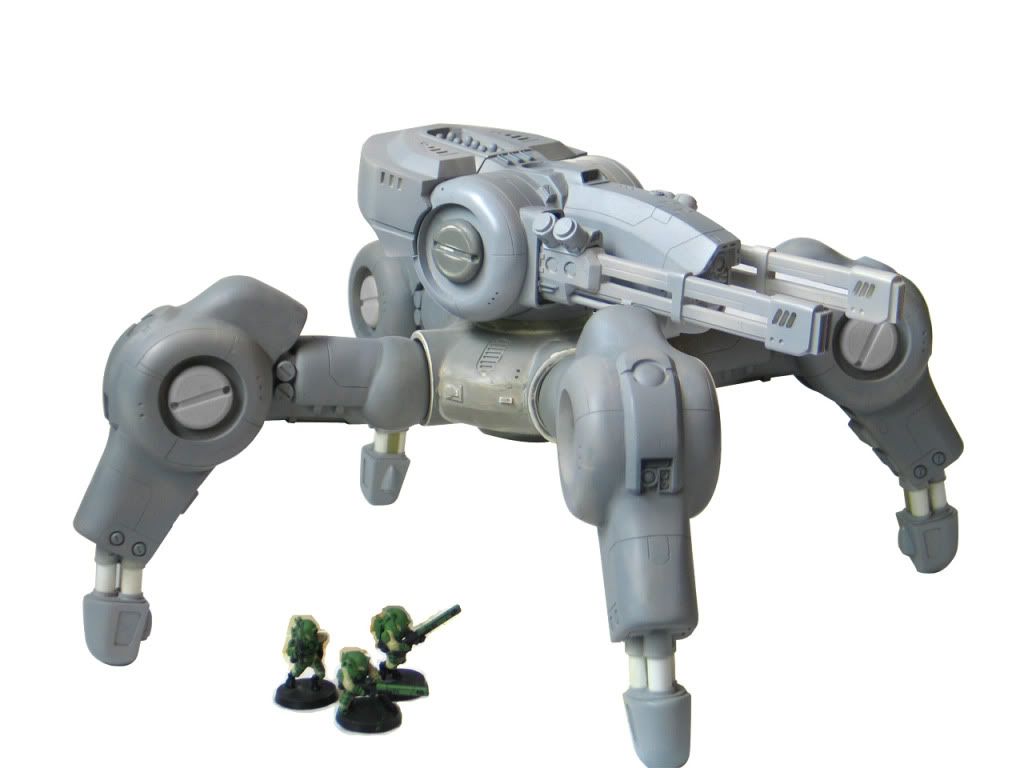
Superheavy Assault Walker
Moderator: Wardens
Re: Superheavy Assault Walker
![]() by paulson games » Thu Nov 19, 2009 9:47 am
by paulson games » Thu Nov 19, 2009 9:47 am
-

paulson games - Resin Addict Collaborator
- Posts: 940
- Joined: Wed Oct 21, 2009 8:09 pm
-

mangozac - Resin Addict Collaborator
- Posts: 4271
- Joined: Fri Oct 16, 2009 3:40 pm
- Location: QLD, Australia
Re: Superheavy Assault Walker
![]() by Warhound » Wed Nov 25, 2009 3:07 am
by Warhound » Wed Nov 25, 2009 3:07 am
My work: http://s198.photobucket.com/albums/aa19 ... und_photo/
My winners: http://demonwinner.free.fr/peintre.php?id_peintre=274
Superglue runs through my veins- what have you ever done for society?
My winners: http://demonwinner.free.fr/peintre.php?id_peintre=274
Superglue runs through my veins- what have you ever done for society?
-

Warhound - Resin Addict Collaborator
- Posts: 230
- Joined: Wed Oct 21, 2009 4:13 pm
- Location: Peterborough-UK
-
mangozac - Resin Addict Collaborator
- Posts: 4271
- Joined: Fri Oct 16, 2009 3:40 pm
- Location: QLD, Australia
Re: Superheavy Assault Walker
![]() by mangozac » Thu Nov 26, 2009 9:35 pm
by mangozac » Thu Nov 26, 2009 9:35 pm
Okay progress has been made!
First up we have the new joint cover disc WIP shot. The outer edge will be puttied to a bevel. That cutout section will have some kind of mechanical detail in it.
Also I've roughly done the plate added to the toe but I'm not sure I'm happy with it. I think it's still protruding too much so will probably sand it down a bit more. I couldn't take the photo with the pistons attaching the foot as they are currently setup on a sprue ready to be moulded.
I should get the joint cover disc puttied up tomorrow.
Oh yeah I can make that....
-
mangozac - Resin Addict Collaborator
- Posts: 4271
- Joined: Fri Oct 16, 2009 3:40 pm
- Location: QLD, Australia
Re: Superheavy Assault Walker
![]() by Warhound » Fri Nov 27, 2009 9:40 pm
by Warhound » Fri Nov 27, 2009 9:40 pm
Hiya,
so after working out the mass of the universe and how quickly Hussain bolt accelerated, I can now enjoy some 7 days of play time (then more exams prior to xmas!)
As you are working on the legs this weekend, I wanted to have one last review of these parts to help you excel!
The new disk 'bolt' is looking great, but will reserve judgement until there is some putty on it- but a massive improvement on the original! Possibly an idea to add the peg onto the back to allow people to easier locate them in the holes on the rotators and knees?
Taking your shots:
(Warning 1/2 meg image)
I know that I bang on about this, but I am convinced that there is a 'flattening' on the rotator hubs within the inner circle.. we can butt heads about this all you want, but if you think you are right, then promise your Granny that you have done your best and that will be good enough
The Thigh plate seems to have suffered some subsidence? Does this need a fill?> also the edges could do with sharpening or even bevelling? Again, this area, being one of the first parts that you did, has suffered the wrath of your current works being a lot sharper? I would be curious to hear your thoughts?
Finally, similar to the burst cannon collar- the engine vents on the top could do with neatening the scribed lines?
Looking at the legs from all angles, I would have to say that the 'bevelled plate' further down on the leg is not necessary (esp in context of the work involved) If you are not happy with the toe plate, then do not worry. It would be nice extra touch, but I think as long as the knee plates are as sharp as they can be, then the leg design looks great!
The Inset angles on the left hand side of the thigh alcove need straightening up. Also, the main hub of the knee, under the panel line on the left (running horizontally) shows the inner circle flattening again? Finally, there seems to be a 'softening' in the middle of the thigh on the right side? Does this need a little filling? (akin to subsidence in tarmac)
Toe and pistons look flawless!!
And yes, I know that this may set back work even more, but last hurdles and all that- no point in tripping now!
cheers
WARHOUND
My work: http://s198.photobucket.com/albums/aa19 ... und_photo/
My winners: http://demonwinner.free.fr/peintre.php?id_peintre=274
Superglue runs through my veins- what have you ever done for society?
My winners: http://demonwinner.free.fr/peintre.php?id_peintre=274
Superglue runs through my veins- what have you ever done for society?
-
Warhound - Resin Addict Collaborator
- Posts: 230
- Joined: Wed Oct 21, 2009 4:13 pm
- Location: Peterborough-UK
Re: Superheavy Assault Walker
![]() by mangozac » Sat Nov 28, 2009 8:43 am
by mangozac » Sat Nov 28, 2009 8:43 am
Yay for completed assignments!
I finished puttying the disc last night and will clean it up this morning. If all goes to plan I'll probably finish it today. I did contemplate a peg on the back but it would only be suitable for the knee joints, not the railgun rotator ends.
OK we'll finally clear this bit up. YES, there is flat spots on the insides of the rotator ends. These will be fixed. The insides of the knee hubs don't have flat spots per se, however I did finally notice that there is a slightly pointed spot where the two ends of plasticard making up the cylinder have joined. It's only noticeable from some angles but I will address it.
The "subsidence" on the thigh is well spotted and I actually filled that with some spare putty the other night.
I'm still undecided on the toe plate. I'm thinking of ripping off what I've done and attempting it using another process that will leave it a bit slimmer.
The toe pistons in the pics actually weren't flawless and the first stage of puttying this week was correcting this. They are now flawless and I've got them all prepped for a single part split mould.
Many of the lower leg defects have also been corrected (including those you mention) gradually over the week. There's still some to go but as I've said all along, the priming makes a massive difference in helping to spot stuff like that!
Hopefully I'll have some more shots up tonight!
Oh yeah I can make that....
-
mangozac - Resin Addict Collaborator
- Posts: 4271
- Joined: Fri Oct 16, 2009 3:40 pm
- Location: QLD, Australia
Re: Superheavy Assault Walker
![]() by mangozac » Sat Nov 28, 2009 3:22 pm
by mangozac » Sat Nov 28, 2009 3:22 pm
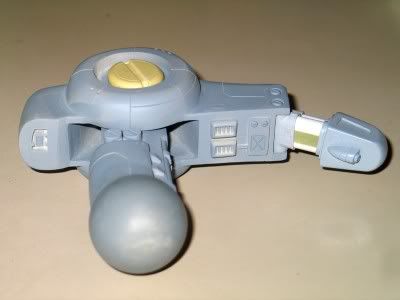
Well putty is setting on most of the parts so I've run out of things to do for today
Here's the mostly done new joint cover disc. I'm thinking I might reduce the depth of the side cutout bit though. Other than that I'm pretty happy with it and I'm hoping to prime it tomorrow arvo.
And here you can see that I've filled those horrible panel lines between the rotator and side discs. I've pencilled in a new panel line on the side which I feel works pretty well. Thoughts?
Oh yeah I can make that....
-
mangozac - Resin Addict Collaborator
- Posts: 4271
- Joined: Fri Oct 16, 2009 3:40 pm
- Location: QLD, Australia
Re: Superheavy Assault Walker
![]() by Warhound » Sat Nov 28, 2009 7:51 pm
by Warhound » Sat Nov 28, 2009 7:51 pm
Homina homina homina!
How cool is the cover disk!? one more sand to tighten the bevel edge and that puppy is done! I love it!!!
The panel lines on the side look great- nice positioning and spacing- just make sure:
that the semi circle is neat
that both sides are symetrical
that the lines meet underneath, so that the front armour panel appears as a cap (if that makes sense?)
Do you have a compass cutter (most art shops have them)- they have the normal pin on one side, and a small blade on the other- if so I would use this to mark in the circle. (stabbing the pin into the smartie as the centre of radius) Also, were you going to scribe directly around the half smarties? This would make them appear to 'blister' from the armour, which is a far cooler effect than just sitting on the surface;-)
Anyway, looking great!
cheers
Smug and vindicated from Peterborough (I knew I was right!)
WARHOUND
How cool is the cover disk!? one more sand to tighten the bevel edge and that puppy is done! I love it!!!
The panel lines on the side look great- nice positioning and spacing- just make sure:
that the semi circle is neat
that both sides are symetrical
that the lines meet underneath, so that the front armour panel appears as a cap (if that makes sense?)
Do you have a compass cutter (most art shops have them)- they have the normal pin on one side, and a small blade on the other- if so I would use this to mark in the circle. (stabbing the pin into the smartie as the centre of radius) Also, were you going to scribe directly around the half smarties? This would make them appear to 'blister' from the armour, which is a far cooler effect than just sitting on the surface;-)
Anyway, looking great!
cheers
Smug and vindicated from Peterborough
WARHOUND
My work: http://s198.photobucket.com/albums/aa19 ... und_photo/
My winners: http://demonwinner.free.fr/peintre.php?id_peintre=274
Superglue runs through my veins- what have you ever done for society?
My winners: http://demonwinner.free.fr/peintre.php?id_peintre=274
Superglue runs through my veins- what have you ever done for society?
-
Warhound - Resin Addict Collaborator
- Posts: 230
- Joined: Wed Oct 21, 2009 4:13 pm
- Location: Peterborough-UK
Re: Superheavy Assault Walker
![]() by mangozac » Sun Nov 29, 2009 7:52 am
by mangozac » Sun Nov 29, 2009 7:52 am
Yes, you were right. 
I'm just glad you're liking it! I'm quite chuffed with how the joint cover disc turned out, especially seeing as it was a minimal amount of effort!
I do have a compass cutter but I've found a better tool for scribing circles - a circle template! It's a piece of plastic with circles of all sizes cut out of it. Similar to my Hasegawa scribing templates but a lot bigger. It'll do the job perfectly so long as you line it up properly in the beginning (which isn't hard).
Cool idea for the half smarties. I was feeling like they needed a little extra something and this is it!
Oh yeah I can make that....
-
mangozac - Resin Addict Collaborator
- Posts: 4271
- Joined: Fri Oct 16, 2009 3:40 pm
- Location: QLD, Australia
Re: Superheavy Assault Walker
![]() by Warhound » Sun Nov 29, 2009 9:10 am
by Warhound » Sun Nov 29, 2009 9:10 am
I got your back bro!
Looking forward to the shots!
cheers
WARHOUND
Looking forward to the shots!
cheers
WARHOUND
My work: http://s198.photobucket.com/albums/aa19 ... und_photo/
My winners: http://demonwinner.free.fr/peintre.php?id_peintre=274
Superglue runs through my veins- what have you ever done for society?
My winners: http://demonwinner.free.fr/peintre.php?id_peintre=274
Superglue runs through my veins- what have you ever done for society?
-
Warhound - Resin Addict Collaborator
- Posts: 230
- Joined: Wed Oct 21, 2009 4:13 pm
- Location: Peterborough-UK
Re: Superheavy Assault Walker
![]() by mangozac » Fri Dec 04, 2009 6:11 pm
by mangozac » Fri Dec 04, 2009 6:11 pm
Well it's been a crappy week for me modelling wise. My Dad has had me drawing up house plans in CAD every night, which has sucked all of my free time. Ahh the joys of living at home
I made my first attempt at a single part split mould on Sunday and it had most of the week to cure fully (although it only needs about 12 hours before it's usable). It was for the four ankle hydraulic piston parts.
However making the split mould was the easy bit. Casting in the split mould is a total pain in the butt! Because you're not able to setup nice sprue channels and air vents there are hideous air lock problems that even the pressure casting can't fix. Here you can see the skinny cylinder actually had a large air pocket at the top which left it unattached to the sprue.
I believe the solution is to vacuum the mould before applying pressure when casting. This will suck the air pockets out of the resin and allow the resin to seep into all of the crevaces. To try this out I will tomorrow buy some more air fittings so that I can vacuum and pressurise the mould consecutively in minimal amount of time. If that works well I will then next week I will order the 5.5kg of silicone and 10kg of resin needed to go into production.
Only some of the parts will be done in a split mould like this. The others will all be done in normal two part moulds.
On a more positive note the joint disc is all completed. It's turned out great! I'll be priming it along with the other refined leg components this weekend in the hope that I can get all of the leg component moulds completed before Christmas.
Hopefully I'll have an update on the split casting situation tomorrow night. And more pictures of the final primed leg components on Sunday.
Oh yeah I can make that....
-
mangozac - Resin Addict Collaborator
- Posts: 4271
- Joined: Fri Oct 16, 2009 3:40 pm
- Location: QLD, Australia
Re: Superheavy Assault Walker
![]() by mangozac » Sun Dec 06, 2009 8:43 pm
by mangozac » Sun Dec 06, 2009 8:43 pm
- Attachments
-
Oh yeah I can make that....
-
mangozac - Resin Addict Collaborator
- Posts: 4271
- Joined: Fri Oct 16, 2009 3:40 pm
- Location: QLD, Australia
Re: Superheavy Assault Walker
![]() by Warhound » Mon Dec 07, 2009 11:39 pm
by Warhound » Mon Dec 07, 2009 11:39 pm
Looking ace!
Loving the new disk and the parts look great!
Looking at the finishing texture of the Mr Surfacer- it seems to settle like GW white undercoat? Does it just set harder and so allows for fine sanding? (almost like a spray on polyfilla- but wafer thin?
cheers
WARHOUND
Loving the new disk and the parts look great!
Looking at the finishing texture of the Mr Surfacer- it seems to settle like GW white undercoat? Does it just set harder and so allows for fine sanding? (almost like a spray on polyfilla- but wafer thin?
cheers
WARHOUND
My work: http://s198.photobucket.com/albums/aa19 ... und_photo/
My winners: http://demonwinner.free.fr/peintre.php?id_peintre=274
Superglue runs through my veins- what have you ever done for society?
My winners: http://demonwinner.free.fr/peintre.php?id_peintre=274
Superglue runs through my veins- what have you ever done for society?
-
Warhound - Resin Addict Collaborator
- Posts: 230
- Joined: Wed Oct 21, 2009 4:13 pm
- Location: Peterborough-UK
Re: Superheavy Assault Walker
![]() by paulson games » Tue Dec 08, 2009 5:38 am
by paulson games » Tue Dec 08, 2009 5:38 am
Was curious what you are doing for the vacum process, are you degassing the resin before pouring then degassing a second time? or are you simplying pouring into a reservoir and then degassing?
How large of a reservoir are you using on your molds? I know the stuff bubbles like mad under vacum and was curious how much space to allow it so it doesn't boil over. I'm looking at picking up some vacum equipment but not sure what I should be looking at motor wise.
How large of a reservoir are you using on your molds? I know the stuff bubbles like mad under vacum and was curious how much space to allow it so it doesn't boil over. I'm looking at picking up some vacum equipment but not sure what I should be looking at motor wise.
-
paulson games - Resin Addict Collaborator
- Posts: 940
- Joined: Wed Oct 21, 2009 8:09 pm
Return to Sculpting and Scratchbuilding
Who is online
Users browsing this forum: No registered users and 12 guests