[phpBB Debug] PHP Warning: in file [ROOT]/includes/bbcode.php on line 483: preg_replace(): The /e modifier is no longer supported, use preg_replace_callback instead
[phpBB Debug] PHP Warning: in file [ROOT]/includes/bbcode.php on line 483: preg_replace(): The /e modifier is no longer supported, use preg_replace_callback instead
[phpBB Debug] PHP Warning: in file [ROOT]/includes/bbcode.php on line 483: preg_replace(): The /e modifier is no longer supported, use preg_replace_callback instead
[phpBB Debug] PHP Warning: in file [ROOT]/includes/bbcode.php on line 483: preg_replace(): The /e modifier is no longer supported, use preg_replace_callback instead
[phpBB Debug] PHP Warning: in file [ROOT]/includes/bbcode.php on line 483: preg_replace(): The /e modifier is no longer supported, use preg_replace_callback instead
[phpBB Debug] PHP Warning: in file [ROOT]/includes/bbcode.php on line 483: preg_replace(): The /e modifier is no longer supported, use preg_replace_callback instead
[phpBB Debug] PHP Warning: in file [ROOT]/includes/bbcode.php on line 483: preg_replace(): The /e modifier is no longer supported, use preg_replace_callback instead
[phpBB Debug] PHP Warning: in file [ROOT]/includes/bbcode.php on line 483: preg_replace(): The /e modifier is no longer supported, use preg_replace_callback instead
[phpBB Debug] PHP Warning: in file [ROOT]/includes/bbcode.php on line 483: preg_replace(): The /e modifier is no longer supported, use preg_replace_callback instead
[phpBB Debug] PHP Warning: in file [ROOT]/includes/bbcode.php on line 483: preg_replace(): The /e modifier is no longer supported, use preg_replace_callback instead
[phpBB Debug] PHP Warning: in file [ROOT]/includes/bbcode.php on line 483: preg_replace(): The /e modifier is no longer supported, use preg_replace_callback instead
[phpBB Debug] PHP Warning: in file [ROOT]/includes/bbcode.php on line 483: preg_replace(): The /e modifier is no longer supported, use preg_replace_callback instead
[phpBB Debug] PHP Warning: in file [ROOT]/includes/bbcode.php on line 483: preg_replace(): The /e modifier is no longer supported, use preg_replace_callback instead
[phpBB Debug] PHP Warning: in file [ROOT]/includes/bbcode.php on line 483: preg_replace(): The /e modifier is no longer supported, use preg_replace_callback instead
[phpBB Debug] PHP Warning: in file [ROOT]/includes/bbcode.php on line 483: preg_replace(): The /e modifier is no longer supported, use preg_replace_callback instead
[phpBB Debug] PHP Warning: in file [ROOT]/includes/bbcode.php on line 483: preg_replace(): The /e modifier is no longer supported, use preg_replace_callback instead
[phpBB Debug] PHP Warning: in file [ROOT]/includes/bbcode.php on line 483: preg_replace(): The /e modifier is no longer supported, use preg_replace_callback instead
[phpBB Debug] PHP Warning: in file [ROOT]/includes/bbcode.php on line 483: preg_replace(): The /e modifier is no longer supported, use preg_replace_callback instead
[phpBB Debug] PHP Warning: in file [ROOT]/includes/bbcode.php on line 483: preg_replace(): The /e modifier is no longer supported, use preg_replace_callback instead
[phpBB Debug] PHP Warning: in file [ROOT]/includes/bbcode.php on line 483: preg_replace(): The /e modifier is no longer supported, use preg_replace_callback instead
[phpBB Debug] PHP Warning: in file [ROOT]/includes/bbcode.php on line 483: preg_replace(): The /e modifier is no longer supported, use preg_replace_callback instead
[phpBB Debug] PHP Warning: in file [ROOT]/includes/bbcode.php on line 483: preg_replace(): The /e modifier is no longer supported, use preg_replace_callback instead
[phpBB Debug] PHP Warning: in file [ROOT]/includes/bbcode.php on line 483: preg_replace(): The /e modifier is no longer supported, use preg_replace_callback instead
[phpBB Debug] PHP Warning: in file [ROOT]/includes/bbcode.php on line 483: preg_replace(): The /e modifier is no longer supported, use preg_replace_callback instead
[phpBB Debug] PHP Warning: in file [ROOT]/includes/bbcode.php on line 483: preg_replace(): The /e modifier is no longer supported, use preg_replace_callback instead
[phpBB Debug] PHP Warning: in file [ROOT]/includes/bbcode.php on line 483: preg_replace(): The /e modifier is no longer supported, use preg_replace_callback instead
[phpBB Debug] PHP Warning: in file [ROOT]/includes/bbcode.php on line 379: preg_replace(): The /e modifier is no longer supported, use preg_replace_callback instead
[phpBB Debug] PHP Warning: in file [ROOT]/includes/bbcode.php on line 112: preg_replace(): The /e modifier is no longer supported, use preg_replace_callback instead
Resin Addict Forum • View topic - Centurion Mecha
ATTENTION: As of March 2017 the Resin Addict Forums are being wound down.
New members are no longer being accepted. Read more about it here.

Centurion Mecha

Discussion of sculpting and scratchbuilding

Moderator: Wardens

Re: Centurion Mecha

Postby mangozac » Sat Jan 22, 2011 5:58 pm

More progress! Started detailing the foot armour (take special note of the fancy round grille I made - yup I'm proud of that :mrgreen: ) and ankle detailing:

Centurion_WIP_12.jpg


Note that the blunt ended bit of tube protruding from the shin piston is just temporary - I do have the proper part made but it is much longer to accommodate any pose (on the actual model the assembler will cut it to the length required) so doesn't work on these shots.

I came away from my last post with loads of confidence about the shin armour but now it's all gone :(
I'm really lost as to what to do. I do love the shin armour on the and would like to emulate that feel. Any suggestions?
Oh yeah I can make that....
User avatar
mangozac
Resin Addict Collaborator
 
Posts: 4271
Joined: Fri Oct 16, 2009 3:40 pm
Location: QLD, Australia

Re: Centurion Mecha

Postby paulson games » Sat Jan 22, 2011 6:32 pm

I'm really liking the detail that you added to the top of the foot.

Like I said in PM get yourself some photo etching stuff for the icons and have some fun with other parts :)

The lucious pattern shin is pretty cool but their design has the whole foot extended out from under it, what you need to do is have a notch in the base of the armor plate where the armored part of the foot comes out of. A lot of the design seems ot mimic Ed-209 from Robocop he as a simular cut out to allow for foot modement in his design just make yours more boxy patterned after the titan.

Image
Last edited by paulson games on Sat Jan 22, 2011 6:36 pm, edited 2 times in total.
User avatar
paulson games
Resin Addict Collaborator
 
Posts: 940
Joined: Wed Oct 21, 2009 8:09 pm

Re: Centurion Mecha

Postby blind pig » Sat Jan 22, 2011 6:33 pm

blind pig
Junkie
 
Posts: 581
Joined: Fri Feb 19, 2010 2:41 am
Location: Brisbane Australia

Re: Centurion Mecha

Postby paulson games » Sat Jan 22, 2011 6:38 pm

Also some of the complication may be from the leg angle, both the warhound's shin and Ed-209's shin slope back while yours is almost upright.

Moar raptor?

Image


Allosaurus?
Image
User avatar
paulson games
Resin Addict Collaborator
 
Posts: 940
Joined: Wed Oct 21, 2009 8:09 pm

Re: Centurion Mecha

Postby Arkangel » Sat Jan 22, 2011 10:44 pm

I agree with blind pig, and I really like the ed-209 styling. Another piece of mecha forgotten! It would definately fit the astetic you going for i think.
Hey do me a favour, point that thing somewhere else!

http://photobucket.com/Arkangel_bucket
User avatar
Arkangel
Habit
 
Posts: 316
Joined: Mon Oct 26, 2009 8:31 am
Location: UK

Re: Centurion Mecha

Postby mangozac » Sun Jan 23, 2011 8:24 am

Thanks for the input guys!

I chatted with Paulson for ages on MSN last night and I came up with a solution. You see the problem was that I was trying to come up with an armour design that protected the shin mechanics/hydraulics, but this results in a very boring looking armour. So I said "screw realism" and just did whatever looked cool and I think the result is much better. I'll have pics later today.

After sleeping on it I'm not happy enough with the lambda in the wreath for a logo. The wreath works but there's something about the lambda that's a bit boring. So I'm going to work with master of iconography Vaaish to see what we can come up with ;)

One of the things I've been dreading is sculpting multiple sizes of the icon in different areas. Then Paulson made the fantastic suggestion of brass-etch. At work we often create prototype printed circuit boards using a technique very similar to brass etch so it should be a snap for me to do the same! I'll go buy some brass sheet stock today. Oh I'll try to take photos of the process also so I can share!

Stay tuned!
Oh yeah I can make that....
User avatar
mangozac
Resin Addict Collaborator
 
Posts: 4271
Joined: Fri Oct 16, 2009 3:40 pm
Location: QLD, Australia

Re: Centurion Mecha

Postby geomod » Sun Jan 23, 2011 9:20 am

I'm keen to see your foray into brass etch Magozac as I am starting to think along those lines myself.

I look forward to hearing of your exploits.
geomod
User
 
Posts: 52
Joined: Sat Jul 24, 2010 4:27 pm

Re: Centurion Mecha

Postby mangozac » Sun Jan 23, 2011 2:53 pm

Well during some initial excitement this morning I was planning to drive out to work try out the brass etching. Then I composed myself and decided to do first things first: finish the thigh armour. Besides, I already have everything needed to do it here at home other than a laser printer and the brass sheet. So I'll head down to the local hobby store for the sheet this afternoon and do the laser printing step at work tomorrow.

For the record I'll be using ferric chloride as my etchant. It's horrible stuff that stains everything it comes into contact with but works well for etching PCBs.

ANYWAY.....

Onto the latest leg progress. As you can see I've been detailing the area just below the ankle in order to ensure that the thigh armour is going to fit properly. The thigh armour is asymmetrical so that the two legs will mirror each other and have less plating on the inside. I also turned up an awesome little cylindrical piece with a fan in it (I was just extremely excited to finally be using a fan from my Koto option sprues!) that poked out on the rear of the shin, but I forgot to take a photo!

Centurion_WIP_13.JPG


The shin armour will be laminated with another 1mm layer of styrene to bulk it up a bit.

Oh by the way, I don't think I've mentioned what the story is with the hip. I've got some Tamiya tape wrapped around it because the resin is actually quite fragile and I found I was accidentally nicking it while sanding other parts of the thigh. The tape gives a bit of protection ;)

Edit: Paulson was asking about the hip. The upper leg armour is built around a piece I earlier scratchbuilt and then cast to get the two of them:
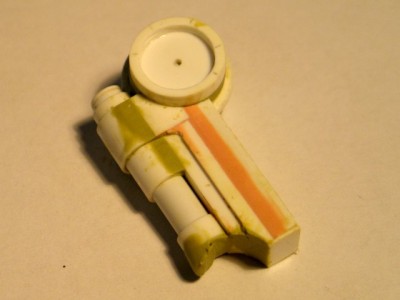
Centurion_WIP_3.JPG
Oh yeah I can make that....
User avatar
mangozac
Resin Addict Collaborator
 
Posts: 4271
Joined: Fri Oct 16, 2009 3:40 pm
Location: QLD, Australia

Re: Centurion Mecha

Postby mangozac » Tue Jan 25, 2011 8:16 pm

Small update for today but no real progress on the model worth sharing. Have been working on bulking up the thigh armour too though.

So I did some preliminary testing with the brass etch stuff and as yet haven't found a paper suitable for transferring the toner. I've got one other to try before I go investing in the proper (expensive) brass etch transfer paper. I did buy some 0.01" (0.254mm) brass sheet to etch up though.

But I still don't have any artwork to try out so I mucked around tonight quickly and came up with the following:

Icon 2.png
Icon 2.png (35.2 KiB) Viewed 12903 times


Tomorrow is Australia day which means a public holiday. But the weather is supposed to be pretty good (and perhaps the surf too) so it may not be too conducive to modelling ;)
Oh yeah I can make that....
User avatar
mangozac
Resin Addict Collaborator
 
Posts: 4271
Joined: Fri Oct 16, 2009 3:40 pm
Location: QLD, Australia

Re: Centurion Mecha

Postby Barn » Tue Jan 25, 2011 8:28 pm

I think the Masterclass book will really help when you come to painting this up.
Barn
User
 
Posts: 137
Joined: Thu Jan 06, 2011 8:00 pm

Re: Centurion Mecha

Postby NoseGoblin » Wed Jan 26, 2011 1:55 am

A wonderful start!
I love watching builds, I cant wait to see where you will go with this one.
NoseGoblin
Casual
 
Posts: 40
Joined: Sat Jun 19, 2010 8:09 am

Re: Centurion Mecha

Postby Vaaish » Wed Jan 26, 2011 3:58 am

This one is a bit difficult to post comments on as you are winging it so there isn't much to correlate the design to in order to better understand how the aesthetic works over the entire kit. I like the angular nature of the foot piece you've got there but I think he would have some serious difficulties balancing or maintaining a steady footing with the layout you have because of the shortness of the rear toes. Compared to the forward bit of the foot and the way the leg is centered over them, there is no way for them to balance correctly. Look at the Warhound or other chicken walker style mech and most of the time there is a fairly substantial rear facing toe to help balance things out. I think you should extend those to be equal or nearly equal in length to the forward toe plate.

The second area I'm finding rather awkward is the shape of the shin armor. The model looks far better without it in place than it does with it right now because of how it tapers down to the ankle and cuts off early. Since it is armor it ends up looking somewhat less detailed and out of place in relation to the armor on the foot. I think the best route here would be to leave the shin armor off all together which will give more of a light armored agile walker or follow more of the Warhound/ed-209 flared style which will give the model more grounding and stability. Either route follows with the 40k aesthetic fairly well.
-Vaaish
Vaaish
Junkie
 
Posts: 827
Joined: Sat Oct 31, 2009 7:55 am
Location: Greenville, SC

Re: Centurion Mecha

Postby mangozac » Wed Jan 26, 2011 7:11 am

Yeah I can understand that. Once I have the legs done I'll do a mock-up sculpt of the torso in clay so you can see the direction things will go in.

With regards to the foot your thoughts do make perfect sense, but I made this decision as one of aesthetics. I did try all sorts of rear toe shapes and sizes and the shorter/smaller style is the only one that looked decent and fit with the aesthetic. I figure the weight distribution of the final model will be pretty wild so it will have to be mounted to a base anyway (even if you didn't want to put it in a dynamic pose), so in terms of physical model stability it's not really necessary.
I could shorten the piece which connects the leg to the foot in order to improve but that would require a slight reshaping of the foot armour. Not that I'm totally opposed to that and I will give it more thought.

The thigh armour I can understand why you might not like it, but personally I'm still pretty happy with it and I'm sure once it's detailed it will fit in with everything else. The rear edges of it have had some reshaping since those pictures anyway. To me the style is reminiscent of the Necron warrior knee/shin area. In any case the person building the model can elect to leave it off. I'll take a photo of where things are currently at today.
Oh yeah I can make that....
User avatar
mangozac
Resin Addict Collaborator
 
Posts: 4271
Joined: Fri Oct 16, 2009 3:40 pm
Location: QLD, Australia

Re: Centurion Mecha

Postby mangozac » Sun Jan 30, 2011 5:14 pm

It's Sunday so it's time for an update, but sadly there's not much progress this week. Much of my weekend was spent provisioning a new PC I built for my neighbour and the Australia Day public holiday on Wednesday had such beautiful weather that I was barely inside all day.

I did do most of the banding on the thigh and added a protruding plate on the side to make the shape more interesting. Into the protrusion I will mount a circular vent piece (more to come on this). The curved sections of the banding were done using a 50/50 mix of GS and Milliput, however I reckon a slightly higher ratio of Milliput would have been a little better (perhaps 70:30).

Centurion_WIP_14.jpg


I decided that the entire design was going to end up needing a few round vent pieces. I have koto sprues with square vents but they don't do round ones and round ones will fit the aesthetic better. So I've made up the following three pieces to be cast in resin. The outside diameters are approximately 5mm, 6.5mm and 8mm. I'll pour a mould one night this week.

Centurion_WIP_13.jpg


And that's it! I told you progress was a little poor! I've been putting off making up the left thigh because it's a pain to do but the reality is that I'm going to have to do it sooner rather than later so that I can have the legs completed and start on the torso. Same with the shin armour plate...

How are people's feelings about the leg aesthetic after reading Vaaish's thoughts and my justification/ response?
Oh yeah I can make that....
User avatar
mangozac
Resin Addict Collaborator
 
Posts: 4271
Joined: Fri Oct 16, 2009 3:40 pm
Location: QLD, Australia

Re: Centurion Mecha

Postby Munkey Joe » Mon Jan 31, 2011 2:20 am

I like it. I do see where Vaaish comes from but I like where it is. The newest pic with the "thick" plates made with GS/M are really cool. I like the reassured thickness as thats how armor is to me, good and thick, but yet it has a elegance to it fitting in with the aesthetics. Good Job!!

As for the vents..... Congrats. Im a bonehead for round things and most of my "round" looks more like a doughnut than true round. I like them and think they will fit nicely. Even ovals might fit in nice with the design.

And enough of the "nice weather" comments. I know it summer there but Im in about a foot of snow and there is no "nice days" to enjoy myself. :mrgreen: Although If you must continue, MD is beautiful in the spring and summer and I will tell you all about it while curled up by your fireplace in July/Aug. I do doubt it gets -4 C though even in the winter... :|
Bartertown Trades:
EBay feedback:
My FAIL Forums:
User avatar
Munkey Joe
Junkie
 
Posts: 622
Joined: Tue Dec 07, 2010 3:05 am

PreviousNext

Return to Sculpting and Scratchbuilding

Who is online

Users browsing this forum: No registered users and 12 guests

cron