Page 1 of 2
New member

Posted:
Fri Jul 25, 2014 2:35 amby MikaMa
Hi,
Greetings from Finland. I have been doing simple casting work before, but just now I started casting in resin. Since this stuff is pretty new for me ( sure I have watched dozens of videos and read tutorials) I wanted to join this forum to get and perhaps some day give advice.
At the moment I am pondering how I should make a mold out of really small items which have details both side. I will post my question to the right topic when I can

Cheers
Mika
Re: New member
Posted:
Fri Jul 25, 2014 8:31 amby mangozac
Hi Mika,
I do really tiny parts all of the time and they're often the easiest to do so long as you have a vacuum casting system. I wouldn't even try without one! Just do them as a and use small gates to connect the parts to the sprue. We've got lots of different discussions on vacuum casting .
Re: New member
Posted:
Fri Jul 25, 2014 3:50 pmby MikaMa
Ouch... I don't have vacuum setup :/. So there's no way?

These are the pieces and that's a 28mm mini in comparison
Re: New member
Posted:
Fri Jul 25, 2014 4:17 pmby mangozac
Hmmm they are simple so you might be able to get away with it. Use a single part split mould and after you pour the resin in keep repeatedly squeezing the mould. You will see bubbles in the resin as the air is pushed out and the resin is sucked in. Hopefully you will be able to squeeze out enough air.
If you glue the parts directly to the sprue without any gates it will provide the maximum surface area for the bubbles to be squeezed out...
They look like Epic scale defensive walls?
Re: New member
Posted:
Fri Jul 25, 2014 5:42 pmby MikaMa
Thanks for the advice. I will need help setting up the sprue ans how to split the mold. There are small holes in the walls, does thatcomplicate things?
If I post a pic of all the parts can you help me with the mold setup?
Yes, they are 6 mm defense walls
Re: New member
Posted:
Fri Jul 25, 2014 6:52 pmby Blindhorizon
I do quite a bit of small parts now adays with only pressure, I believe i could cast those with a fair ammount of success. Probably 95% of the casts coming out, with some bubbles in the other 5% but nothing that isn't fixable. It really depends on how you connect the items to the sprue, and they don't look to deep at all. Like zac recommends the squeeze technique is the way to do it, mould release(for me is a must), as well as johnsons and johnsons baby powder or equivalent.
It will take some time for you to learn how to be efficient, and practice makes perfect.
Re: New member
Posted:
Fri Jul 25, 2014 8:26 pmby MikaMa
Thanks blind:)
The sprue setup is the thing I need to learn. Care to help?
Re: New member
Posted:
Mon Jul 28, 2014 1:34 pmby Blindhorizon
No problem at all i don't mind helping.
Re: New member
Posted:
Thu Jul 31, 2014 10:06 amby mangozac
OK as per Mika's request, here is how I would lay things out for casting. Mount your parts horizontally. You want as much surface area as possible on the uppermost faces so that as much resin and air movement as possible can be facilitated.
Glue some small gates right along the length of each of the walls and then glue that to a sprue:
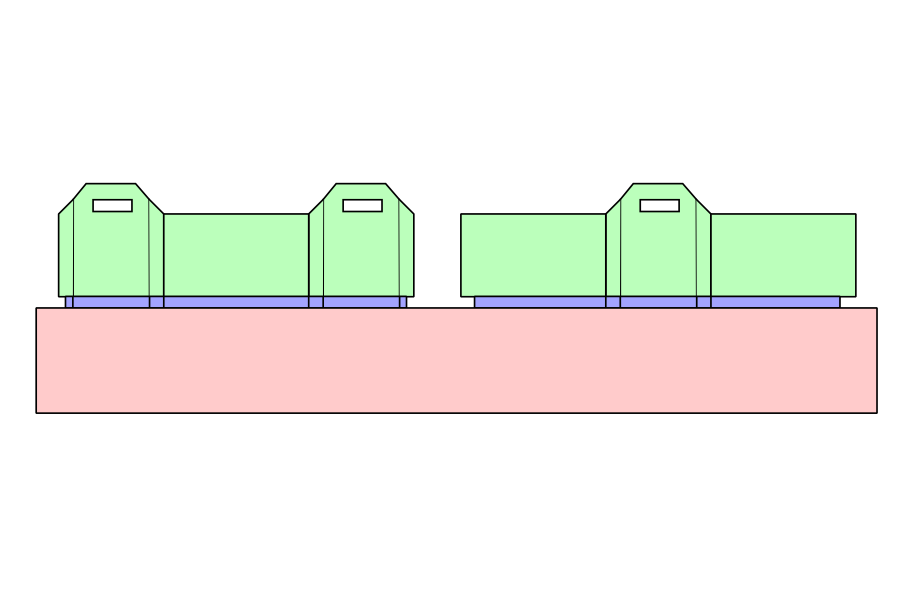
- Sprue.png (10.38 KiB) Viewed 11280 times
Green is the parts
Blue is the gates
Red is the sprue
Don't have a single pour spout but rather leave the entire top of the sprue open. Make sure that the glue connection between the gates and the sprue is very weak so that once the silicone has cured you can snap the sprue away from the gates. From that stage you simply slice down the sides of the parts to remove them. Don't cut all the way to the bottom of the silicone and you have a split mould! The windows in the walls are no problem - just slice through the rubber when you get to there.
When casting, pour the resin into the sprue and then repeatedly squeeze the long sides of the mould. You'll see the air bubbling out of where the parts are and the resin flowing in to replace it. With a bit of squeezing and some luck you should be able to get rid of most of the bubbles. Try not to generate any lateral force when squeezing or you can affect the mould alignment.
Re: New member
Posted:
Thu Jul 31, 2014 5:04 pmby Blindhorizon
Mango has said it perfectly.
Re: New member
Posted:
Thu Jul 31, 2014 7:23 pmby Fleafa
Everything Mango said except I would do the sprue like this, to allow for easier separation after casting:

Such thin parts will benefit from a slightly harder silicone and minimal pressure from elastic bands holding the mould together. Too much could make the casts too thin.
Re: New member
Posted:
Fri Aug 01, 2014 7:49 amby mangozac
Re: New member
Posted:
Fri Aug 01, 2014 7:04 pmby Fleafa
Re: New member
Posted:
Sat Aug 02, 2014 11:53 amby mangozac
Good point. I'd try with them horizontal first and then if that works well perhaps experiment with them at an angle later. Another plus to the horizontal method is that it's slightly easier to cut them out of the silicone, which is a plus for a beginner...
Re: New member
Posted:
Mon Aug 04, 2014 7:28 pmby TomG
You can still use transparent silicone and pour colored resin with hypodermic syringe + needle. So you will see where are bubbles and you can tweak it a bit. With room presure you will have problems only with rivets on castings, something you can remove, when you use slower resin and pour it slower.