Hello all, I need a little help from you resin addicts. Having browsed the forum this may be a project unlike the resin projects that most of you are working on but I'm hoping that the same principles will apply and that someone will be able to offer a little advice.
I'm currently working on a sculpt for a custom motorcycle helmet with the idea of making a silicone mould of the final clay piece and then casting it in resin. I've done some reading up on the techniques required but the bit that's frying my brain at present is once I have the mould prepared and begin pouring the resin how do I keep the curve created by the visor at the back of the mould to ensure an exact fit with the final cast? In essence I need to keep the shape at both the front and the back of the clay.
Any ideas? All advice and guidance gratefully received, until I can work out this part of the process I can't progress.
Thanks folks.
ATTENTION: As of March 2017 the Resin Addict Forums are being wound down. New members are no longer being accepted. Read more about it here.
Resin Addict Forum
A place to talk about your addiction
Resin Noob needs some guidance
Moderator: Wardens
20 posts
• Page 1 of 2 • 1, 2
Resin Noob needs some guidance
![]() by Severeign » Mon Feb 16, 2015 11:39 am
by Severeign » Mon Feb 16, 2015 11:39 am
- Severeign
- Casual
- Posts: 8
- Joined: Mon Feb 16, 2015 10:35 am
Re: Resin Noob needs some guidance
![]() by mangozac » Tue Feb 17, 2015 8:11 am
by mangozac » Tue Feb 17, 2015 8:11 am
Welcome to RA! That is some very cool sculpting you're doing there!
While slightly larger than the stuff most of us do, it's still going to be using the same materials and techniques. Just at a larger scale!
So when you pour the silicone mould you were going to do it while the sculpt is attached to the helmet? That's fine. My initial thought is to then somehow fill the cavity in the first half of the mould - maybe with some oil based clay (make sure it is sulphur free) - and then pour the second half of the mould.
Another option would be to take a silicone mould of the helmet without the sculpt on it, but that's a lot of wasted expense in silicone.
There may be a better way to do it so I'll give it some more thought and we'll see if anybody else has any suggestions
On the plus side, casting a low volume of these should be pretty easy at room pressure. Just brush on a first layer of resin to ensure there's no air bubbles trapped around the front detail. Then do a normal pour. It doesn't matter if you get bubbles on the rear.
Oh yeah I can make that....
-

mangozac - Resin Addict Collaborator
- Posts: 4271
- Joined: Fri Oct 16, 2009 3:40 pm
- Location: QLD, Australia
Re: Resin Noob needs some guidance
![]() by Severeign » Wed Feb 18, 2015 3:40 am
by Severeign » Wed Feb 18, 2015 3:40 am
Thanks for the swift response mangozac.
I've had several thoughts about how to approach this (all of them pure theory from one who is new to the world of resin casting). The initial idea was to cast the clay whilst still on the helmet but that's where the issue of the visor curve came into play.
In an ideal world the final resin cast would be a thin layer of resin rather than a solid block, i.e. not the same weight and volume as the clay, so as to minimise the amount of weight placed on the front of the helmet. Thick enough to be strong and durable but not so thick as to give me neck ache when riding! It may be that I have to cast it as a solid block and then drill out areas to reduce the weight.
Since then I've contemplated perhaps casting it in sections and then assembling the pieces afterwards but maintaining a uniform thickness would be tricky and ideally it should be one piece.
The other idea would be to sculpt it all on the helmet and then remove it for casting but the danger there of course is the possibility of movement in the clay, any slight bending and flexing would lose that all important curve.
Thanks for the advice, it's a puzzler but there has to be an answer. Once it's all finished and painted I'll be sure to post some pics.
- Severeign
- Casual
- Posts: 8
- Joined: Mon Feb 16, 2015 10:35 am
Re: Resin Noob needs some guidance
![]() by mangozac » Wed Feb 18, 2015 8:41 am
by mangozac » Wed Feb 18, 2015 8:41 am
Ahh yeah making it hollow is a smart idea. And with that in mind I have a new idea:
1. Take a mould of the front of the sculpt (while it's still attached to the helmet).
2. Remove the mould from the helmet and ensure there's no clay left inside.
3. Mix up some resin and paint it into all of the all of the mould cavity. You will have to do this in several stages to get all of the areas, waiting for the resin to thicken somewhat too. The ideas is to make a shell cast of the part several millimetres thick (I'd say at least 3).
4. Apply suitable silicone release agents and then pour a second half of the mould. You now have a 2-part mould of the part that is hollow from behind.
You will need to ensure that you build some rigid frame for the mould so that it doesn't warp during the process, but that's not difficult.
Does that make sense?
Oh yeah I can make that....
-
mangozac - Resin Addict Collaborator
- Posts: 4271
- Joined: Fri Oct 16, 2009 3:40 pm
- Location: QLD, Australia
Re: Resin Noob needs some guidance
![]() by RageofAchilles » Wed Feb 18, 2015 8:56 am
by RageofAchilles » Wed Feb 18, 2015 8:56 am
Hi,
I happen to have had some experience making fibreglass copies of medieval helmets, so may have some useful tips.
First thing you need to do is make sure there is a full seal on the helmet you have worked on and cover the helmet surrounding the area to be moulded with a pvc tape. You will need to waste some silicon rubber now. Make a block of silicone around an inch (2.5cm) thick and about 4 inches( 10cm) square. This will be cut into cubes once cured .
Then mix a small amount of silicone rubber and paint it on to your sculpt with about an inch of bleed around it. Not a thick coat as you are just creating a smooth skin at this point.
mix up you main batch of silicone and add a silicone thixotropic gel to the mix. This will turn the usually runny silicone into a spreadable paste that can be put on thick. Once you have spread it over your sculpt, take the cubes you made earlier and set them in the thick layer of silicone paste so that they are evenly spaced over the mould. The purpose of these is to act as anchors for the next process, so they should protrude at least half an inch and be evenly spaced in rows around the curve of the mould.
Next step is unpleasant but necessary. When the silicone is fully cured, you will need to apply resin and fibreglass to the outside of your mould, making sure to properly encapsulate your silicone anchors. this fibreglass should be tough and durable 3mm (1/8th inch) should be sufficient.
The curved nature of your mould will help the anchors stay in place in the fibreglass backing, stopping your mould from warping. Fibreglass is handy because it is rigid but does have some flex so that you can remove the mould from your sculpt when the mould is dry.
When it comes to casting ,probably your best bet is fibreglass re-enforced polyurethane. Some thing with a 30 min pot life will help when it comes to laying down the fibreglass. As mangozac suggested painting a layer of resin first is essential, this first layer should be dry before adding further coats with fibreglass.
The benefit of this method is you can make the cast as thick as you like and it will be very strong.
the negative is that you will need to clean up the back of the cast.
The other way is to make a negative mould of the front of the helmet by pouring silicone into a mould of a basic helmet frontage ( not forgetting mould release agent!) , to form the back of a two part mould ( expensive!) you would get a better fit, but its a lot more trouble to go to.
hope this helps
-

RageofAchilles - Habit
- Posts: 249
- Joined: Fri May 09, 2014 4:14 am
- Location: West Sussex
Re: Resin Noob needs some guidance
![]() by Severeign » Wed Feb 18, 2015 12:03 pm
by Severeign » Wed Feb 18, 2015 12:03 pm
A quick question. When working with the resin do you mean to work in layers? What I mean is is it possible to paint a layer, allow it to cure just a little (or allow it to cure completely) and then paint another layer over that thus building up the thickness gradually? This would certainly help with the idea of creating a 'shell' rather than a solid block but I'm not sure whether that approach would compromise the strength of the finished piece.
Thanks, appreciate all of the input. It feels like we may be getting somewhere!
Thanks, appreciate all of the input. It feels like we may be getting somewhere!
- Severeign
- Casual
- Posts: 8
- Joined: Mon Feb 16, 2015 10:35 am
Re: Resin Noob needs some guidance
![]() by mangozac » Wed Feb 18, 2015 12:51 pm
by mangozac » Wed Feb 18, 2015 12:51 pm
Yep. You can let it cure completely before doing the next layer - it will stick to itself very well!
Oh yeah I can make that....
-
mangozac - Resin Addict Collaborator
- Posts: 4271
- Joined: Fri Oct 16, 2009 3:40 pm
- Location: QLD, Australia
Re: Resin Noob needs some guidance
![]() by Severeign » Thu Feb 19, 2015 3:03 am
by Severeign » Thu Feb 19, 2015 3:03 am
- Severeign
- Casual
- Posts: 8
- Joined: Mon Feb 16, 2015 10:35 am
Re: Resin Noob needs some guidance
![]() by mangozac » Thu Feb 19, 2015 9:10 am
by mangozac » Thu Feb 19, 2015 9:10 am
Yep, exactly! Since you're going to cast a low volume of these things you could even just do each cast that way, rather than having to make a 2-part mould!
I can't really recommend any resins as being more paintable. You could try adding a filler (like chalk) on subsequent resin coats to both save on resin cost and decrease the viscosity to make it more paintable. The other option is using some fine fibreglass matt as RoA has suggested (but still do just resin for the first coat). Working with fibreglass can be a pain though (so much itchiness!)...
For the first resin coat I'd mix the resin, brush it in to all of the detailed surfaces, pour the rest in and then tilt the mould around to continually coat as much of the surface as possible.
Oh yeah I can make that....
-
mangozac - Resin Addict Collaborator
- Posts: 4271
- Joined: Fri Oct 16, 2009 3:40 pm
- Location: QLD, Australia
Re: Resin Noob needs some guidance
![]() by Severeign » Fri Feb 20, 2015 2:47 am
by Severeign » Fri Feb 20, 2015 2:47 am
Right, I think we have a plan!
I'll take the approach of gradually adding layers of resin to create a 'shell' from the mould, once that's done I may have to look at ways of creating a surface to apply the adhesive when attaching it to the visor but that depends entirely on the results of the resin application.
Many thanks, if the internet is good for anything it's getting in touch with people who know a thing or two!
Some more sculpting to be done but once finished I'll be sure to let you folks see the results.
- Severeign
- Casual
- Posts: 8
- Joined: Mon Feb 16, 2015 10:35 am
Re: Resin Noob needs some guidance
![]() by mangozac » Sun Feb 22, 2015 7:19 pm
by mangozac » Sun Feb 22, 2015 7:19 pm
Please do keep us posted - both to see how your awesome looking sculpt turns out and so we can learn how the casting process went!
Oh yeah I can make that....
-
mangozac - Resin Addict Collaborator
- Posts: 4271
- Joined: Fri Oct 16, 2009 3:40 pm
- Location: QLD, Australia
Re: Resin Noob needs some guidance
![]() by Severeign » Tue Jun 09, 2015 12:32 pm
by Severeign » Tue Jun 09, 2015 12:32 pm
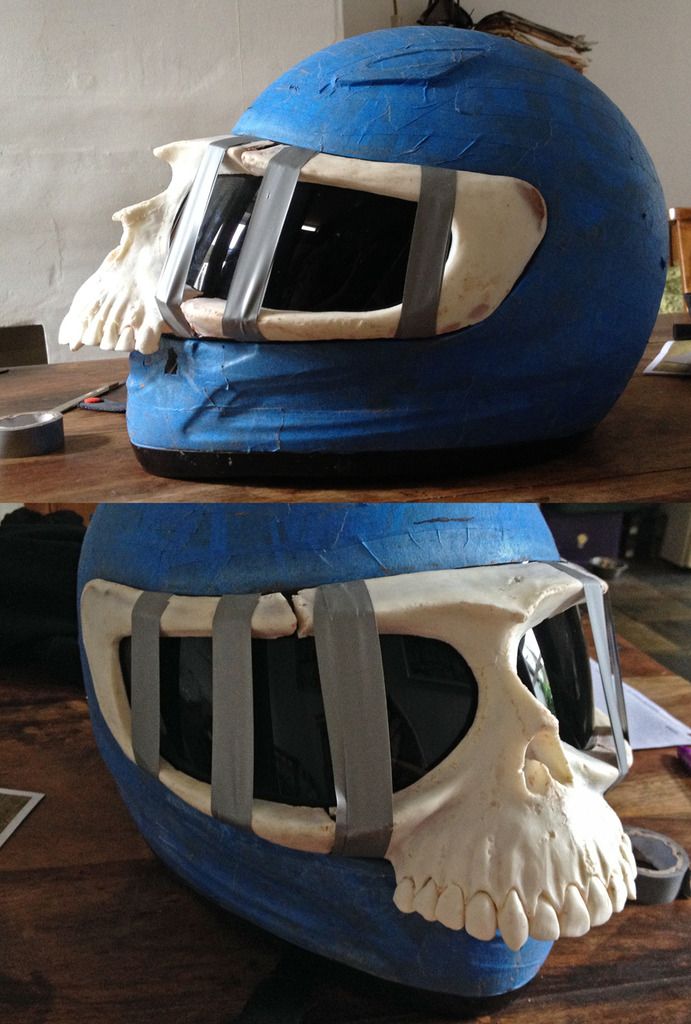
Apologies for the wait, life has been getting in the way of this project but so far so good! A new sculpt, have decided to mould and cast it in pieces but rolling the resin around the mould is getting exactly the results I'm after (i.e. casting a resin 'shell' rather than a solid block).
Got to sculpt the lower jaw, a piece for the top of the helmet and then there's the paint job to finish it all off. Progress so far:

Got to sculpt the lower jaw, a piece for the top of the helmet and then there's the paint job to finish it all off. Progress so far:
- Severeign
- Casual
- Posts: 8
- Joined: Mon Feb 16, 2015 10:35 am
Re: Resin Noob needs some guidance
![]() by mangozac » Wed Jun 10, 2015 7:53 am
by mangozac » Wed Jun 10, 2015 7:53 am
That is so cool! I'm impressed not only with your sculpting, but also your moulding and replication techniques! Fantastic work!
Oh yeah I can make that....
-
mangozac - Resin Addict Collaborator
- Posts: 4271
- Joined: Fri Oct 16, 2009 3:40 pm
- Location: QLD, Australia
Re: Resin Noob needs some guidance
![]() by Severeign » Wed Jun 10, 2015 11:15 am
by Severeign » Wed Jun 10, 2015 11:15 am
Thanks Mangozac,
The process is far from perfect as of yet. Maintaing the contours of the visor is proving a little tricky without using a two part mould and there's some 'cleaning up' to be done from each resin cast to get as close a fit as is possible. I've also had to reinforce certain parts with fibre glass where the resin hasn't created a thick enough layer to be durable enough.
Still it's a all a learning curve. I'll post more as the project progresses.
- Severeign
- Casual
- Posts: 8
- Joined: Mon Feb 16, 2015 10:35 am
Re: Resin Noob needs some guidance
![]() by RageofAchilles » Wed Jun 10, 2015 11:17 pm
by RageofAchilles » Wed Jun 10, 2015 11:17 pm
Nice sculpt, looking good. I understand the problem you have with your parts being a shell.
Surely you could fill in the back of a cast to fit the contour of the helmet and then make a two part mould of it?
Surely you could fill in the back of a cast to fit the contour of the helmet and then make a two part mould of it?
-
RageofAchilles - Habit
- Posts: 249
- Joined: Fri May 09, 2014 4:14 am
- Location: West Sussex
20 posts
• Page 1 of 2 • 1, 2
Who is online
Users browsing this forum: No registered users and 13 guests