[phpBB Debug] PHP Warning: in file [ROOT]/includes/bbcode.php on line 483: preg_replace(): The /e modifier is no longer supported, use preg_replace_callback instead
[phpBB Debug] PHP Warning: in file [ROOT]/includes/bbcode.php on line 483: preg_replace(): The /e modifier is no longer supported, use preg_replace_callback instead
[phpBB Debug] PHP Warning: in file [ROOT]/includes/bbcode.php on line 483: preg_replace(): The /e modifier is no longer supported, use preg_replace_callback instead
[phpBB Debug] PHP Warning: in file [ROOT]/includes/bbcode.php on line 483: preg_replace(): The /e modifier is no longer supported, use preg_replace_callback instead
[phpBB Debug] PHP Warning: in file [ROOT]/includes/bbcode.php on line 483: preg_replace(): The /e modifier is no longer supported, use preg_replace_callback instead
[phpBB Debug] PHP Warning: in file [ROOT]/includes/bbcode.php on line 483: preg_replace(): The /e modifier is no longer supported, use preg_replace_callback instead
[phpBB Debug] PHP Warning: in file [ROOT]/includes/bbcode.php on line 483: preg_replace(): The /e modifier is no longer supported, use preg_replace_callback instead
[phpBB Debug] PHP Warning: in file [ROOT]/includes/bbcode.php on line 483: preg_replace(): The /e modifier is no longer supported, use preg_replace_callback instead
[phpBB Debug] PHP Warning: in file [ROOT]/includes/bbcode.php on line 483: preg_replace(): The /e modifier is no longer supported, use preg_replace_callback instead
[phpBB Debug] PHP Warning: in file [ROOT]/includes/bbcode.php on line 483: preg_replace(): The /e modifier is no longer supported, use preg_replace_callback instead
[phpBB Debug] PHP Warning: in file [ROOT]/includes/bbcode.php on line 483: preg_replace(): The /e modifier is no longer supported, use preg_replace_callback instead
[phpBB Debug] PHP Warning: in file [ROOT]/includes/bbcode.php on line 483: preg_replace(): The /e modifier is no longer supported, use preg_replace_callback instead
[phpBB Debug] PHP Warning: in file [ROOT]/includes/bbcode.php on line 483: preg_replace(): The /e modifier is no longer supported, use preg_replace_callback instead
[phpBB Debug] PHP Warning: in file [ROOT]/includes/bbcode.php on line 483: preg_replace(): The /e modifier is no longer supported, use preg_replace_callback instead
[phpBB Debug] PHP Warning: in file [ROOT]/includes/bbcode.php on line 483: preg_replace(): The /e modifier is no longer supported, use preg_replace_callback instead
[phpBB Debug] PHP Warning: in file [ROOT]/includes/bbcode.php on line 483: preg_replace(): The /e modifier is no longer supported, use preg_replace_callback instead
[phpBB Debug] PHP Warning: in file [ROOT]/includes/bbcode.php on line 483: preg_replace(): The /e modifier is no longer supported, use preg_replace_callback instead
[phpBB Debug] PHP Warning: in file [ROOT]/includes/bbcode.php on line 483: preg_replace(): The /e modifier is no longer supported, use preg_replace_callback instead
[phpBB Debug] PHP Warning: in file [ROOT]/includes/bbcode.php on line 483: preg_replace(): The /e modifier is no longer supported, use preg_replace_callback instead
[phpBB Debug] PHP Warning: in file [ROOT]/includes/bbcode.php on line 483: preg_replace(): The /e modifier is no longer supported, use preg_replace_callback instead
[phpBB Debug] PHP Warning: in file [ROOT]/includes/bbcode.php on line 483: preg_replace(): The /e modifier is no longer supported, use preg_replace_callback instead
[phpBB Debug] PHP Warning: in file [ROOT]/includes/bbcode.php on line 483: preg_replace(): The /e modifier is no longer supported, use preg_replace_callback instead
[phpBB Debug] PHP Warning: in file [ROOT]/includes/bbcode.php on line 483: preg_replace(): The /e modifier is no longer supported, use preg_replace_callback instead
[phpBB Debug] PHP Warning: in file [ROOT]/includes/bbcode.php on line 483: preg_replace(): The /e modifier is no longer supported, use preg_replace_callback instead
[phpBB Debug] PHP Warning: in file [ROOT]/includes/bbcode.php on line 483: preg_replace(): The /e modifier is no longer supported, use preg_replace_callback instead
[phpBB Debug] PHP Warning: in file [ROOT]/includes/bbcode.php on line 483: preg_replace(): The /e modifier is no longer supported, use preg_replace_callback instead
[phpBB Debug] PHP Warning: in file [ROOT]/includes/bbcode.php on line 379: preg_replace(): The /e modifier is no longer supported, use preg_replace_callback instead
[phpBB Debug] PHP Warning: in file [ROOT]/includes/bbcode.php on line 112: preg_replace(): The /e modifier is no longer supported, use preg_replace_callback instead
[phpBB Debug] PHP Warning: in file [ROOT]/includes/bbcode.php on line 112: preg_replace(): The /e modifier is no longer supported, use preg_replace_callback instead
[phpBB Debug] PHP Warning: in file [ROOT]/includes/bbcode.php on line 112: preg_replace(): The /e modifier is no longer supported, use preg_replace_callback instead
[phpBB Debug] PHP Warning: in file [ROOT]/includes/bbcode.php on line 112: preg_replace(): The /e modifier is no longer supported, use preg_replace_callback instead
Resin Addict Forum • View topic - Munkeys Rig: Setup and Messup Thread
ATTENTION: As of March 2017 the Resin Addict Forums are being wound down.
New members are no longer being accepted. Read more about it here.

Munkeys Rig: Setup and Messup Thread

Questions and discussion of tools, materials and techniques.

Moderator: Wardens

Munkeys Rig: Setup and Messup Thread

Postby Munkey Joe » Fri Jan 07, 2011 12:34 pm

OK Well I have my rig unboxed and assembled and now.... Im gonna get busy!!
Image

OK well after a quick question or 10...
Heres the rig:
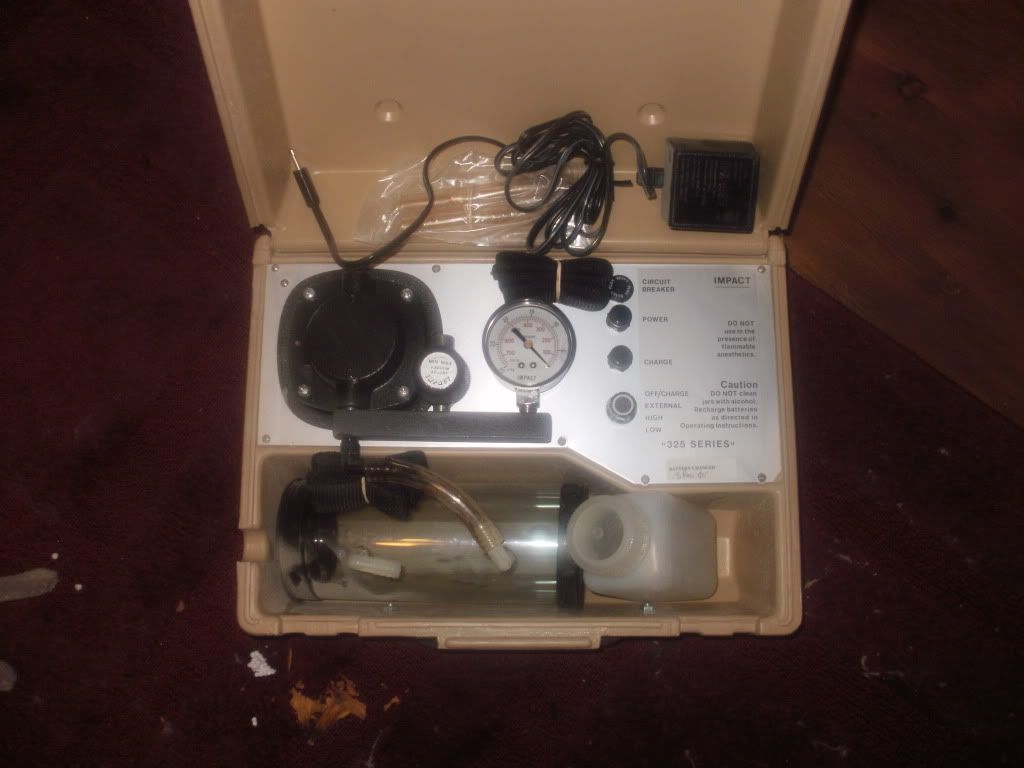
Suction: good old oropharyngeal suction from my stint in the Military Medical corps
Image
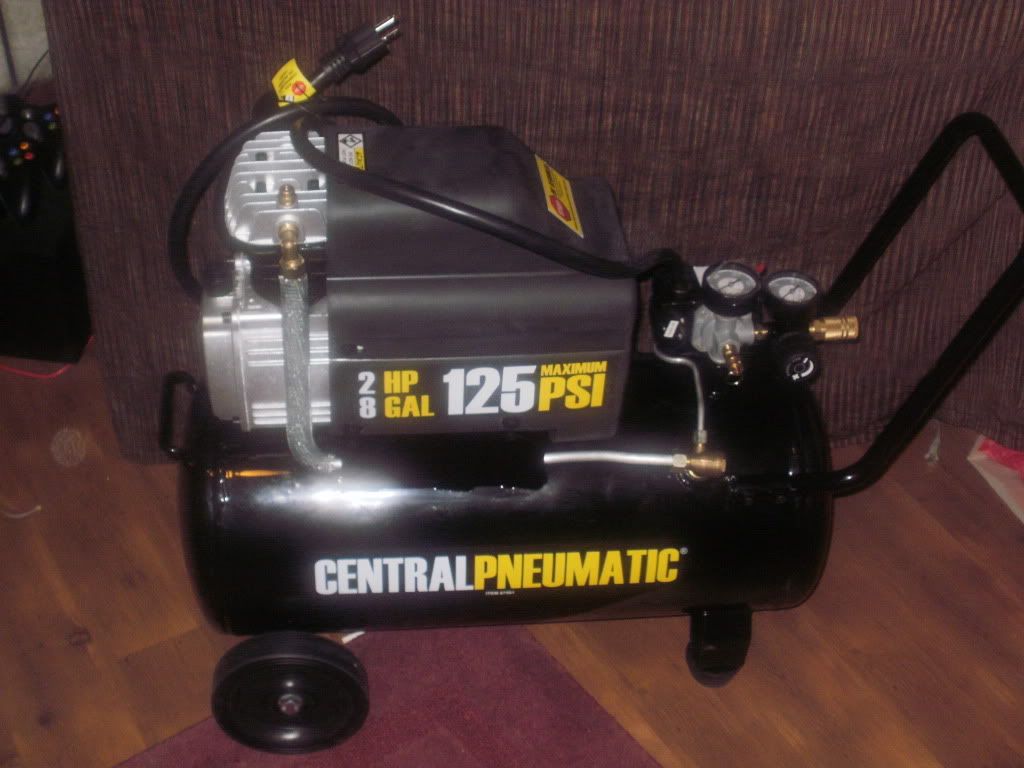
compressor: 2 HP 8 Gal oiled compressor, On sale at harbor freight
Image
Pot: 2.5 Gal on sale nuthin fancy
Image

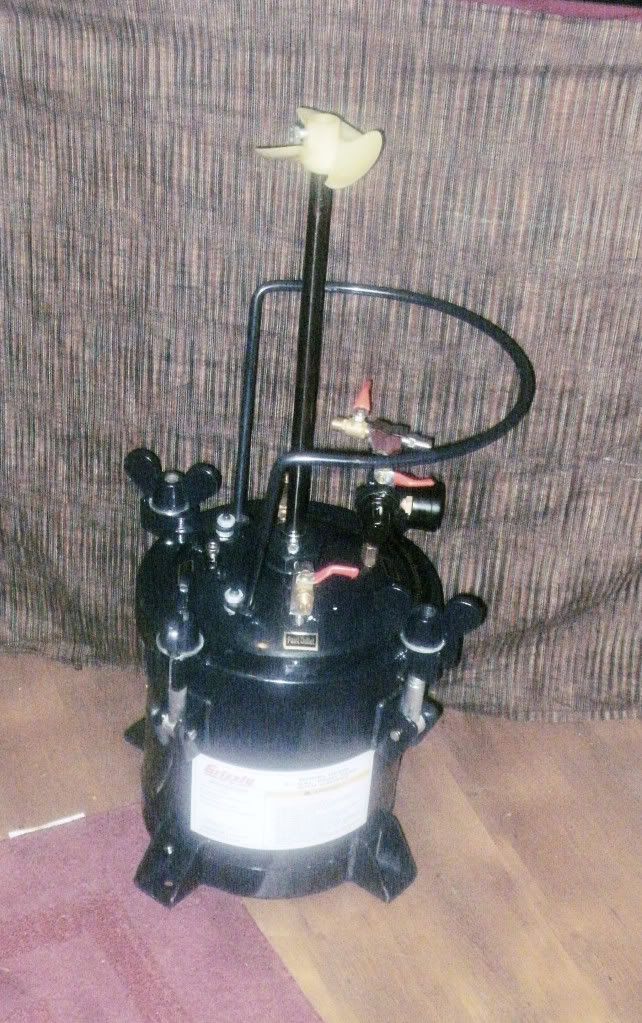
Ok with the pot... The "Propeller" on top is the paint stir turned upside down for more room. Now this is nothing more than a metal stick in the lid of the pot. removing the stick gives me a hole, therefor not good for holding pressure. NOW it is held in place by a removable guide that screws in and looks like it can be replaced with a plug:
Image
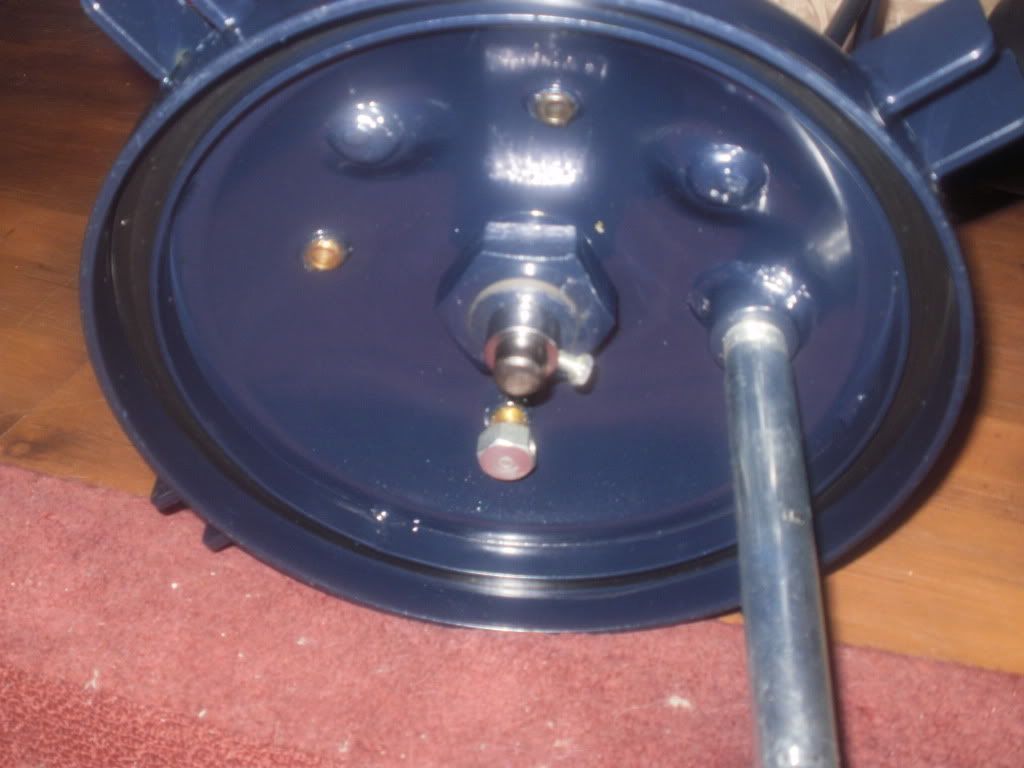
Bad picture but the short stem is the stick and the round part is a screw in guide....Now can this be replaced with just and ordinary "freeze plug" type plug?? I would think so... And the long stem is the paint siphon to be removed.
NOW #2:
the Screw closures. Is there a way to "speed" shut these? perhaps with standard nuts and an drill & socket? I am afraid with mixing, degassing, pouring, and pressurizing that I might not have the time for it to close enough to seal. Although this is hypothetical, so MAY not pose a problem. the wing nuts just seem......impractical for my needs in my head.
#3:
my method of pressure is a male coupler in the lid of the pot to attach the female end of the hose into for pressure. is this the "best" or is there an easier way? this seems pretty simple on paper....
#4:
45 LBS pressure release. OK well from mangozac's TUT I know I can replace it but my google-fu is off today so anyone know where to find a 60 PSI release? I see no need for above 60 so 50-60 is fine by me.
#5:
I am installing a water trap and such on my compressor as I wish not to have water in my tires and castings, but I wonder is this a problem really? With my grandfathers shop we had a water trap and it would fill about every week (well not full but need emptying) but we used the S#*T out of the compressor (metal fabricating) and it was in an humid environment. does anyone have one and is it worthwhile?
#6:
there is no #6. Move along.
#7:
Suction. Now I can pull 500-600 mmHg with a yankauer catheter in less than 60 seconds (plugged with my thumb...)BUT would it be worthwhile to connect into one unit like Mangozacs OR to pull vacuum in a separate container and then transfer the contents to the pot for pressure? just looking for educated guesses here as I know it will be what works well for me Im sure... Part two is this is a battery operated portable so this has to be taken into consideration. Battery life is about 1.5 hours continuous. It does have a AC/DC adapter plug for recharge/external power and can be powered with it in a pinch/if needed or wanted.
Bartertown Trades:
EBay feedback:
My FAIL Forums:
User avatar
Munkey Joe
Junkie
 
Posts: 622
Joined: Tue Dec 07, 2010 3:05 am

Re: Munkeys Rig: Setup and Messup Thread

Postby blind pig » Fri Jan 07, 2011 3:38 pm

blind pig
Junkie
 
Posts: 581
Joined: Fri Feb 19, 2010 2:41 am
Location: Brisbane Australia

Re: Munkeys Rig: Setup and Messup Thread

Postby mangozac » Fri Jan 07, 2011 6:59 pm

Bec hasn't left anything for me to reply about - she's spot on about everything ;)

The suitability of that vacuum pump is very dubious though - you really need one intended for refrigeration mechanics to evacuate the volume effectively. I would recommend using the pressure pot for both vac and pressure - it certainly saves time and makes life easier once you get the fittings on the pressure pot rigged up for it.

Great to see you're really diving headfirst into this!
Oh yeah I can make that....
User avatar
mangozac
Resin Addict Collaborator
 
Posts: 4271
Joined: Fri Oct 16, 2009 3:40 pm
Location: QLD, Australia

Re: Munkeys Rig: Setup and Messup Thread

Postby paulson games » Fri Jan 07, 2011 9:16 pm

There's a number of people on ebay selling pressure relief valves. If you plan on casting at 60 PSI then you should get a 70PSI rated valuve as they aren't super precise. A valve rated at 60 will probably open at around 55PSI, so you need one rated slightly higher than what you actually want to cast at.

You can also pick them up at shops that sell refirgeration equipment.

For my hose connectors I use quick release valves, I have male connects on the lid with a ball valve shut off so I can open or close the air line slowly which is helpfull when emptying the pot. The secondary advantage is once the pot is up to pressure I can shut off the valve then disconnect the hose and leave the pot sealed under pressure while everything cures.

I make a habit of always closeing the valve as i've had the quick connect pop loose accidentaly causing a major explosion of resin all over the inside of the pot as the pressure level changed.

Also very important is a non-stick pan or other piece of metal to help make a level surface in the bottom of the pot and then a small board, plastic, etc to place under the air intake point and act as an air diverter or you'll end up blasting resin all over the place as the air rushes into the pot.
User avatar
paulson games
Resin Addict Collaborator
 
Posts: 940
Joined: Wed Oct 21, 2009 8:09 pm

Re: Munkeys Rig: Setup and Messup Thread

Postby Munkey Joe » Sat Jan 08, 2011 9:13 am

Bartertown Trades:
EBay feedback:
My FAIL Forums:
User avatar
Munkey Joe
Junkie
 
Posts: 622
Joined: Tue Dec 07, 2010 3:05 am

Re: Munkeys Rig: Setup and Messup Thread

Postby Munkey Joe » Thu Feb 24, 2011 12:57 pm

OK sorry for Necropost BUT I now have problems!!!

I have been fiddling with my pot for the past week replacing leaky joins and other things and I have it to the point now that I cannot hear any leaks...... BUT.....

Im losing 20 PSI over about 2 hours. I go from 65 PSI to 40-45 PSI in 2 hours. It seems to stop about 40 PSI but I have not let it set for longer than about 3-4 hours. I cannot find my leak. is there some trick to detecting leaks?? I have tried soapy water (old tire trick) and no avail. I have thought of filling the tub with water and submersing the pot but have yet to resort to that. plus that might mess with the gauges....

I have simple thread tape joins (no locktite) and there is no sounds anymore. everything is pretty tight as far as joints. This is not much of a problem CASTING, but I have to make the molds under pressure before I cast, and it needs to be 60+ for 12-15 hours...... I have thought of leaving the compressor connected and as it drops the compressor kicks on to refill. but I would rather pour pressurize and leave for work (or bed!!) without the thought of my neighbors calling me to complain.

any suggestions??

EDIT: this is where I should have placed this.... Zac you can delete the other post....
Bartertown Trades:
EBay feedback:
My FAIL Forums:
User avatar
Munkey Joe
Junkie
 
Posts: 622
Joined: Tue Dec 07, 2010 3:05 am

Re: Munkeys Rig: Setup and Messup Thread

Postby paulson games » Thu Feb 24, 2011 5:57 pm

My pot usually tapers off pressure levels as well, as much as you may try the seal is never perfect even when my tanks were brand new they wouldn't hold a level pressure for more than a few hours. The air is most likely leaking from around the rim which can be very hard to find especially if it's only leaking a few PSI an hour. (and there's not much you can do about the rims leaking anyway)

One option is that you could leave the air compressor hooked up to the pot, it'll only kick on when the pressure level dips down. So it should only go off about once an hour or so. If you go for this option make sure to do it the first couple times when you are around that way you can make sure there's no issues with the compressor running for hours on end and overheating.

I've found that the pressure is only important on the inital stage of the mold/resin setting, a slow decrease in pressure doesn't seem to have any major effect. The main reason that you pressurize the material is that it changes the vicosity properties of the silicon (or resin) at a higher level of PSI the bubbles are not only crushed smaller but they are actually pushed out of the material, once it's out the silicon can return to normal pressure without any bubbles reforming in the silicon.

I typically only have my silicon under pressure for the first half of the cure time (1 hour as I use a 2hr cure product) After I pour and the tank fills up I just close off the tank and leave it alone, it usually loses 20-30 psi over that time. Later I open the valve just a hair and let the tank air out over the next 5-10 minutes. It's usually still gooey at this point so I just let it finish the curing at normal room pressure, that I can use the pot in the meantime.

I've made a lot of molds this way and had no problems yet.
User avatar
paulson games
Resin Addict Collaborator
 
Posts: 940
Joined: Wed Oct 21, 2009 8:09 pm

Re: Munkeys Rig: Setup and Messup Thread

Postby mangozac » Thu Feb 24, 2011 7:23 pm

What Paulson said :mrgreen:

It's next to impossible to get a good enough seal that there's no leakage - you will find that even the compressor itself will leak out over a similar period. Using a compressor with a larger tank would cause it to run less often, however it would still have to run.

So you have three options:
1. Only pour silicone in the morning and leave the compressor running periodically all day.
2. Get a faster curing silicone. I'm loving this 30 minute cure stuff (although I leave under pressure for 1 hour).
3. Vacuum degas the silicone - then you don't need to cure it under pressure. You will however need to brush the degassed silicone into all of the detail areas before pouring the rest over the part. That's the way I used to do it before changing to Pinkysil.
Oh yeah I can make that....
User avatar
mangozac
Resin Addict Collaborator
 
Posts: 4271
Joined: Fri Oct 16, 2009 3:40 pm
Location: QLD, Australia

Re: Munkeys Rig: Setup and Messup Thread

Postby blind pig » Thu Feb 24, 2011 11:50 pm

have you tried a silicone based lubricant (not petroleum based) to seal the rubber seal, not forgetting both sides of the rubber seal?
blind pig
Junkie
 
Posts: 581
Joined: Fri Feb 19, 2010 2:41 am
Location: Brisbane Australia

Re: Munkeys Rig: Setup and Messup Thread

Postby Munkey Joe » Fri Feb 25, 2011 7:26 am

Ok well Im guessing That Im just freaking about nothing then... I got to thinking with these posts and the 12 hour cure stuff is my METAL casting silicon, not my resin SO it doesn't need it ANYWAY...

I will look into quick cure silicone, and then just give it a go. I have some 4-6 hour cure BUT I should be good with just turning up the pressure for the first few hours until its all gone. then I'll start in with the fast cure stuff.

Thanks for the quick replies, and no Pig I have not used lube on the gasket. I might look into it but probably wont worry with it.

And off topic.....Jeff, I got the package today. Great stuff and the models were very nice. Thanks buddy!!
Bartertown Trades:
EBay feedback:
My FAIL Forums:
User avatar
Munkey Joe
Junkie
 
Posts: 622
Joined: Tue Dec 07, 2010 3:05 am

Re: Munkeys Rig: Setup and Messup Thread

Postby blind pig » Fri Feb 25, 2011 10:58 am

blind pig
Junkie
 
Posts: 581
Joined: Fri Feb 19, 2010 2:41 am
Location: Brisbane Australia

Re: Munkeys Rig: Setup and Messup Thread

Postby Barn » Fri Feb 25, 2011 6:20 pm

Barn
User
 
Posts: 137
Joined: Thu Jan 06, 2011 8:00 pm


Return to Dr Polymer

Who is online

Users browsing this forum: No registered users and 16 guests

cron