I will post here to save a new thread.
I've just searched the forum for relavant posts and read most of them.
This post is long and rambling, thanks in advance if you have time to read and advise!
I need to sort my casting out!
It needs to be better quality, higher volume, and use less materials, as this means I can minimise costs and thus, prices.
At the moment I am using two part molds which gravity fill from a resin channel underneath the parts.
Im then pressure casting at 45psi. This approach gets me probably around 90% good parts without any air bubbles, though my milage varies depending on the mold.
I would like lots of advice on switching my mold making process to vacuum casting. using one/two part molds with just a top channel, as used by forgeworld, scibor, and shown in deadmeat30's admittance form.
Ive found this vacuum pump-
http://www.hvacstore.co.uk/acatalog/VPU ... _pump.html
which I would propose to use with a thick polycarbonate sheet and custom made silcone ring, stuck on top of one of my existing pressure pots. Is this a suitable pump?
Is it possible to JUST apply a vacuum for 30 seconds, to suck all the air out, then remove the tray from the pot, allowing it to cure under atmospheric pressure? obviously for "difficult" molds I could just stick the pot lid on and apply pressure as well.. but Id hope for a lot of my parts vacuum alone would be enough.
Deadmeat, Is this roughly how forgeworld do it? I read you mentioned they dont use pressure.
The plan would be to stick to pressure casting for my existing molds, but for all future components, make two part split molds.
Im still trying to figure out how to make more than one of a split mold.. forgeworld for example must make hundreds of the things..
When you make the split mold, its very hard to cut round the master without damaging it, and if you damage the master you cannot make another split mold from it?
Is it easiest just to make a two part mold but have one part partially enclose the master? that I can is doable using mold plates to duplicate each half.
How do you guys who use split molds a lot solve this problem?
Once Ive got my molds, I just strap them up as normal, pour resin into the top channel and vacuum them, presumably I need quite high walls in the channel to stop the resin splashing everywhere?
Thanks for any advice.
Joel
ATTENTION: As of March 2017 the Resin Addict Forums are being wound down. New members are no longer being accepted. Read more about it here.
Resin Addict Forum
A place to talk about your addiction
Split Mould Casting Technique
Moderator: Wardens
Re: Split Mould Casting Technique
![]() by Anvils Hammer » Sat Dec 10, 2011 5:48 am
by Anvils Hammer » Sat Dec 10, 2011 5:48 am
- Anvils Hammer
- Habit
- Posts: 232
- Joined: Fri Oct 07, 2011 8:58 am
Re: Split Mould Casting Technique
![]() by mangozac » Sat Dec 10, 2011 10:32 am
by mangozac » Sat Dec 10, 2011 10:32 am
OK I'll try a coherent response to your rambling 
That vac pump is really overkill (and overpriced). A 2CFM pump will evacuate a 10L pot in 10 seconds - I don't think you really need much faster than that.
Now my pump is really old and struggles to pull a really good vacuum so I've always found it necessary to still pressurise after vacuuming to get perfect results. Theoretically you should be able to get good results with just vacuum, but you will definitely need well designed air vents. Pressure removes the bubbles by squashing them whereas vacuum removes them by sucking them out, so you must have a path for the expanded bubbles to exit the mould.
The transparent lid isn't all that necessary. To start off with on the cheap I'd just use your standard pressure pot lid - the cool thing is that you don't even have to do up the clamps!
If you're damaging the master when making your split moulds then you're doing it wrong. Also, you should use the first good cast from the new mould as a future master to ensure damage is never done to the original (for the record I only use duplicate masters about 10% of the time, but my volume isn't exactly high). When cutting you want to use a new knife blade and pry the silicone apart with your fingers so that just touching the silicone with the blade causes it to cut. You shouldn't have to use a sawing motion.
It might be possible to setup mould plates, but honestly if you have standardised mould boxes and each master with a dedicated block it gets mounted to for moulding I don't think the time saving would be that massive unless you're getting awfully short mould life.
Make sure you have that reservoir in the top of the mould as the resin does expand while under vacuum and without it it will overflow everywhere. Oh and make sure you use the squeeze technique when first pouring the resin into the moulds.
Once you have the technique sorted you will be able to minimise the amount of resin that ends up in the reservoir/sprue.
I wouldn't recommend using fillers or anything with this style of casting as the decreased viscosity would be detrimental to the vacuum's ability to remove air.
Oh yeah I can make that....
-

mangozac - Resin Addict Collaborator
- Posts: 4271
- Joined: Fri Oct 16, 2009 3:40 pm
- Location: QLD, Australia
Re: Split Mould Casting Technique
![]() by blind pig » Sat Dec 10, 2011 6:46 pm
by blind pig » Sat Dec 10, 2011 6:46 pm
I have a vacuum pump pretty much like that (9CFM) that can empty my 10L pot in about 2 seconds. I bought it new on eBay from an Australian seller who had misspelled vacuume and I bought it for under $20.
He wasn't happy.......
To be honest, it is too much power, but I will eventually be making a 500L vacuum tank (when my Boiler Maker mate pulls his finger out), so it will come in handy then. When I use it to evacuate the 10L tank, it will erupt in a shower of silicone and resin if I'm not careful and I can boil water at room temperature in under 2 seconds. It still amazes me, that one.
- blind pig
- Junkie
- Posts: 581
- Joined: Fri Feb 19, 2010 2:41 am
- Location: Brisbane Australia
Re: Split Mould Casting Technique
![]() by Anvils Hammer » Wed Dec 14, 2011 4:58 am
by Anvils Hammer » Wed Dec 14, 2011 4:58 am
Woop Woop!
Got my vacuum pump, cost me £250 in total for a decent quality 5CFM one, ultimate vacuum is 15 microns.
Having just looked on eBay, it looks like I could have got a second hand one for half the price, but I needed it ASAP and the company delivered it to my door in less than 24H.
Thanks for the advice Mango, much obliged.
Im currently waiting for my first mold to cure, thank god for 2.5hour cure rubber!!
I finnished off the masters which will be my first vacuum cast parts, stuck them on sticks in some plasticine, used some forgeworld sprues I have as a guideline for positioning/size of the vents.
I build the mold box with lego and plasticard.
Mixed the rubber, vacuumed it with no trouble, really annoyed I had to use the pressure pot lid, as I couldnt see all the pretty bubbles popping!
How long does it take to degas? I left mine in there for about 2 minutes, to be sure.
I poured it into the mold box and put the whole box into the chamber to degas again.
Disaster strikes!!
Opened it up,to find the walls had split open and the plate was a pool of rubber.. I had about 3 minutes of pot life left at this point.. Rapid emergency surgery to repair the mold and get the rubber back in.. Just about managed it!!
So Im currently waiting on my first every vacuumed mold, pretty damn exciting.. in fact Ive been bouncing around the house all day like an over excited 3 year old, and I have a 3 year old, so I know..
I will update with photos later this evening.
Cheers,
AH
- Anvils Hammer
- Habit
- Posts: 232
- Joined: Fri Oct 07, 2011 8:58 am
Re: Split Mould Casting Technique
![]() by mangozac » Wed Dec 14, 2011 7:49 am
by mangozac » Wed Dec 14, 2011 7:49 am
Oh yeah I can make that....
-
mangozac - Resin Addict Collaborator
- Posts: 4271
- Joined: Fri Oct 16, 2009 3:40 pm
- Location: QLD, Australia
Re: Split Mould Casting Technique
![]() by Anvils Hammer » Wed Dec 14, 2011 8:33 am
by Anvils Hammer » Wed Dec 14, 2011 8:33 am
Yes, £250 is a lot of money but it all goes straight on the business expenses. Thats the best thing about making mini parts for a living.. I can justify exorbiantly expensive toys!!
Just pulled the first sprues out, bah! Guess it was a little optimistic to expect a perfect result first time right...
With 65D, every part had an air bubble of some sort.. I dont get it.. the air is removed.. how can anything form a bubble??
I guess with a vacuum on the outside of the mold, the pressure forcing the bubbles up and out through the tube is still only 14PSI, which is not all that great..
Will now try again with my slightly more liquid resin, with less resin in the tray, and holding it under vacuum for longer,
If that doesnt work, I will cut bigger channels.
AH
- Anvils Hammer
- Habit
- Posts: 232
- Joined: Fri Oct 07, 2011 8:58 am
Re: Split Mould Casting Technique
![]() by mangozac » Wed Dec 14, 2011 8:35 am
by mangozac » Wed Dec 14, 2011 8:35 am
Bummer. Like I said, it does require very good vent design.
Make sure you keep squeezing the mould in and out as you pour the resin in too
Make sure you keep squeezing the mould in and out as you pour the resin in too
Oh yeah I can make that....
-
mangozac - Resin Addict Collaborator
- Posts: 4271
- Joined: Fri Oct 16, 2009 3:40 pm
- Location: QLD, Australia
Re: Split Mould Casting Technique
![]() by Anvils Hammer » Wed Dec 14, 2011 9:36 am
by Anvils Hammer » Wed Dec 14, 2011 9:36 am
Basically the heads have approx 1.5mm diameter sticks attached to their necks, and are then upside down.. The forgeworld sprue has heads with single vents like this.. so it must be possible...
I think I will enlarge the vents though in future as it would probs be easier...
Attempt two-
Used the "squeeze" technique and less resin than before. used vacuum only this time. The resin came out like swiss cheese, like it was boiling when it set.. which it was, I forgot to take off the vacuum!!
the resin cured for the entire 20 minutes with no air pressure, thus I think compounds inthe resin boiled off, and also the parts were basically hollow shells.. total disaster..
Tommorow morning I will try with sqeezing, vacuum for 30 seconds, then atmosphere to cure.. Has to work eventually..
I've run out of fast rubber which is annoying as any new mold I make will take 6 hours to cure!!! argh!!
I will upload photos of my progress tommorow.
AH
- Anvils Hammer
- Habit
- Posts: 232
- Joined: Fri Oct 07, 2011 8:58 am
Re: Split Mould Casting Technique
![]() by blind pig » Wed Dec 14, 2011 10:40 am
by blind pig » Wed Dec 14, 2011 10:40 am
That is one of the problems with using vacuum for casting and moulding - air bubbles.
I have a fantastic vacuum pump (probably too good for the job) that will pretty much boil any liquid placed in it and kept at a vacuum. Boiling resin at room temperature while it is setting will leave you with bubbles everywhere.
The simple answer for me was to make moulds using vacuum degassing of the silicone and curing under vacuum, then casting at pressure.
Why? well, I figure that when vacuum degassing and curing has been used, there are almost no airbubbles in the silicone to collapse when pressure is applied and deform the mould. Pressure will also collapse any small bubbles trapped in the resin that mould design and squeezing has not removed, making them so small that they are not noticeable. Having made the mould under vacuum, you shouldn't (and I never have) get that spiky/ball bearing effect on the surface of the model.
- blind pig
- Junkie
- Posts: 581
- Joined: Fri Feb 19, 2010 2:41 am
- Location: Brisbane Australia
Re: Split Mould Casting Technique
![]() by Anvils Hammer » Wed Dec 14, 2011 11:27 pm
by Anvils Hammer » Wed Dec 14, 2011 11:27 pm
Woop Woop, managed it!!
attempt 3 this morning was sqeezing and vacuum- air bubbles again
attempt 4 I poured the resin, then pulled the mold apart till i was damn sure the parts were full, then closed it up, vacuumed AND pressured, this worked. Perfect parts, no air bubbles. It really is gorgeous when it works, the lack of a mold line is such a massive improvement!
Attempt 5 was the same, but with smooth on 65D instead of my usual resin, got a few small air bubbles, which I think is due to 65D being comparatively more viscous, I really dont get on well with this resin.. and they have the cheek to charge more for it than any other!!
Attempt 6 Ijust opened up, same resin and technique as attempt 4, but this time a few air bubbles here and here.. So its possible the smooth on would work with some more trial and error.. which would be good as I have a whole trial pack to use up!
Attempt 7 is curing as I type this..
Here are some photos-
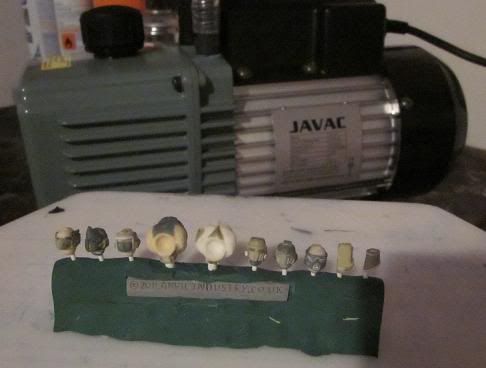
The parts ready to be molded, with my new toy in the background.. I think the vents are hilariously too thin right?

attempts 1, 4 and 5, from the top down.
some of the new parts, including the smaller praetorian torso and shorter arm. Im going to shorten the arms again, by another mm or so.
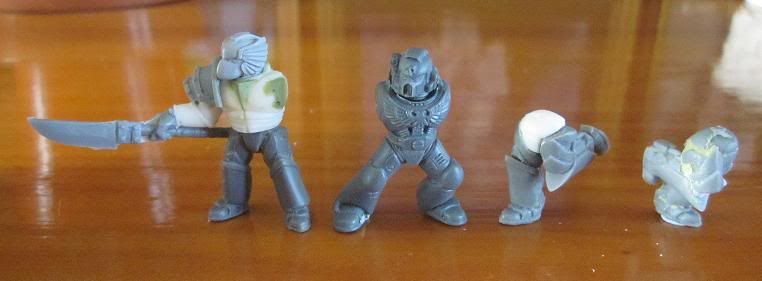
You can also see some WIP running legs.. these were a pain to position correctly, but they are based on slow motion stills of actual athletes.. so should look realistic when assembled as minis.
Im aiming to cast up enough parts today to make the production molds over night. And I also want to start painting the new parts, so plenty of work to be getting on with!!
Blind Pig, yep thats what happened! but the resin is ok when only vacuumed for less than 20 seconds, at least so far..
I've been curing my resin molds under pressure, which results in no "hedgehoging" as the air bubbles are properly crushed, but the vacuumed mold rubber is much better, no air bubbles what so ever!! and the other advantage is I dont have to have them sitting in a pot for 2-6 hours curing!
AH
attempt 3 this morning was sqeezing and vacuum- air bubbles again
attempt 4 I poured the resin, then pulled the mold apart till i was damn sure the parts were full, then closed it up, vacuumed AND pressured, this worked. Perfect parts, no air bubbles. It really is gorgeous when it works, the lack of a mold line is such a massive improvement!
Attempt 5 was the same, but with smooth on 65D instead of my usual resin, got a few small air bubbles, which I think is due to 65D being comparatively more viscous, I really dont get on well with this resin.. and they have the cheek to charge more for it than any other!!
Attempt 6 Ijust opened up, same resin and technique as attempt 4, but this time a few air bubbles here and here.. So its possible the smooth on would work with some more trial and error.. which would be good as I have a whole trial pack to use up!
Attempt 7 is curing as I type this..
Here are some photos-
The parts ready to be molded, with my new toy in the background.. I think the vents are hilariously too thin right?
attempts 1, 4 and 5, from the top down.
some of the new parts, including the smaller praetorian torso and shorter arm. Im going to shorten the arms again, by another mm or so.
You can also see some WIP running legs.. these were a pain to position correctly, but they are based on slow motion stills of actual athletes.. so should look realistic when assembled as minis.
Im aiming to cast up enough parts today to make the production molds over night. And I also want to start painting the new parts, so plenty of work to be getting on with!!
Blind Pig, yep thats what happened! but the resin is ok when only vacuumed for less than 20 seconds, at least so far..
I've been curing my resin molds under pressure, which results in no "hedgehoging" as the air bubbles are properly crushed, but the vacuumed mold rubber is much better, no air bubbles what so ever!! and the other advantage is I dont have to have them sitting in a pot for 2-6 hours curing!
AH
- Anvils Hammer
- Habit
- Posts: 232
- Joined: Fri Oct 07, 2011 8:58 am
Re: Split Mould Casting Technique
![]() by Anvils Hammer » Thu Dec 15, 2011 12:15 am
by Anvils Hammer » Thu Dec 15, 2011 12:15 am
Random question for anyone else with a vacuum pump..
mine chucks out a load of white vapour when its pumping the air out, does everyone else get this?
My guess is that this is the humidity in the pot being vacuumed and thus, expelled as water vapour.. is this correct?
AH
mine chucks out a load of white vapour when its pumping the air out, does everyone else get this?
My guess is that this is the humidity in the pot being vacuumed and thus, expelled as water vapour.. is this correct?
AH
- Anvils Hammer
- Habit
- Posts: 232
- Joined: Fri Oct 07, 2011 8:58 am
Re: Split Mould Casting Technique
![]() by Lane » Thu Dec 15, 2011 6:03 am
by Lane » Thu Dec 15, 2011 6:03 am
I think the running legs are a bit aggressive for an armored figure. You are modeling soldiers in armor, not 120# athletes who expend all their energy in 2-3 minutes.
- Lane
- Habit
- Posts: 243
- Joined: Sat Mar 19, 2011 4:02 pm
Re: Split Mould Casting Technique
![]() by Anvils Hammer » Thu Dec 15, 2011 6:55 am
by Anvils Hammer » Thu Dec 15, 2011 6:55 am
- Anvils Hammer
- Habit
- Posts: 232
- Joined: Fri Oct 07, 2011 8:58 am
Re: Split Mould Casting Technique
![]() by mangozac » Thu Dec 15, 2011 7:12 am
by mangozac » Thu Dec 15, 2011 7:12 am
I dunno I'm kind of with Lane on this one: they might be super-human but something doesn't look quite right. I think it's more that the design of the leg armour doesn't look like it facilitates fast, athletic movement. I feel like the armour plates conceal the joints too much to give them the range of motion necessary.
Some food for thought anyway
On to the casts! Firstly, the vents aren't prohibitively small - I frequently use 2mm rod as my vents on small parts and don't have any issues. The squeeze while pouring resin technique is important here as it ensures that the resin gets sucked into the parts that the more viscous resin would make difficult.
So you're settled on vacuum + pressure? That's the same as I use. But if you were getting acceptable results using just pressure before doesn't this defeat the purpose? I think if you want to be able to use just vacuum you will need a long pot life resin so you can pour it, vacuum for a couple of minutes and then put aside to cure.
My vac pump does the white vapour thing too. I thought it was just cause it was old and burning the oil inside or something. I stuck an oil breather filter on my exhaust port which cuts it down a bit.
Oh yeah I can make that....
-
mangozac - Resin Addict Collaborator
- Posts: 4271
- Joined: Fri Oct 16, 2009 3:40 pm
- Location: QLD, Australia
Re: Split Mould Casting Technique
![]() by Anvils Hammer » Thu Dec 15, 2011 8:58 am
by Anvils Hammer » Thu Dec 15, 2011 8:58 am
Glad its not just my pump then! the vapour smells ever so slightly of the oil.. but I dont think its toxic... *hopes*
The rod shown on the helmets is about 1mm.. I think 2mm is about the minimum.. as I tried with 3/4mm and it made a massive difference!
Yeah I was getting great results with pressure, bad mold design aside.
The reason I think vacuum is the way forward is the quality enhancement.. my helmets had a mold line all around the outside. even when it was very faint it was still there.. now they have no visisble mold line at all!! Same with things like sword blades, arms, torsos.. many small parts benefit from losing most of the mold line.
It also means I can make parts which fit nicely on tiny sprues, which means I can mail them on the sprues rather than have to break all the heads into pots, and count out 10 or twenty or however many someone purchases..
I do intend to build this glove box, as im confident that will allow me to make parts with just vacuum, giving me massively improved quality and much faster casting, which leaves more time to make new product, the fun part!
re the running legs, points noted,
The issue is that on a 28m mini, the legs are twice as thick relative to lenght as they would be at full size, which means as soon as you bend the leg to approaching 90 degrees, nessecary for the running poses, you have to chop away vast parts of the leg and armour plating to get it to look right.
I dont intend to tone down the posingI will work on the armour plating to add gaps and exposed/bunched cabling etc where nessecary, to show that the armour is really "working" to keep up the pace!
AH
- Anvils Hammer
- Habit
- Posts: 232
- Joined: Fri Oct 07, 2011 8:58 am
Who is online
Users browsing this forum: No registered users and 2 guests