[phpBB Debug] PHP Warning: in file [ROOT]/includes/bbcode.php on line 483: preg_replace(): The /e modifier is no longer supported, use preg_replace_callback instead
[phpBB Debug] PHP Warning: in file [ROOT]/includes/bbcode.php on line 483: preg_replace(): The /e modifier is no longer supported, use preg_replace_callback instead
[phpBB Debug] PHP Warning: in file [ROOT]/includes/bbcode.php on line 483: preg_replace(): The /e modifier is no longer supported, use preg_replace_callback instead
[phpBB Debug] PHP Warning: in file [ROOT]/includes/bbcode.php on line 483: preg_replace(): The /e modifier is no longer supported, use preg_replace_callback instead
[phpBB Debug] PHP Warning: in file [ROOT]/includes/bbcode.php on line 483: preg_replace(): The /e modifier is no longer supported, use preg_replace_callback instead
[phpBB Debug] PHP Warning: in file [ROOT]/includes/bbcode.php on line 483: preg_replace(): The /e modifier is no longer supported, use preg_replace_callback instead
[phpBB Debug] PHP Warning: in file [ROOT]/includes/bbcode.php on line 483: preg_replace(): The /e modifier is no longer supported, use preg_replace_callback instead
[phpBB Debug] PHP Warning: in file [ROOT]/includes/bbcode.php on line 483: preg_replace(): The /e modifier is no longer supported, use preg_replace_callback instead
[phpBB Debug] PHP Warning: in file [ROOT]/includes/bbcode.php on line 483: preg_replace(): The /e modifier is no longer supported, use preg_replace_callback instead
[phpBB Debug] PHP Warning: in file [ROOT]/includes/bbcode.php on line 483: preg_replace(): The /e modifier is no longer supported, use preg_replace_callback instead
[phpBB Debug] PHP Warning: in file [ROOT]/includes/bbcode.php on line 483: preg_replace(): The /e modifier is no longer supported, use preg_replace_callback instead
[phpBB Debug] PHP Warning: in file [ROOT]/includes/bbcode.php on line 483: preg_replace(): The /e modifier is no longer supported, use preg_replace_callback instead
[phpBB Debug] PHP Warning: in file [ROOT]/includes/bbcode.php on line 483: preg_replace(): The /e modifier is no longer supported, use preg_replace_callback instead
[phpBB Debug] PHP Warning: in file [ROOT]/includes/bbcode.php on line 483: preg_replace(): The /e modifier is no longer supported, use preg_replace_callback instead
[phpBB Debug] PHP Warning: in file [ROOT]/includes/bbcode.php on line 483: preg_replace(): The /e modifier is no longer supported, use preg_replace_callback instead
[phpBB Debug] PHP Warning: in file [ROOT]/includes/bbcode.php on line 483: preg_replace(): The /e modifier is no longer supported, use preg_replace_callback instead
[phpBB Debug] PHP Warning: in file [ROOT]/includes/bbcode.php on line 483: preg_replace(): The /e modifier is no longer supported, use preg_replace_callback instead
[phpBB Debug] PHP Warning: in file [ROOT]/includes/bbcode.php on line 483: preg_replace(): The /e modifier is no longer supported, use preg_replace_callback instead
[phpBB Debug] PHP Warning: in file [ROOT]/includes/bbcode.php on line 483: preg_replace(): The /e modifier is no longer supported, use preg_replace_callback instead
[phpBB Debug] PHP Warning: in file [ROOT]/includes/bbcode.php on line 483: preg_replace(): The /e modifier is no longer supported, use preg_replace_callback instead
[phpBB Debug] PHP Warning: in file [ROOT]/includes/bbcode.php on line 483: preg_replace(): The /e modifier is no longer supported, use preg_replace_callback instead
[phpBB Debug] PHP Warning: in file [ROOT]/includes/bbcode.php on line 483: preg_replace(): The /e modifier is no longer supported, use preg_replace_callback instead
[phpBB Debug] PHP Warning: in file [ROOT]/includes/bbcode.php on line 483: preg_replace(): The /e modifier is no longer supported, use preg_replace_callback instead
[phpBB Debug] PHP Warning: in file [ROOT]/includes/bbcode.php on line 483: preg_replace(): The /e modifier is no longer supported, use preg_replace_callback instead
[phpBB Debug] PHP Warning: in file [ROOT]/includes/bbcode.php on line 483: preg_replace(): The /e modifier is no longer supported, use preg_replace_callback instead
[phpBB Debug] PHP Warning: in file [ROOT]/includes/bbcode.php on line 483: preg_replace(): The /e modifier is no longer supported, use preg_replace_callback instead
[phpBB Debug] PHP Warning: in file [ROOT]/includes/bbcode.php on line 112: preg_replace(): The /e modifier is no longer supported, use preg_replace_callback instead
Resin Addict Forum • View topic - Split Mould Casting Technique
Page 6 of 7

Re: Split Mould Casting Technique

PostPosted: Mon Nov 26, 2012 7:01 pm
by mangozac
I'll get to them as soon as I can but don't hold your breath :(

In the meantime I did upload a couple in this thread: and the info in the thread we're currently in is still very valid ;)

Re: Split Mould Casting Technique

PostPosted: Sun Dec 30, 2012 11:44 pm
by Bunny
this is all very useful!

Im still confused about where i should cut for things like legs? This is where you have big gaps between them that the silcone is gone into, say you have five, im just not sure where to cut? As i thought the idea was to have as small as cut as possible to minimise mould lines???

Re: Split Mould Casting Technique

PostPosted: Fri Feb 01, 2013 11:42 pm
by Magnetic Duckling
YAY I'm going to try those for my dolls and most likely pathetically fail. Wish me luck <3
(if everything fails, I will annoy Zac till the end of times for being the one saying it was possible xD)

Re: Split Mould Casting Technique

PostPosted: Sat Feb 02, 2013 7:12 am
by mangozac
:o I hope it works then - if not, then Skype has a "block" function :P

Re: Split Mould Casting Technique

PostPosted: Tue Sep 17, 2013 7:58 am
by lastspartacus
It seems this site and youtube are lacking any videos about split mold casting? This should be remedied for folks like me who are visual learners :D

Its hard for me to visualize the tips and tricks that go into doing this.

Re: Split Mould Casting Technique

PostPosted: Tue Sep 17, 2013 12:13 pm
by mangozac
That requires a video camera, editing skills and time; three things I'm lacking :P

Re: Split Mould Casting Technique

PostPosted: Wed Sep 18, 2013 4:08 am
by lastspartacus
Oh I didn't necessarily mean you Mango, it just seems this process has really taken off, so I'm shocked there are no video tutorials online.

Re: Split Mould Casting Technique

PostPosted: Wed Sep 18, 2013 6:28 am
by mangozac
That's OK ;)

I do believe Munkey Joe is planning to do such a video, but he's as time poor as I am!

Re: Split Mould Casting Technique

PostPosted: Wed Sep 25, 2013 12:35 pm
by lastspartacus
I've been really trying to wrap my mind around this casting technique by just visualizing the instructions. Probably the most confusing part to me is how to do the whole sprues, like the backpacks shown on the first page.

I was under the impression that you did your cutting on the side or underside of the mold. I get that the sprue is the 'top' of the mold that collects the extra resin and allows for bubbling under vacuum. But does one simply just take that sprue and pull everything out? I'm confused at how you get the entire thing out without damaging the mold, as I would think that those backpacks would not pull free without somehow spraying mold release down in the cracks.

That brings up a second question, as I would think that it would be very difficult to get mold release up in a split mold?

Re: Split Mould Casting Technique

PostPosted: Wed Sep 25, 2013 2:43 pm
by Blindhorizon
Okay with the mold release, you spray the actual miniature before you pour the silicone to help get the master out of the split mold.

With split molds, you attach the reservoir and sprue piece to the item. Attach it with a small dab of glue so when you bend the mold side to side the connection breaks and you can pull the sprue reservoir out. Then you use a razor to cut open the mold.

Image
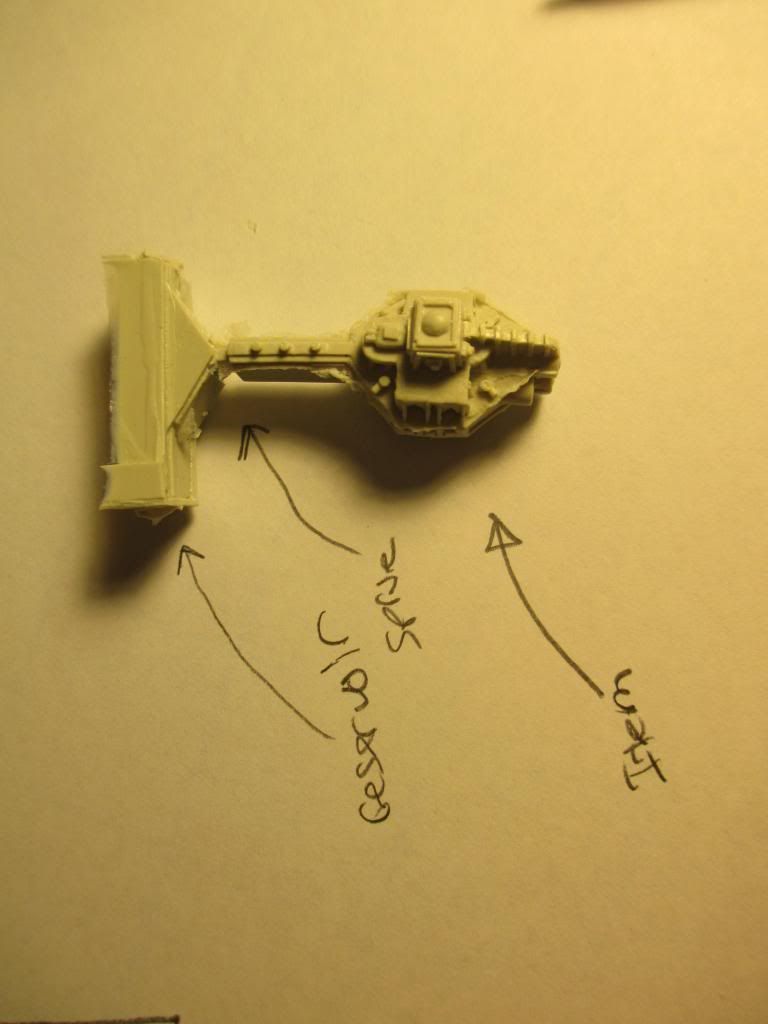
This is a cast piece i have. you can see the reservoir and if i move them around especially in the mold the ship hull will come apart from the overflow. (in case you can't read my writing from top to bottom, reservoir, sprue, item)

Image
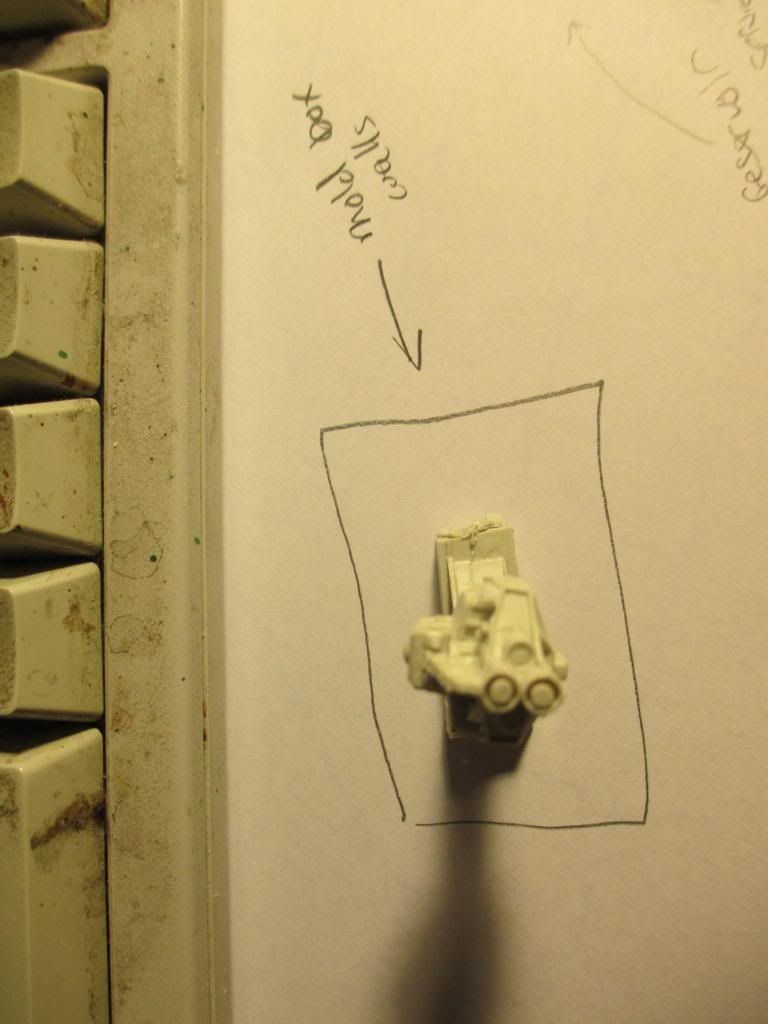
The mold walls are the box around the item to be cast, you want to make sure the item is fixed in place somehow the silicone can push it around.

Image
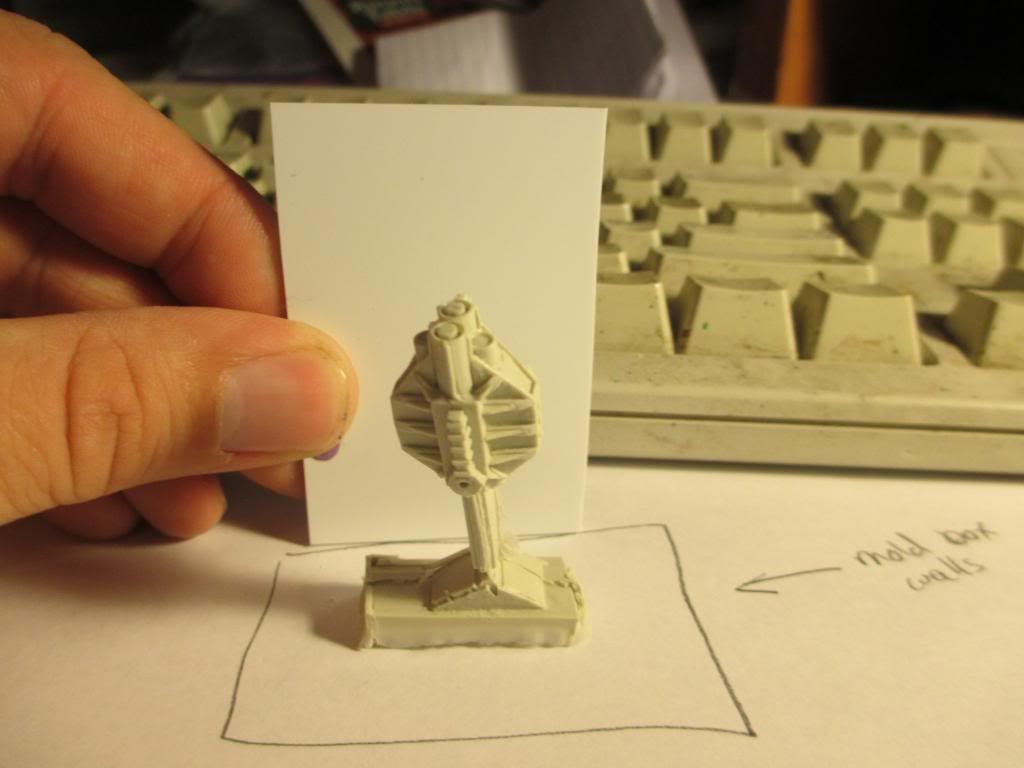
A side on look the plastic in the back is supposed to be a wall you want it to go over the end of the item atleast a quarter inch probably more but i'm no pro the ones that know can correct my errors.

Then the tricky part is to cut open the mold using the hook xacto head, i hear this is standard. I myself thought oh i can do a straight exacto and i ended up damaging the detail on the inside of my molds. I've only made 3 split molds and they where all at the same time of super small items with overlapping details. I hated it, I will be doing a split mold for bigger items though the small parts turned me off.

Re: Split Mould Casting Technique

PostPosted: Wed Sep 25, 2013 2:56 pm
by mangozac

Re: Split Mould Casting Technique

PostPosted: Thu Sep 26, 2013 5:14 am
by lastspartacus
I pretty much get the mold making part of the split mold process. Make a base of clay, attach parts to clay with vent, and pour silicone = seems pretty easy.

Edit: I just wrote a long post...but halfway through it it just clicked with me, I think I understand now.

It seems in my mind this process would be very difficult for pieces with undercuts, like say a ship that has recesses in its sides.

I'm going to fiddle with my setup and see if I can't wrap my mind around this more. For some reason its hard to visualize completely.

Re: Split Mould Casting Technique

PostPosted: Thu Sep 26, 2013 5:24 am
by Blindhorizon
The mold will open like a clam, just pull the piece out. Overlapping like you say will degrade the mold faster.

Re: Split Mould Casting Technique

PostPosted: Fri Jun 12, 2015 7:55 pm
by TomG
Not sure in wich topic I should ask. Zac, do you have photo of "ready to cast" split mold with resin reservoir (how big it is) for vacuum/pressure combined casting? I´m want to make some tests soon.

Re: Split Mould Casting Technique

PostPosted: Mon Jun 15, 2015 9:33 am
by mangozac
Yes, this thread is fine ;)

I think the only picture I have is this one here: . Also look a couple of posts up to get a better idea of the reservoir volume. If you want I can take another picture for you?