[phpBB Debug] PHP Warning: in file [ROOT]/includes/bbcode.php on line 483: preg_replace(): The /e modifier is no longer supported, use preg_replace_callback instead
[phpBB Debug] PHP Warning: in file [ROOT]/includes/bbcode.php on line 483: preg_replace(): The /e modifier is no longer supported, use preg_replace_callback instead
[phpBB Debug] PHP Warning: in file [ROOT]/includes/bbcode.php on line 483: preg_replace(): The /e modifier is no longer supported, use preg_replace_callback instead
[phpBB Debug] PHP Warning: in file [ROOT]/includes/bbcode.php on line 483: preg_replace(): The /e modifier is no longer supported, use preg_replace_callback instead
[phpBB Debug] PHP Warning: in file [ROOT]/includes/bbcode.php on line 483: preg_replace(): The /e modifier is no longer supported, use preg_replace_callback instead
[phpBB Debug] PHP Warning: in file [ROOT]/includes/bbcode.php on line 483: preg_replace(): The /e modifier is no longer supported, use preg_replace_callback instead
[phpBB Debug] PHP Warning: in file [ROOT]/includes/bbcode.php on line 483: preg_replace(): The /e modifier is no longer supported, use preg_replace_callback instead
[phpBB Debug] PHP Warning: in file [ROOT]/includes/bbcode.php on line 483: preg_replace(): The /e modifier is no longer supported, use preg_replace_callback instead
[phpBB Debug] PHP Warning: in file [ROOT]/includes/bbcode.php on line 483: preg_replace(): The /e modifier is no longer supported, use preg_replace_callback instead
[phpBB Debug] PHP Warning: in file [ROOT]/includes/bbcode.php on line 483: preg_replace(): The /e modifier is no longer supported, use preg_replace_callback instead
[phpBB Debug] PHP Warning: in file [ROOT]/includes/bbcode.php on line 483: preg_replace(): The /e modifier is no longer supported, use preg_replace_callback instead
[phpBB Debug] PHP Warning: in file [ROOT]/includes/bbcode.php on line 483: preg_replace(): The /e modifier is no longer supported, use preg_replace_callback instead
[phpBB Debug] PHP Warning: in file [ROOT]/includes/bbcode.php on line 483: preg_replace(): The /e modifier is no longer supported, use preg_replace_callback instead
[phpBB Debug] PHP Warning: in file [ROOT]/includes/bbcode.php on line 483: preg_replace(): The /e modifier is no longer supported, use preg_replace_callback instead
[phpBB Debug] PHP Warning: in file [ROOT]/includes/bbcode.php on line 483: preg_replace(): The /e modifier is no longer supported, use preg_replace_callback instead
[phpBB Debug] PHP Warning: in file [ROOT]/includes/bbcode.php on line 483: preg_replace(): The /e modifier is no longer supported, use preg_replace_callback instead
[phpBB Debug] PHP Warning: in file [ROOT]/includes/bbcode.php on line 483: preg_replace(): The /e modifier is no longer supported, use preg_replace_callback instead
[phpBB Debug] PHP Warning: in file [ROOT]/includes/bbcode.php on line 483: preg_replace(): The /e modifier is no longer supported, use preg_replace_callback instead
[phpBB Debug] PHP Warning: in file [ROOT]/includes/bbcode.php on line 483: preg_replace(): The /e modifier is no longer supported, use preg_replace_callback instead
[phpBB Debug] PHP Warning: in file [ROOT]/includes/bbcode.php on line 483: preg_replace(): The /e modifier is no longer supported, use preg_replace_callback instead
[phpBB Debug] PHP Warning: in file [ROOT]/includes/bbcode.php on line 483: preg_replace(): The /e modifier is no longer supported, use preg_replace_callback instead
[phpBB Debug] PHP Warning: in file [ROOT]/includes/bbcode.php on line 483: preg_replace(): The /e modifier is no longer supported, use preg_replace_callback instead
[phpBB Debug] PHP Warning: in file [ROOT]/includes/bbcode.php on line 483: preg_replace(): The /e modifier is no longer supported, use preg_replace_callback instead
[phpBB Debug] PHP Warning: in file [ROOT]/includes/bbcode.php on line 483: preg_replace(): The /e modifier is no longer supported, use preg_replace_callback instead
[phpBB Debug] PHP Warning: in file [ROOT]/includes/bbcode.php on line 483: preg_replace(): The /e modifier is no longer supported, use preg_replace_callback instead
[phpBB Debug] PHP Warning: in file [ROOT]/includes/bbcode.php on line 483: preg_replace(): The /e modifier is no longer supported, use preg_replace_callback instead
[phpBB Debug] PHP Warning: in file [ROOT]/includes/bbcode.php on line 112: preg_replace(): The /e modifier is no longer supported, use preg_replace_callback instead
[phpBB Debug] PHP Warning: in file [ROOT]/includes/bbcode.php on line 112: preg_replace(): The /e modifier is no longer supported, use preg_replace_callback instead
Resin Addict Forum • View topic - Project Log: Superheavy Assault Walker
ATTENTION: As of March 2017 the Resin Addict Forums are being wound down.
New members are no longer being accepted. Read more about it here.

Project Log: Superheavy Assault Walker

Discussion of modelling

Moderator: Wardens

Project Log: Superheavy Assault Walker

Postby mangozac » Tue Feb 08, 2011 8:54 pm

Well it finally arrived - my very own SAW kit!

You see, after designing this behemoth and subsequently casting half a dozen copies for some people I was so sick of the project that I had lost the urge to have one of my own! Recently however - a year on from completing the original design - I suddenly felt the urge to have a SAW of my own.

Since my moulds were partially worn out and I didn't have the time or motivation to cast it up myself, I decided to order a kit from Chapterhouse (exercising my designer's discount and purchasing it at cost). It still worked out pretty expensive by the time I paid for post though...

Anyway a USPS box rocked up at work today and I proceeded to get excited. It's great having stuff sent to your work address! ;)

Tonight I checked that all of the parts were present and gave it the standard resin kit bath in dish detergent. I couldn't particularly feel any release agents on the resin, but it's still best practice to wash it anyway. And scrub with a scrubbing brush.

So all I have for now is a pic of the parts, post washing and drying on the kitchen bench:

SAW Construction 1.JPG


Since I'm not gaming anymore I plan to make this into a static display piece, mounted on a (somewhat massive) plinth vignette style. Desert terrain and maybe some Tau troops will be underneath it. I'm planning to paint the SAW in a very non-Tau sand yellow colour the same as operating in Iraq/Afghanistan. Painting will be airbrushing as per the IA Model Masterclass book.

Progress will be slow but I'm hoping to assemble at least one leg this week. The casting is decent enough but there are some pretty decent mould lines that need removing.

That's about all for now...
Oh yeah I can make that....
User avatar
mangozac
Resin Addict Collaborator
 
Posts: 4271
Joined: Fri Oct 16, 2009 3:40 pm
Location: QLD, Australia

Re: Project Log: Superheavy Assault Walker

Postby BlueRonin » Wed Feb 09, 2011 12:29 am

Congratulations on getting started on one of your own babies! I am very excited, and looking forward to my own arriving soon! :)

I like the modern desert color scheme, I got a few articles from the Fine Scale Modeler magazine that I might dig up, scan and send you if they look like they could be helpful!
BlueRonin
User
 
Posts: 111
Joined: Tue Nov 23, 2010 11:24 pm

Re: Project Log: Superheavy Assault Walker

Postby Munkey Joe » Wed Feb 09, 2011 2:52 am

I have some close up pictures and such of a M113 painted in desert colors if you would like to see them and see real pictures of what the paint does for your weathering.....
Bartertown Trades:
EBay feedback:
My FAIL Forums:
User avatar
Munkey Joe
Junkie
 
Posts: 622
Joined: Tue Dec 07, 2010 3:05 am

Re: Project Log: Superheavy Assault Walker

Postby mangozac » Wed Feb 09, 2011 6:06 am

Thanks guys! Both offerings would be fantastic and much appreciated ;)
Oh yeah I can make that....
User avatar
mangozac
Resin Addict Collaborator
 
Posts: 4271
Joined: Fri Oct 16, 2009 3:40 pm
Location: QLD, Australia

Re: Project Log: Superheavy Assault Walker

Postby mangozac » Sun Feb 13, 2011 9:48 am

OK well 2 nights and half of my Saturday and I've got the bulk of the cleanup done. All four legs and the pelvis are now looking much better. Although the casting wasn't too bad, there were pretty awful mould slip lines in really bad spots. My solution was to level them out a bit with a modelling chisel, pack the areas up with Tamiya putty and then sand with 240 then 800 wet and dry.

Many panel lines needed rescribing after the cleanup but that's pretty easy to do in resin. I noticed too that during the cleanup work many panel lines get clogged with the resin dust mud (I wet sand outdoors to avoid having to wear a mask) so after cleanup I gave all of the parts another wash, ensuring that I use a scrubbing brush in all of the detail areas.

My reason for focusing on the lower half is tat now I can start looking at assembly. Since it will be mounted to a base I'm going to go for a "mid-stride" pose so I'm now mucking around trying to find the coolest looking positioning. Here's a pic of that progress:

SAW_WIP.JPG


I was thinking of doing some mods like hanging another gun from underneath the pelvis, but frankly I don't want to invest any more time into modelling on it so I'm just going to go stock.

Once I've found a pose I'm happy with it will be time to start pinning. Every joint on the legs will be pinned with quite decent thickness metal rod. Probably around 3mm diameter. I'll be using the "glue and pin" technique (where the joint is glue into position and then a pin drilled and inserted) on all but the ball joints as I can easily hide the insertion points. Pinning of the hip joints will be standard "blind" pinning. I plan to thread holes into the bottom of the feet in contact with the ground so that it can be mounted to its base with bolts for ease of assembly/removal.

I'll have to give some thought as to the rest of the vignette base and what I want to add. There will certainly be a lot of bare surface on it so the last think I want is for it to look boring. I was thinking of picking up a resin Tau tank commander to stick on set with a couple of Tau troops. I'm open to ideas!

Edit: Research on desert dioramas:


Oh yeah I can make that....
User avatar
mangozac
Resin Addict Collaborator
 
Posts: 4271
Joined: Fri Oct 16, 2009 3:40 pm
Location: QLD, Australia

Re: Project Log: Superheavy Assault Walker

Postby Munkey Joe » Sun Feb 13, 2011 11:51 am

I just remembered the pictures..... I'll shoot them to you buddy!! :oops:
Bartertown Trades:
EBay feedback:
My FAIL Forums:
User avatar
Munkey Joe
Junkie
 
Posts: 622
Joined: Tue Dec 07, 2010 3:05 am

Re: Project Log: Superheavy Assault Walker

Postby mangozac » Tue Feb 15, 2011 8:54 pm

OK I have a plan for the vignette. I'll fish some 18mm thick MDF out of the garage tomorrow and cut to a circular shape. Then rout the edges with a fancy shape and paint it black. On top of that I will build up the terrain.

The terrain will feature at the front of the piece the top of a hilly rise on which a pair of Pathfinders are hiding out. One will be laying down with a rail rifle, the other spotting with binoculars. So the SAW will be mounted like it is walking up behind them.
The title of the piece will be "Support Has Arrived".

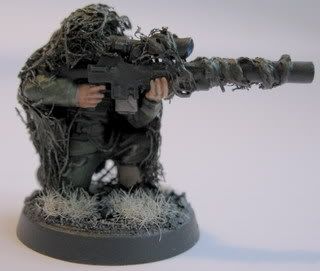
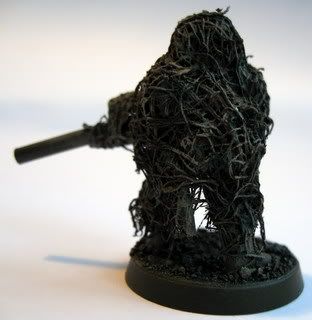
Now I wanted to do the pathfinders (or at least the one laying down) in something akin to a ghillie suit. I did some Googling but was unable to come up with any decent looking examples in miniature. Has anybody seen anything like this pulled off well? Any other suggestions for Tau alternative camouflages?
Oh yeah I can make that....
User avatar
mangozac
Resin Addict Collaborator
 
Posts: 4271
Joined: Fri Oct 16, 2009 3:40 pm
Location: QLD, Australia

Re: Project Log: Superheavy Assault Walker

Postby Munkey Joe » Tue Feb 15, 2011 11:21 pm

Hey.... something I actually know something about!!

the worst thing about ghillie suits is that they are made to do the opposite of miniature painting. they make you disappear. NOW that said there is some ways we can do this. your best bet is a ghillie cloak. now these are similar to suits BUT are not conforming, just a drape.
Image

now BOTH your spotter and you shooter will need to be camo. Snipers work as a team. with one prone and one standing you have the options of making you suits look realistic. I have collected some pics myself to illustrate.
Image
Image
These were from here:
they are not good.... :( BUT are what Im trying to say about drapes. use a "higher thread count" material for your cloaks, like real cloth.

now here is a good ghillie pattern:
Image
Image
these are from Dakka:
Very realistic for miniature, using medical guaze. 2x2 or 4x4 should work just fine.

another method that works well in a desert area is flaps. not too many bushes in the desert but these work OK in a pinch and are actually common in an semi arid environment.
Image
dont know how you would recreate this though.

you could always use a cloth drape, coat in PVA/White glue and drape your mini. the layer static grass from the bottom to the top, but this would take lots of patience and alot of grass.

key points in doing this.... both are in suits. do not place a suit below the waist on the front (this will always be on the ground but DO wrap around the front of the chest!). and if your layering, layer from bottom up overlapping as you go to create "rippling" that helps break up your silhouette. hope i helped!! :mrgreen:
Bartertown Trades:
EBay feedback:
My FAIL Forums:
User avatar
Munkey Joe
Junkie
 
Posts: 622
Joined: Tue Dec 07, 2010 3:05 am

Re: Project Log: Superheavy Assault Walker

Postby Arkangel » Tue Feb 15, 2011 11:25 pm

Well I did a Ghillie suit for a catachan sniper before they came out. It was fairly easy to do although doing it again I would take a lot more time over it. Using reference material helps especially if you've never had to make one for real. If I was going to do it again I would recommend getting as much ref material as possible from different military sources. So you've got any number of SF units to choose from and it you know anyone that has COD black ops you could have a look at the 'Ghost' Perk kitted out to see a few different ideas?
They other thing is the layering of the 'Burlap' material which makes the suit. It's basically hessian strips rolled into balls to make it kinda go 'fluffy' and then you start at the bottom and work your way up. Most of the real suits I've seen up close and personal look nothing like the 'Wookie' type ones you see on the net, and are very minimal on the front and the majority of the material is on the back/side of the legs for the trousers. And the Jacket is devoid of burlap on the front for the majority but the arms/back and hood are covered.
There are also some good films you can watch for 'Research' purposes :lol: Sniper - with Tom Beringer and Billy Zane (Obviously!!! :roll: ) And then you have Clear and Present Danger - 3rd Jack Ryan film with Harrison Ford and Willem Defoe, which has the Marine Recon team with Sniper.
As for desert specific stuff it just the same stuff died a different colour.
HOWEVER.....those suits are really hot once you've been in them for about.....30 seconds!!
MJ maybe able to point you in the right direction?

Just remember SHINE, SHAPE, SHADOW, SILHOUETTE, MOVEMENT :mrgreen:
Hey do me a favour, point that thing somewhere else!

http://photobucket.com/Arkangel_bucket
User avatar
Arkangel
Habit
 
Posts: 316
Joined: Mon Oct 26, 2009 8:31 am
Location: UK

Re: Project Log: Superheavy Assault Walker

Postby Arkangel » Tue Feb 15, 2011 11:26 pm

Damn MJ posted while I was writing :oops:

So anyway...yeah everything he said :evil:
Hey do me a favour, point that thing somewhere else!

http://photobucket.com/Arkangel_bucket
User avatar
Arkangel
Habit
 
Posts: 316
Joined: Mon Oct 26, 2009 8:31 am
Location: UK

Re: Project Log: Superheavy Assault Walker

Postby blind pig » Wed Feb 16, 2011 12:29 am

Surgical gauze.

close weave when you want it, can be enlarged to open up the weave by pulling a little on the edges.

Also comes in green or white.
blind pig
Junkie
 
Posts: 581
Joined: Fri Feb 19, 2010 2:41 am
Location: Brisbane Australia

Re: Project Log: Superheavy Assault Walker

Postby mangozac » Wed Feb 16, 2011 6:32 am

Oh yeah I can make that....
User avatar
mangozac
Resin Addict Collaborator
 
Posts: 4271
Joined: Fri Oct 16, 2009 3:40 pm
Location: QLD, Australia

Re: Project Log: Superheavy Assault Walker

Postby Arkangel » Wed Feb 16, 2011 7:34 am

There's always the possibility of painting them in a camoflage pattern to match their surroundings? The New MTP being used by UK forces is a slant on the MultiCam(TM) produced by Crye Precision which was made popular by the Ghost Recon: Advanced Warfighter video game. And was produced for a real life answer to a single camo option instead of multiple camo's for different enviroments.
MC 1.jpg
Spot the good guys in MultiCam

There are 8 Guys in that pic!!! :mrgreen:
MC 4.jpg
And Here?

MC 3.jpg


Just a couple I dragged off the Crye site. This stuff is the SHIT!!! :mrgreen:
And it's comfy too like slippers :lol:
Hey do me a favour, point that thing somewhere else!

http://photobucket.com/Arkangel_bucket
User avatar
Arkangel
Habit
 
Posts: 316
Joined: Mon Oct 26, 2009 8:31 am
Location: UK

Re: Project Log: Superheavy Assault Walker

Postby mangozac » Wed Feb 16, 2011 8:56 am

Wow! That is really amazing stuff and would make me feel much better about wearing camo if I were in the military!

It's probably a good solution though - paint the Pathfinders in a desert camo pattern and just hope that their profile (raised from the ground) makes them visible enough to the viewer. I'll have to make sure that the ground is otherwise quite plain - I was thinking of doing some small shrubs but will just stick to sparse grasses and a few rocks.
Oh yeah I can make that....
User avatar
mangozac
Resin Addict Collaborator
 
Posts: 4271
Joined: Fri Oct 16, 2009 3:40 pm
Location: QLD, Australia

Re: Project Log: Superheavy Assault Walker

Postby Munkey Joe » Wed Feb 16, 2011 12:29 pm

Bartertown Trades:
EBay feedback:
My FAIL Forums:
User avatar
Munkey Joe
Junkie
 
Posts: 622
Joined: Tue Dec 07, 2010 3:05 am

Next

Return to Modelling

Who is online

Users browsing this forum: No registered users and 1 guest

cron