[phpBB Debug] PHP Warning: in file [ROOT]/includes/bbcode.php on line 483: preg_replace(): The /e modifier is no longer supported, use preg_replace_callback instead
[phpBB Debug] PHP Warning: in file [ROOT]/includes/bbcode.php on line 483: preg_replace(): The /e modifier is no longer supported, use preg_replace_callback instead
[phpBB Debug] PHP Warning: in file [ROOT]/includes/bbcode.php on line 483: preg_replace(): The /e modifier is no longer supported, use preg_replace_callback instead
[phpBB Debug] PHP Warning: in file [ROOT]/includes/bbcode.php on line 483: preg_replace(): The /e modifier is no longer supported, use preg_replace_callback instead
[phpBB Debug] PHP Warning: in file [ROOT]/includes/bbcode.php on line 483: preg_replace(): The /e modifier is no longer supported, use preg_replace_callback instead
[phpBB Debug] PHP Warning: in file [ROOT]/includes/bbcode.php on line 483: preg_replace(): The /e modifier is no longer supported, use preg_replace_callback instead
[phpBB Debug] PHP Warning: in file [ROOT]/includes/bbcode.php on line 483: preg_replace(): The /e modifier is no longer supported, use preg_replace_callback instead
[phpBB Debug] PHP Warning: in file [ROOT]/includes/bbcode.php on line 483: preg_replace(): The /e modifier is no longer supported, use preg_replace_callback instead
[phpBB Debug] PHP Warning: in file [ROOT]/includes/bbcode.php on line 483: preg_replace(): The /e modifier is no longer supported, use preg_replace_callback instead
[phpBB Debug] PHP Warning: in file [ROOT]/includes/bbcode.php on line 483: preg_replace(): The /e modifier is no longer supported, use preg_replace_callback instead
[phpBB Debug] PHP Warning: in file [ROOT]/includes/bbcode.php on line 483: preg_replace(): The /e modifier is no longer supported, use preg_replace_callback instead
[phpBB Debug] PHP Warning: in file [ROOT]/includes/bbcode.php on line 483: preg_replace(): The /e modifier is no longer supported, use preg_replace_callback instead
[phpBB Debug] PHP Warning: in file [ROOT]/includes/bbcode.php on line 483: preg_replace(): The /e modifier is no longer supported, use preg_replace_callback instead
[phpBB Debug] PHP Warning: in file [ROOT]/includes/bbcode.php on line 483: preg_replace(): The /e modifier is no longer supported, use preg_replace_callback instead
[phpBB Debug] PHP Warning: in file [ROOT]/includes/bbcode.php on line 483: preg_replace(): The /e modifier is no longer supported, use preg_replace_callback instead
[phpBB Debug] PHP Warning: in file [ROOT]/includes/bbcode.php on line 483: preg_replace(): The /e modifier is no longer supported, use preg_replace_callback instead
[phpBB Debug] PHP Warning: in file [ROOT]/includes/bbcode.php on line 483: preg_replace(): The /e modifier is no longer supported, use preg_replace_callback instead
[phpBB Debug] PHP Warning: in file [ROOT]/includes/bbcode.php on line 483: preg_replace(): The /e modifier is no longer supported, use preg_replace_callback instead
[phpBB Debug] PHP Warning: in file [ROOT]/includes/bbcode.php on line 483: preg_replace(): The /e modifier is no longer supported, use preg_replace_callback instead
[phpBB Debug] PHP Warning: in file [ROOT]/includes/bbcode.php on line 483: preg_replace(): The /e modifier is no longer supported, use preg_replace_callback instead
[phpBB Debug] PHP Warning: in file [ROOT]/includes/bbcode.php on line 483: preg_replace(): The /e modifier is no longer supported, use preg_replace_callback instead
[phpBB Debug] PHP Warning: in file [ROOT]/includes/bbcode.php on line 483: preg_replace(): The /e modifier is no longer supported, use preg_replace_callback instead
[phpBB Debug] PHP Warning: in file [ROOT]/includes/bbcode.php on line 483: preg_replace(): The /e modifier is no longer supported, use preg_replace_callback instead
[phpBB Debug] PHP Warning: in file [ROOT]/includes/bbcode.php on line 483: preg_replace(): The /e modifier is no longer supported, use preg_replace_callback instead
[phpBB Debug] PHP Warning: in file [ROOT]/includes/bbcode.php on line 483: preg_replace(): The /e modifier is no longer supported, use preg_replace_callback instead
[phpBB Debug] PHP Warning: in file [ROOT]/includes/bbcode.php on line 483: preg_replace(): The /e modifier is no longer supported, use preg_replace_callback instead
[phpBB Debug] PHP Warning: in file [ROOT]/includes/bbcode.php on line 379: preg_replace(): The /e modifier is no longer supported, use preg_replace_callback instead
[phpBB Debug] PHP Warning: in file [ROOT]/includes/bbcode.php on line 112: preg_replace(): The /e modifier is no longer supported, use preg_replace_callback instead
[phpBB Debug] PHP Warning: in file [ROOT]/includes/bbcode.php on line 112: preg_replace(): The /e modifier is no longer supported, use preg_replace_callback instead
[phpBB Debug] PHP Warning: in file [ROOT]/includes/bbcode.php on line 112: preg_replace(): The /e modifier is no longer supported, use preg_replace_callback instead
Resin Addict Forum • View topic - Split Mould Casting Technique
ATTENTION: As of March 2017 the Resin Addict Forums are being wound down.
New members are no longer being accepted. Read more about it here.

Split Mould Casting Technique

Tutorials and resources. Beginners start in here!

Moderator: Wardens

Split Mould Casting Technique

Postby mangozac » Sun Oct 10, 2010 11:35 am

Attachments
splitmould1.jpg
splitmould2.jpg
splitmould3.jpg
splitmould4.jpg
splitmould5.jpg
Oh yeah I can make that....
User avatar
mangozac
Resin Addict Collaborator
 
Posts: 4271
Joined: Fri Oct 16, 2009 3:40 pm
Location: QLD, Australia

Re: Split Mould Casting Technique

Postby blind pig » Sun Oct 10, 2010 12:31 pm

Great tutorial Mangozac!

I should PM you more often when you're drunk at 1am. :lol:

Split moulds are my prefered method of casting for ease of manufature. Other companies - such as Forgeworld - use split mould for a great deal of their casting, for the reasons you state.

FW use split moulds for quite large model parts, including Reaver Titan legs!

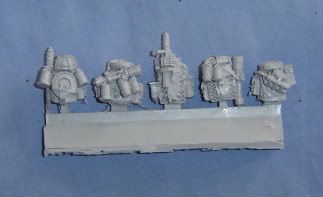
Here is a pic of the backpacks from the FW ORK KOMMANDO CONVERSION SET. As you can see, they use the same process as above for *very* detailed items. The overall length of the casting is a bit under 120mm.
Image
Image
blind pig
Junkie
 
Posts: 581
Joined: Fri Feb 19, 2010 2:41 am
Location: Brisbane Australia

Re: Split Mould Casting Technique

Postby Kennui » Wed Oct 13, 2010 2:03 am

Now i know why FW stuff have such huge tabs which seem like a waste of resin.

I popped into barnes the other day, lady was busy with others so i didnt have a chat but saw some cool stuff. Like FOAM!

Foam looks like a ton of fun. Foam marines. Yummmmmm.

Or in your case, foam plasma pistol. :lol:
Kennui
Casual
 
Posts: 30
Joined: Tue Dec 29, 2009 12:25 am

Re: Split Mould Casting Technique

Postby blind pig » Wed Oct 13, 2010 10:57 am

blind pig
Junkie
 
Posts: 581
Joined: Fri Feb 19, 2010 2:41 am
Location: Brisbane Australia

Re: Split Mould Casting Technique

Postby josh76 » Tue Nov 02, 2010 10:22 am

Hi mangozac

I found this guide and have been playing around with split moulds for the last few days.

Previously I'd been making 2 part moulds with pinkysil and only had limited success, there would be a lot work to do once id poured and a substantial amount of resin/pinky wasted, also really severe flashing.

I've found the split moulds to work incredibly well, especially with no pressure/vacuum (something i may progress in to in the future).

Initially I had some air bubble problems due to the relatively small openings, i tried using the technique you described of squeezing the mould to try and fill the cavity but still had some issues. Then I had the thought of needling out these bubbles, essentially just sticking a needle in to the cavity to get it fulled up and it worked really well. For the first time I have two pours that I can use everything on. Very pleasing.

Thanks for the great explanation.

Cheers
Josh.
josh76
Casual
 
Posts: 2
Joined: Tue Nov 02, 2010 10:13 am

Re: Split Mould Casting Technique

Postby mangozac » Wed Nov 03, 2010 8:34 am

Hi Josh, congratulations on being our 100th member! Thankyou for giving such great feedback, it's really great to hear that people are finding this site to useful and improving their skills.

I'm not sure I quite follow you on this "needling" technique. Any chance you could elaborate a bit more? Would it be possible to see pictures of your results?
Oh yeah I can make that....
User avatar
mangozac
Resin Addict Collaborator
 
Posts: 4271
Joined: Fri Oct 16, 2009 3:40 pm
Location: QLD, Australia

Re: Split Mould Casting Technique

Postby amphoterik » Fri Nov 05, 2010 9:27 pm

I made a split mold based on this tutorial, and was gonna send pictures of my results. Unfortunately, my results came out horrible. A little more practice I think.
amphoterik
Casual
 
Posts: 28
Joined: Sun Oct 17, 2010 1:30 pm

Re: Split Mould Casting Technique

Postby mangozac » Fri Nov 05, 2010 9:29 pm

What went wrong? The mould or the cast? It would still be educational if you could share pics anyway...
Oh yeah I can make that....
User avatar
mangozac
Resin Addict Collaborator
 
Posts: 4271
Joined: Fri Oct 16, 2009 3:40 pm
Location: QLD, Australia

Re: Split Mould Casting Technique

Postby amphoterik » Fri Nov 05, 2010 11:03 pm

Well, the problem is twofold. The first is that I failed to make a cut along the molded object, but beside it. This has resulted in problem 2: air bubbles like crazy. I haven't given up on the mold yet, I just am practicing with it to see what I can do better.

I will see about pictures a little later.
amphoterik
Casual
 
Posts: 28
Joined: Sun Oct 17, 2010 1:30 pm

Re: Split Mould Casting Technique

Postby factor40 » Wed May 04, 2011 11:28 am

Is it possible to get some insight as to how your example would apply to making a mold of, say, 5 guns? My question is...how do you deal withe the silicone that is in between each piece?


User avatar
factor40
Habit
 
Posts: 347
Joined: Tue Apr 26, 2011 5:01 am
Location: Arlington Heights, IL, USA

Re: Split Mould Casting Technique

Postby mangozac » Wed May 04, 2011 12:40 pm

Oh yeah I can make that....
User avatar
mangozac
Resin Addict Collaborator
 
Posts: 4271
Joined: Fri Oct 16, 2009 3:40 pm
Location: QLD, Australia

Re: Split Mould Casting Technique

Postby factor40 » Thu May 05, 2011 1:34 am

Ah...no need for a drawing, the light just went on :)


User avatar
factor40
Habit
 
Posts: 347
Joined: Tue Apr 26, 2011 5:01 am
Location: Arlington Heights, IL, USA

Re: Split Mould Casting Technique

Postby Seb » Wed May 11, 2011 11:33 pm

Great tute Zac, clearly you've come back from your trip refreshed :D

I should get back into basic level casting again, have several ideas that really are best suited to reproduction of key parts.

Bookmarked!
Seb.
User avatar
Seb
Resin Addict Collaborator
 
Posts: 205
Joined: Wed Oct 21, 2009 2:03 pm
Location: Escapee

Re: Split Mould Casting Technique

Postby mangozac » Thu May 12, 2011 7:12 am

Haha you know this tute is about 7 months old now Seb? No matter ;)

You know if you do need any odd parts reproduced drop me a line and I can sort you out!
Oh yeah I can make that....
User avatar
mangozac
Resin Addict Collaborator
 
Posts: 4271
Joined: Fri Oct 16, 2009 3:40 pm
Location: QLD, Australia

Re: Split Mould Casting Technique

Postby Seb » Fri May 20, 2011 6:13 pm

Aargh!.. seven months? :shock:

Was browsing 'New Posts', this must have been one I missed from my big catch up session a while back.

Looks like I need a holiday then. I'll get my bags.

- Seb. :D
User avatar
Seb
Resin Addict Collaborator
 
Posts: 205
Joined: Wed Oct 21, 2009 2:03 pm
Location: Escapee

Next

Return to Advisory

Who is online

Users browsing this forum: No registered users and 2 guests