[phpBB Debug] PHP Warning: in file [ROOT]/includes/bbcode.php on line 483: preg_replace(): The /e modifier is no longer supported, use preg_replace_callback instead
[phpBB Debug] PHP Warning: in file [ROOT]/includes/bbcode.php on line 483: preg_replace(): The /e modifier is no longer supported, use preg_replace_callback instead
[phpBB Debug] PHP Warning: in file [ROOT]/includes/bbcode.php on line 483: preg_replace(): The /e modifier is no longer supported, use preg_replace_callback instead
[phpBB Debug] PHP Warning: in file [ROOT]/includes/bbcode.php on line 483: preg_replace(): The /e modifier is no longer supported, use preg_replace_callback instead
[phpBB Debug] PHP Warning: in file [ROOT]/includes/bbcode.php on line 483: preg_replace(): The /e modifier is no longer supported, use preg_replace_callback instead
[phpBB Debug] PHP Warning: in file [ROOT]/includes/bbcode.php on line 483: preg_replace(): The /e modifier is no longer supported, use preg_replace_callback instead
[phpBB Debug] PHP Warning: in file [ROOT]/includes/bbcode.php on line 483: preg_replace(): The /e modifier is no longer supported, use preg_replace_callback instead
[phpBB Debug] PHP Warning: in file [ROOT]/includes/bbcode.php on line 483: preg_replace(): The /e modifier is no longer supported, use preg_replace_callback instead
[phpBB Debug] PHP Warning: in file [ROOT]/includes/bbcode.php on line 483: preg_replace(): The /e modifier is no longer supported, use preg_replace_callback instead
[phpBB Debug] PHP Warning: in file [ROOT]/includes/bbcode.php on line 483: preg_replace(): The /e modifier is no longer supported, use preg_replace_callback instead
[phpBB Debug] PHP Warning: in file [ROOT]/includes/bbcode.php on line 483: preg_replace(): The /e modifier is no longer supported, use preg_replace_callback instead
[phpBB Debug] PHP Warning: in file [ROOT]/includes/bbcode.php on line 483: preg_replace(): The /e modifier is no longer supported, use preg_replace_callback instead
[phpBB Debug] PHP Warning: in file [ROOT]/includes/bbcode.php on line 483: preg_replace(): The /e modifier is no longer supported, use preg_replace_callback instead
[phpBB Debug] PHP Warning: in file [ROOT]/includes/bbcode.php on line 483: preg_replace(): The /e modifier is no longer supported, use preg_replace_callback instead
[phpBB Debug] PHP Warning: in file [ROOT]/includes/bbcode.php on line 483: preg_replace(): The /e modifier is no longer supported, use preg_replace_callback instead
[phpBB Debug] PHP Warning: in file [ROOT]/includes/bbcode.php on line 483: preg_replace(): The /e modifier is no longer supported, use preg_replace_callback instead
[phpBB Debug] PHP Warning: in file [ROOT]/includes/bbcode.php on line 483: preg_replace(): The /e modifier is no longer supported, use preg_replace_callback instead
[phpBB Debug] PHP Warning: in file [ROOT]/includes/bbcode.php on line 483: preg_replace(): The /e modifier is no longer supported, use preg_replace_callback instead
[phpBB Debug] PHP Warning: in file [ROOT]/includes/bbcode.php on line 483: preg_replace(): The /e modifier is no longer supported, use preg_replace_callback instead
[phpBB Debug] PHP Warning: in file [ROOT]/includes/bbcode.php on line 483: preg_replace(): The /e modifier is no longer supported, use preg_replace_callback instead
[phpBB Debug] PHP Warning: in file [ROOT]/includes/bbcode.php on line 483: preg_replace(): The /e modifier is no longer supported, use preg_replace_callback instead
[phpBB Debug] PHP Warning: in file [ROOT]/includes/bbcode.php on line 483: preg_replace(): The /e modifier is no longer supported, use preg_replace_callback instead
[phpBB Debug] PHP Warning: in file [ROOT]/includes/bbcode.php on line 483: preg_replace(): The /e modifier is no longer supported, use preg_replace_callback instead
[phpBB Debug] PHP Warning: in file [ROOT]/includes/bbcode.php on line 483: preg_replace(): The /e modifier is no longer supported, use preg_replace_callback instead
[phpBB Debug] PHP Warning: in file [ROOT]/includes/bbcode.php on line 483: preg_replace(): The /e modifier is no longer supported, use preg_replace_callback instead
[phpBB Debug] PHP Warning: in file [ROOT]/includes/bbcode.php on line 483: preg_replace(): The /e modifier is no longer supported, use preg_replace_callback instead
[phpBB Debug] PHP Warning: in file [ROOT]/includes/bbcode.php on line 112: preg_replace(): The /e modifier is no longer supported, use preg_replace_callback instead
Resin Addict Forum • View topic - Painting Log: Superheavy Assault Walker
ATTENTION: As of March 2017 the Resin Addict Forums are being wound down.
New members are no longer being accepted. Read more about it here.

Painting Log: Superheavy Assault Walker

Discussion of painting

Moderator: Wardens

Painting Log: Superheavy Assault Walker

Postby mangozac » Sun Apr 29, 2012 7:05 pm

Following on from

Some small progress this weekend: painting has begun!

First up, last weekend while playing around with the chassis I dropped it, smashing one of the vents that sits behind the top hatch. Although the vents were just Kotobukiya detailing bits, I didn't have any spare. But I did have the original SAW chassis mould! So I mixed up a little bit of resin and cast just that area, giving me a spare vent:
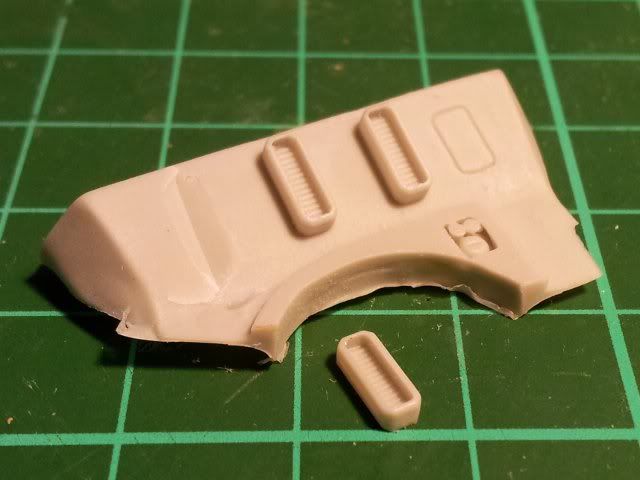
Image

Easy!

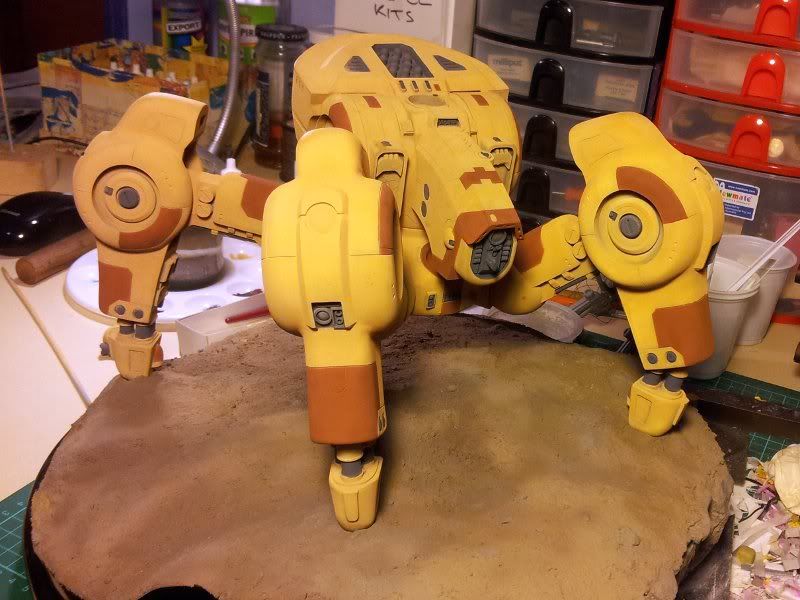
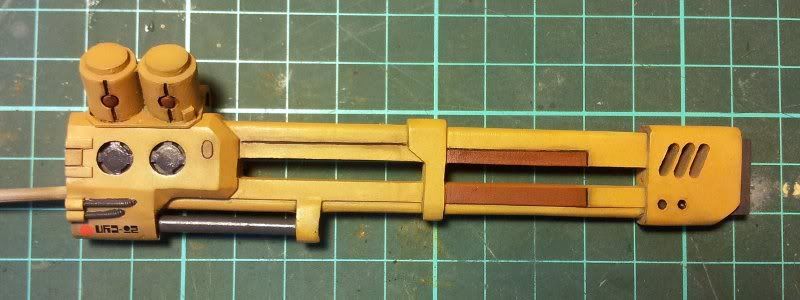
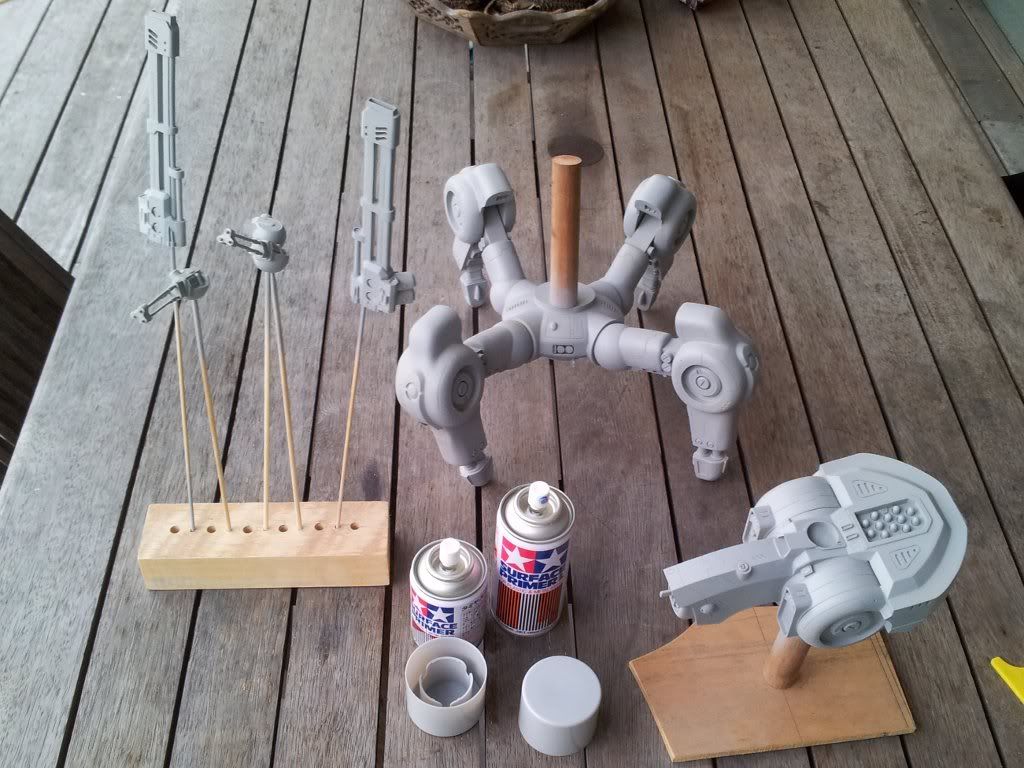
Before I could prime the parts I had to have a method of holding them while the paint is being applied. Since I had some threaded rod left over from the base I decided to use it and some wooden dowel to temporarily screw to the chassis assembly and legs assembly. These screwed into the chassis-pelvis joint areas so the holes would be hidden once assembled. The dowel for the chassis was then screwed to a piece of plywood for a base. The railguns, gattling cannons and sensor turret were all mounted on kebab skewers for painting.

My primer of choice is Tamiya Surface Primer (in the spray can). It's grey and in my experience gives superior adhesion (at least to styrene, which I admit is irrelevant here). Yes, it's more expensive than the cheap acrylic rattle cans people buy from Bunnings to prime with, but for good models you've spent a lot of money on why risk it? Pro tip: buy the 180ml can; it's only a couple of dollars more than the 100ml can and gives you 80% more!

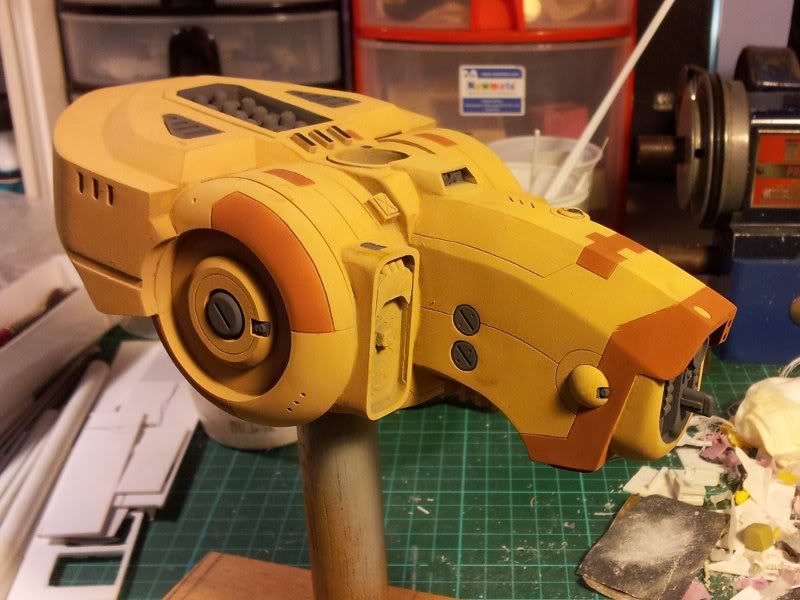
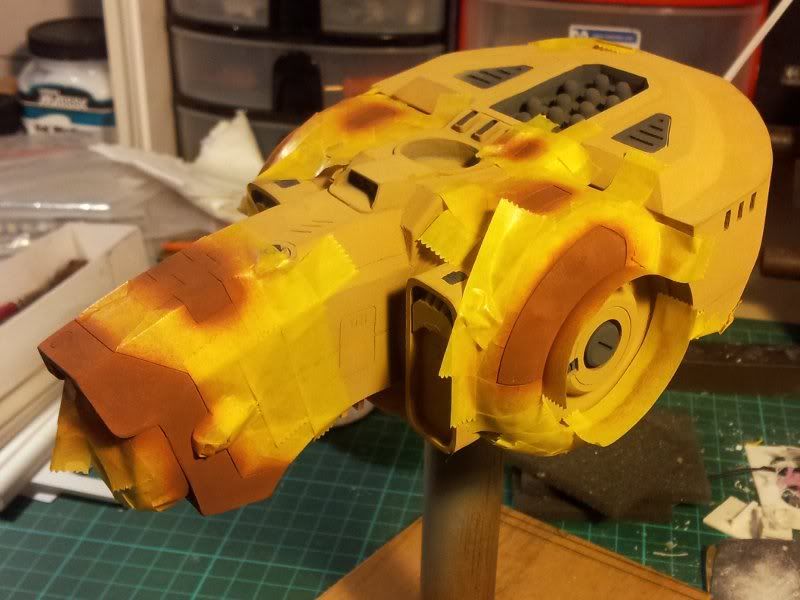
Here's how things looked post priming:

Image

Just like on a scratchbuild, the priming stage shows up all of the little flaws leftover from cleaning up the casts and gap filling. So I've done a quick run around with some . Those spots will need some quick sanding later, then some touch up with the primer and priming will be complete.

Since this is my first time airbrushing a model I've been hassling my mate Jas for a lot of painting advice. He's an awesome painter and if I can get this to turn out half a nicely as his I'll be happy!
After a lengthy phone call with him the other night I think I've got the process sussed. The next stage will be to airbrush everything black as the first step in pre-shading. Hopefully I'll get a chance to do this one night this week...

That's all for now!
Oh yeah I can make that....
User avatar
mangozac
Resin Addict Collaborator
 
Posts: 4271
Joined: Fri Oct 16, 2009 3:40 pm
Location: QLD, Australia

Re: Painting Log: Superheavy Assault Walker

Postby Munkey Joe » Thu May 03, 2012 1:34 am

NIce start Bud!!! Cant wait till your well under way!!

And your friends IG are just Ace..... :mrgreen:
Bartertown Trades:
EBay feedback:
My FAIL Forums:
User avatar
Munkey Joe
Junkie
 
Posts: 622
Joined: Tue Dec 07, 2010 3:05 am

Re: Painting Log: Superheavy Assault Walker

Postby mangozac » Thu May 03, 2012 7:39 pm

Oh yeah I can make that....
User avatar
mangozac
Resin Addict Collaborator
 
Posts: 4271
Joined: Fri Oct 16, 2009 3:40 pm
Location: QLD, Australia

Re: Painting Log: Superheavy Assault Walker

Postby mangozac » Sun May 13, 2012 8:45 pm

Alright I've been doing a lot of painting this last week (this is what's been keeping me from the Centurion)! First real painting I've done in quite a while actually! Since much of this painting process has been an educational exercise I haven't documented much of it. But I felt that things are starting to look pretty smart now so I would take a pic ;)

Massive props go to Jas for his continual tuition (both in person and via my steady stream of messages) ;)

The technique I'm using (as taught by Jas) is "preshading" based. The process goes like this:
1. Prime (I used Tamiya Surface Primer rattle can which is grey)
2. Airbrush a black coat over the entire model
3. Airbrush a white coat, heavier on the upper surfaces (and almost non-existant on the lower surfaces) but avoiding the panel lines.
4. Coat the entire model in the base colour. The pre-shading should leave subtle variations.
5. Mask off alternate colour areas and airbrush them
6. Hand paint dark grey "metal" areas

And that brings us to where I am now. Well kind of - I'm yet to do the alternate colour areas for the legs assembly. The upcoming steps will be something like:

7. Coat with a gloss clear (wanted to use Pledge One Go but it's not available in Oz anymore :()
8. Use oil paints to do all of the panel lining and vent areas.
9. Apply decals
10. Gloss clear coat again
11. Chipping and final detailing
12. Matte clear coat

Anyway I actually did a lot of agonising over the weekend trying to decide what secondary colour to use on the SAW. I had a look through IA3: Taros Campaign, paying particular attention to the Tau aircraft colour schemes.

There was one I liked with white detail panels, but I decided that in order to pull it off the desert yellow colour would need a brown camouflage pattern applied (as per the Barracuda in question in IA3). I really wanted to avoid doing camo on this model if I could help it (would rather practice on something else first!) so I was leaning back towards brown detail panels (from another Barracuda). In the end I bit the bullet and picked up a pot of Tamiya Nato Brown. I masked around some panels with Tamiya tape (seriously, the most awesome tape around!) and hit it with the airbrush late this arvo (yes, after spending Mothers Day with my dear Mum).

I'm definitely pleased with the results:

Image

And that's us up to date! I'll get the legs assembly taped up over the next couple of nights and then hit them with the brown too. Then I have to track down a decent gloss varnish that I can airbrush. Jas was kind enough to offer some of his Pledge but I do need a more sustainable solution...
Oh yeah I can make that....
User avatar
mangozac
Resin Addict Collaborator
 
Posts: 4271
Joined: Fri Oct 16, 2009 3:40 pm
Location: QLD, Australia

Re: Painting Log: Superheavy Assault Walker

Postby mangozac » Thu May 17, 2012 9:38 pm

More painting done!

First up a shot showing what the masking is like. Fun fun! I've gone through a bit of Tamiya tape on this project (need to buy some more 10mm wide type).

Image

And next the one everybody has been waiting for! I unscrewed my "painting handles" and sat it all together on the base to see how it's coming together:

Image

Probably wasn't optimal to do the lower legs in brown like that, but there's no turning back now! Oh and my taping was a bit anaemic so I've got a few spots of brown overspray on the desert yellow. I'll fix them up on the weekend. Overall I'm pretty happy with how it's turning out. Obviously it still has a long way to go, but just having three colours applied really gives a feeling of progress.

Remember how I said I thought I'd damaged my airbrush needle? Well it turns out I didn't. I think I just needed to strip it right back and give it a really good clean out. I might have had needles and nozzles mixed up too. Last night I carefully matched up the needles and corresponding nozzles and am now running my beloved 0.3mm combo again. 0.3mm really is the perfect size!

Next major step: gloss coat in preparation for oil panel lining and washing.

I guess I'd best start painting up my figures - will probably hit them with the airbrush too! Oh my Forge World tank commander turned up too so now I have to bring myself to chopping off his legs so he can be mounted in the SAW top hatch.
Oh yeah I can make that....
User avatar
mangozac
Resin Addict Collaborator
 
Posts: 4271
Joined: Fri Oct 16, 2009 3:40 pm
Location: QLD, Australia

Re: Painting Log: Superheavy Assault Walker

Postby pat » Tue Jun 12, 2012 12:05 pm

That looks great!
pat
Casual
 
Posts: 10
Joined: Sat Dec 24, 2011 5:33 pm
Location: Hawaii

Re: Painting Log: Superheavy Assault Walker

Postby Vaaish » Tue Jun 12, 2012 11:05 pm

coming along nicely. The Strike cruisers I'm working up are making me wish I'd picked up and used an airbrush for all the time they are taking to build up the tone.
-Vaaish
Vaaish
Junkie
 
Posts: 827
Joined: Sat Oct 31, 2009 7:55 am
Location: Greenville, SC

Re: Painting Log: Superheavy Assault Walker

Postby mangozac » Wed Jun 13, 2012 12:38 pm

Thanks guys. Yeah it's looking even better now that I've got the decals on. Just need to give it some more coats of clear then it's ready for oils. Unfortunately I'm suffering from a bit of hobby burnout at the moment and haven't touched any of my projects in a couple of weeks :(

It would be interesting to see how such intricate models as BFG ships would be airbrushed...
Oh yeah I can make that....
User avatar
mangozac
Resin Addict Collaborator
 
Posts: 4271
Joined: Fri Oct 16, 2009 3:40 pm
Location: QLD, Australia

Re: Painting Log: Superheavy Assault Walker

Postby Vaaish » Wed Jun 13, 2012 1:57 pm

If the technique using black and white spray paint that the BFG rulebooks addvocate, quite well I think. Airbrush would give more more control and combined with brushed sharp highlights I think you'd have a look far superior to drybrushing and washes.
-Vaaish
Vaaish
Junkie
 
Posts: 827
Joined: Sat Oct 31, 2009 7:55 am
Location: Greenville, SC

Re: Painting Log: Superheavy Assault Walker

Postby mangozac » Wed Jun 13, 2012 3:37 pm

Oh yeah I'd forgotten about that! Have you done much airbrushing? Perhaps it would be a good technique to use on my Ramilies, which is sitting stashed away, grey and unloved...
Oh yeah I can make that....
User avatar
mangozac
Resin Addict Collaborator
 
Posts: 4271
Joined: Fri Oct 16, 2009 3:40 pm
Location: QLD, Australia

Re: Painting Log: Superheavy Assault Walker

Postby mangozac » Sun Aug 26, 2012 10:15 am

You know it's not a good start to trying out a new hobby technique when the new tube of oil paint explodes when you open it... :(

So yesterday I picked up some oil paints and some odourless thinner. They are Winsor and Newton series 1 paints and I was quite surprised how expensive they are, but since that's what all the other hobbyists around here seem to recommend that's what I went with. I'm waiting for my painting tutor Jas to get back from an overseas trip but figured what the hell I might as well have a go at using the oils to blacken the panel lines.

I got everything set up and unscrewed the lid from the tube of black paint. Bam! There must have been a LOT of excess pressure in the tube as I ended up with black oil paint everywhere. Not a good start! Fortunately the SAW wasn't in the immediate vicinity so it avoided any paint shrapnel. To say I was not impressed would be an understatement. Now I was under the impression that oils are supposed to be a breeze to clean up using thinners. Not so. I now have a jumper covered in black specks and marks all over my messy work hobby bench (where I do my airbrushing and casting).

Still I decided I've made a mess I might as well continue on. So I grabbed the railguns from the SAW. I mixed up a wash by dropping some black paint into some thinners and started applying it to the panel lines on the railguns. Capillary action works well and sucks the wash everywhere. I was starting to feel confident! But I then noticed that as the was mixture dried there was very little pigment left over. So I had to do each panel line a couple of times. Oh well not such a big deal. I did find that by ensuring constant agitation of the jar in which I made the wash I could achieve a better pigmentation - I guess the paint separates from the thinner pretty quickly.

OK we're halfway there. I let it dry for a short while and then got out the Q-tips. I dunked them in the thinners, wiped off the excess and then began wiping the excess oil paint from around the panel lines. What a mess! I found that although the bulk of the paint was removed, what was left was a faint smudge of black around the area. No amount of rubbing, even with a fresh Q-tip would help. So at the moment my railguns look like this:

Image

I guessing the problem here is that my clear coat is not glassy enough. I'm using Pascoes Long Life, since Johnson's Klear and Pledge One Go are no longer available here in Oz, but from other reports Pascoes is supposed to work just fine. Perhaps I need to concentrate on getting a more consistent, physically flat coating so that the oil paint can't sit in the tiny divots in the finish caused by an uneven coat?

The only good thing is that I didn't get too excited and do the main chassis and legs of the SAW, so I've got a chance to give it some more coats of clear first. I might just have to wait until Jas gets back before I can work up the courage to do that!
Oh yeah I can make that....
User avatar
mangozac
Resin Addict Collaborator
 
Posts: 4271
Joined: Fri Oct 16, 2009 3:40 pm
Location: QLD, Australia

Re: Painting Log: Superheavy Assault Walker

Postby Vaaish » Sun Aug 26, 2012 1:47 pm

Hmm. I wonder if you have your paint too thin and perhaps you are letting it sit too long. Oils shouldn't dry that quickly, in fact they should take overnight to dry enough to paint over. Of course I don't know that I'd use oils for paneling, more of a shading and fading effect.
-Vaaish
Vaaish
Junkie
 
Posts: 827
Joined: Sat Oct 31, 2009 7:55 am
Location: Greenville, SC

Re: Painting Log: Superheavy Assault Walker

Postby mangozac » Sun Aug 26, 2012 5:10 pm

Yeah, that's why I'm wondering if the problem isn't due to the paint being drawn into the pitted gloss surface. My underlying airbrushing really isn't very smooth and has quite a rough texture. I've since hit the rest of the model with another super thick coat of clear, to the point that it now feels pretty smooth. So perhaps that will provide better results?

The other alternative of course is just to go back to acrylics for the panel lines, which is very tempting. I can just mix some retarder in with the black acrylic to create a thin paint that can be quickly and easily removed if I screw something up. I'll wait and see what Jas has to say.

As far as I understand it's common enough for those who are used to working with oils to use them for panel lining. I watched this video for instruction: . I also read good tutorial on ATT.
Oh yeah I can make that....
User avatar
mangozac
Resin Addict Collaborator
 
Posts: 4271
Joined: Fri Oct 16, 2009 3:40 pm
Location: QLD, Australia

Re: Painting Log: Superheavy Assault Walker

Postby mangozac » Sun Jan 20, 2013 11:26 am

Epic does not even begin to describe the journey that has been this project. From such humble beginnings in early 2008, far before Resin Addict was even dreamed of, I embarked on my first scratchbuilding project. The sheer amount I learned along the way was just mind blowing and after two years of construction it was finally completed. The problem was that after such an epic modelling project I found myself burned out and since I didn't play 40k any more I had no desire to actually build up one of my own!

It was over a year later that I decided I was ready to build up my own SAW kit to proudly display. The problem is that it has taken me almost another two years to finish the damn thing! Due to the size of it just making the base was a mission in itself.

Just like with the original scratchbuild, painting has been a massive educational adventure too. This was my first time using "advanced" modelling techniques such as airbrushing, clear coats, oil paints and using pigments for anything other than rust. I screwed up a lot along the way and the finished model still isn't perfect, but it's good enough that for now at least I'm happy to call it done.

So enough jibber-jabber and on to the pictures. Thanks to our beautiful Queensland Summer weather light levels were perfect to take photos this morning. I didn't take a massive number of shots - I figure I can always take more another time if need be ;)


The next project I'll be completing is a new BFG ship, followed by painting either a Warhound Titan or an FDV1Mako kit from Filbot (yet to decide which one to do first). I guess I'll get stuck back into the Centurion again some time this year so I can get it finished off...

Enjoy!
Oh yeah I can make that....
User avatar
mangozac
Resin Addict Collaborator
 
Posts: 4271
Joined: Fri Oct 16, 2009 3:40 pm
Location: QLD, Australia

Re: Painting Log: Superheavy Assault Walker

Postby Arkangel » Sun Jan 20, 2013 8:23 pm

After following this from Concept to miniature, and miniature production to paint, I have to say I feel slightly privaledged to be part of the journey over the last few years.

At every turn you've listened to friends and strangers alike, some of those strangers even became friends :mrgreen:
And taken it from a 'what-if Tau had a titan' concept, to one of the most iconic non-FW/GW produced miniatures to grace the 40K universe.

My hat's off to you mate. Thanks for the journey. I look forward to our next one. :mrgreen:
Hey do me a favour, point that thing somewhere else!

http://photobucket.com/Arkangel_bucket
User avatar
Arkangel
Habit
 
Posts: 316
Joined: Mon Oct 26, 2009 8:31 am
Location: UK

Next

Return to Painting

Who is online

Users browsing this forum: No registered users and 0 guests

cron