ATTENTION: As of March 2017 the Resin Addict Forums are being wound down. New members are no longer being accepted. Read more about it here.
Resin Addict Forum
A place to talk about your addiction
Paint chipping hairspray technique test
Moderator: Wardens
15 posts
• Page 1 of 1
Paint chipping hairspray technique test
![]() by mangozac » Sat Sep 22, 2012 3:27 pm
by mangozac » Sat Sep 22, 2012 3:27 pm
Oh yeah I can make that....
-

mangozac - Resin Addict Collaborator
- Posts: 4271
- Joined: Fri Oct 16, 2009 3:40 pm
- Location: QLD, Australia
Re: Paint chipping hairspray technique test
![]() by Munkey Joe » Sat Sep 22, 2012 9:55 pm
by Munkey Joe » Sat Sep 22, 2012 9:55 pm
Bartertown Trades:
EBay feedback:
My FAIL Forums:
EBay feedback:
My FAIL Forums:
-

Munkey Joe - Junkie
- Posts: 622
- Joined: Tue Dec 07, 2010 3:05 am
Re: Paint chipping hairspray technique test
![]() by mangozac » Sun Sep 23, 2012 9:59 am
by mangozac » Sun Sep 23, 2012 9:59 am
Yeah I do have a bottle of masking fluid so I should try that out too. My only reservation is that I don't expect the masking fluid technique to give the cool primer coat effect too...
Oh yeah I can make that....
-
mangozac - Resin Addict Collaborator
- Posts: 4271
- Joined: Fri Oct 16, 2009 3:40 pm
- Location: QLD, Australia
Re: Paint chipping hairspray technique test
![]() by Munkey Joe » Sun Sep 23, 2012 10:28 am
by Munkey Joe » Sun Sep 23, 2012 10:28 am
Bartertown Trades:
EBay feedback:
My FAIL Forums:
EBay feedback:
My FAIL Forums:
-
Munkey Joe - Junkie
- Posts: 622
- Joined: Tue Dec 07, 2010 3:05 am
Re: Paint chipping hairspray technique test
![]() by mangozac » Sun Sep 23, 2012 11:07 am
by mangozac » Sun Sep 23, 2012 11:07 am
I'm assembling the other barrels at the moment so I'll do a test with the masking fluid next. I'm also considering the salt technique for the even more pronounced 3D effect it seems to give.
I think I'll take a mould of one of the barrels so that I can have extras more easily in the future. A single drum could be done with a single part mould, which would be quicker and easier than all of the cleanup required after you glue the two halves of the Tamiya styrene drums together and then have to fill and file the seams.
The amount you remove with the hairspray technique does take some practice. It takes a few dabs with the brush to get the chipping to start, but once it does if you have too much water you will start removing big chunks pretty quickly. I think the best tool for the job would be a number 2 brush with it's bristles all chopped off to be only a couple of millimetres long.
Oh yeah I can make that....
-
mangozac - Resin Addict Collaborator
- Posts: 4271
- Joined: Fri Oct 16, 2009 3:40 pm
- Location: QLD, Australia
Re: Paint chipping hairspray technique test
![]() by Munkey Joe » Sun Sep 23, 2012 9:24 pm
by Munkey Joe » Sun Sep 23, 2012 9:24 pm
Bartertown Trades:
EBay feedback:
My FAIL Forums:
EBay feedback:
My FAIL Forums:
-
Munkey Joe - Junkie
- Posts: 622
- Joined: Tue Dec 07, 2010 3:05 am
Re: Paint chipping hairspray technique test
![]() by mangozac » Mon Sep 24, 2012 7:16 am
by mangozac » Mon Sep 24, 2012 7:16 am
That looks like a zombie like button with the tattered sleeve!
Oh yeah I can make that....
-
mangozac - Resin Addict Collaborator
- Posts: 4271
- Joined: Fri Oct 16, 2009 3:40 pm
- Location: QLD, Australia
Re: Paint chipping hairspray technique test
![]() by Seb » Mon Oct 01, 2012 9:26 am
by Seb » Mon Oct 01, 2012 9:26 am
Great tutorial on how you went about this - definitely marking it in my bookmarks.
And I agree.. looks like a Zombie 'Like'
And I agree.. looks like a Zombie 'Like'
-

Seb - Resin Addict Collaborator
- Posts: 205
- Joined: Wed Oct 21, 2009 2:03 pm
- Location: Escapee
Re: Paint chipping hairspray technique test
![]() by paulson games » Mon Oct 01, 2012 1:51 pm
by paulson games » Mon Oct 01, 2012 1:51 pm
Come on guys it's a hairy monkey wrist.  Although it could easily double as a zombie hand.
-

paulson games - Resin Addict Collaborator
- Posts: 940
- Joined: Wed Oct 21, 2009 8:09 pm
Re: Paint chipping hairspray technique test
![]() by mangozac » Mon Oct 01, 2012 2:50 pm
by mangozac » Mon Oct 01, 2012 2:50 pm
Ahh that makes much more sense Jon 
I've assembled and painted the rust colours onto another 3 fuel drums so that I can do a side by side comparison of the three main techniques:
1. Hairspray (this time doing a better job by using a specially made brush and a toothpick)
2. Salt
3. Masking fluid (sponged on)
I'll do them one night this week and report back!
Oh yeah I can make that....
-
mangozac - Resin Addict Collaborator
- Posts: 4271
- Joined: Fri Oct 16, 2009 3:40 pm
- Location: QLD, Australia
Re: Paint chipping hairspray technique test
![]() by Munkey Joe » Tue Oct 02, 2012 2:06 pm
by Munkey Joe » Tue Oct 02, 2012 2:06 pm
How have I missed these posts?? LOL Thanks Paulson for the Identification!!!
And Yea I can wait to see your side by side comparison Zac!!!
And Yea I can wait to see your side by side comparison Zac!!!
Bartertown Trades:
EBay feedback:
My FAIL Forums:
EBay feedback:
My FAIL Forums:
-
Munkey Joe - Junkie
- Posts: 622
- Joined: Tue Dec 07, 2010 3:05 am
Re: Paint chipping hairspray technique test
![]() by mangozac » Thu Nov 15, 2012 8:44 pm
by mangozac » Thu Nov 15, 2012 8:44 pm
OK I finally got around to doing the technique comparison!
I primed another three fuel drums and painted them with the blotchy brown rusty colour as used last time. Drum #1 was given a coat of some dirt cheap "Home Brand" hairspray I bought specifically for this purpose. On drum #2 I used a bit of blister pack foam to sponge on some in random rust patterns. God that stuff smells nasty!
For drum #3 I wet it under a tap and then rolled it around in some freshly ground Himalayan crystal salt. My salt grinder has a feature where you can adjust the grain size so I made sure that I had a nice variety. The water isn't the best fixative and a lot of the salt falls off, but I was surprised by how much remained.
A few days later I sprayed the colour coats: first white and then the yellow/green. Immediately afterword I began the chipping process.
This time the hairspray technique did not work very well at all. Perhaps I didn't spray a thick enough coat because the paint just did not want to chip off. I was finding that if I was too rough I was chipping all the way through to plastic, which completely ruins it. Fail.
Sorry MJ but the liquid mask technique was also a bust. I used a pair of tweezers to pick the masking off and found that it just exposed massive areas of the rust underneath in a very fake, forced looking style. I didn't like it at all. I did try to improve both this and the hairspray drum by stippling some orange onto the rust areas, but I think this actually made things worse.
By and large the best result was from the salt technique. The salt grains rubbed off easily using my fingers, leaving a very random, believable looking rust effect. The only downside is that the salt technique didn't expose enough rust due to not enough salt sticking in the first place. In light of this I think the very best technique would have to be a combination of hairspray and salt, as I've seen mentioned elsewhere. You would first spray the part with hairspray and then quickly apply the salt - the hairspray providing a better fixative than just water.
Here's the results, left to right:
Hairspray, liquid mask, salt
I'm also much happier with the green colour for the drum than yellow. The problem is that that green was a random mix at the time of a standard green darkened with some grey! Oh well the next step is to drop the yellow drums into some stripper and start them again.
Oh yeah I can make that....
-
mangozac - Resin Addict Collaborator
- Posts: 4271
- Joined: Fri Oct 16, 2009 3:40 pm
- Location: QLD, Australia
Re: Paint chipping hairspray technique test
![]() by Munkey Joe » Fri Nov 16, 2012 12:47 am
by Munkey Joe » Fri Nov 16, 2012 12:47 am
Your Right VERY interesting....
I also like the salt.... Very good and DEF the best of the 3.
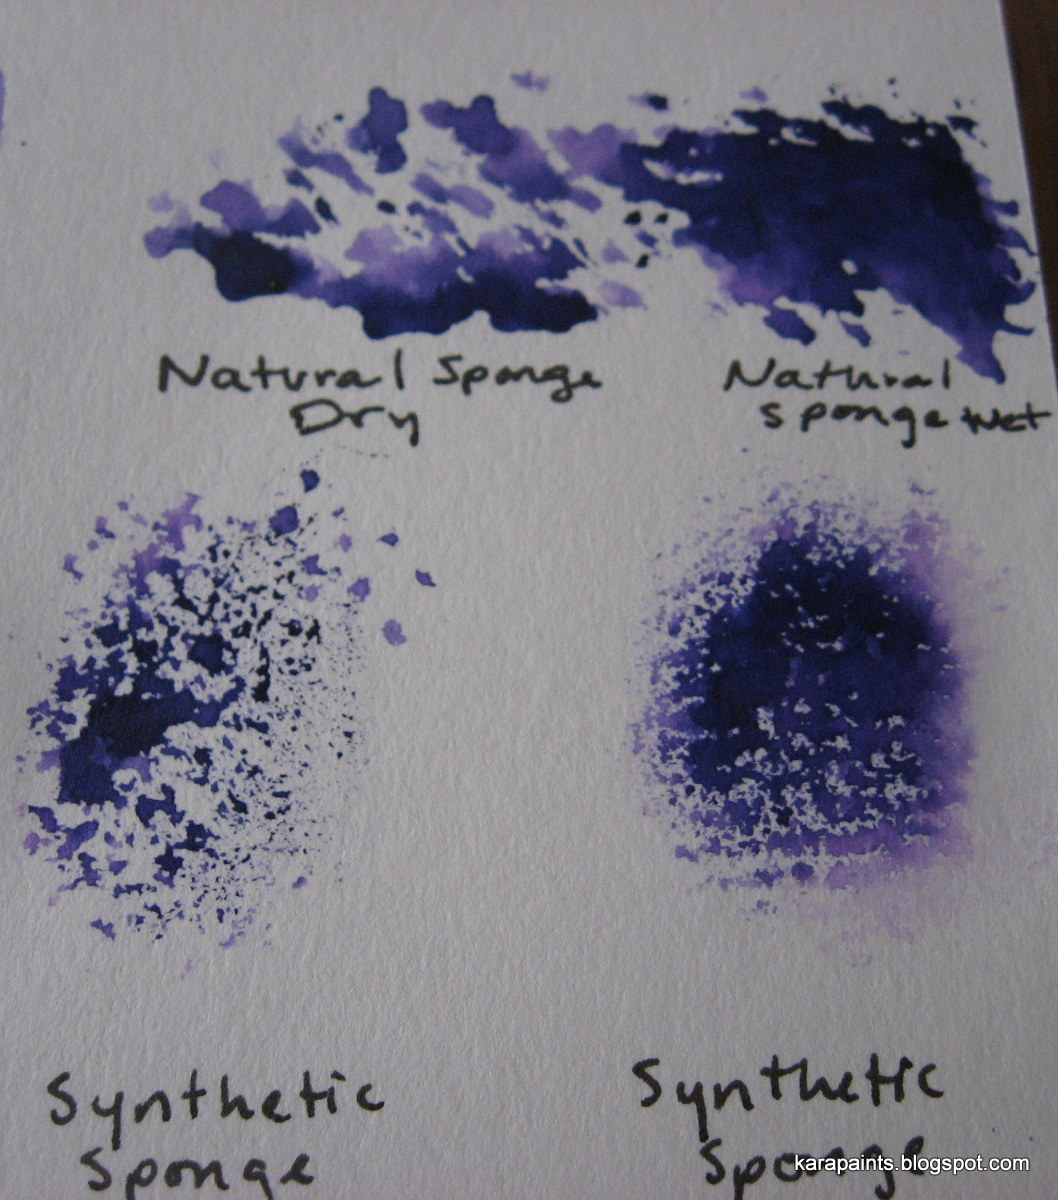
With the mask.... It looks as if you actually used a bit much compared to what I do. I usually take it and Blot it on a bit of tissue/paper towel and then blot it on the model. This gives it a more random effect. Here is a couple of pictures to help show what I mean.
With too much you tend to get the plate on the lower left. thick spots and not a mottled effect

Here is a side by side using the same sponges just less and more paint. You want the left VS the right.
As for removal... I use a Very pricey piece of technical equipment that you may not be able to get in the outback....


This way works pretty good for me, but it might not for you. I find the hairspray problematic also, and the Salt I have had mixed success. I like the "control chaos" I have with the mask liquid though.
I will also have to do a side by side using these methods, as this has made me more interested in how to achieve different looks and find a way to suit my style!!
I also like the salt.... Very good and DEF the best of the 3.
With the mask.... It looks as if you actually used a bit much compared to what I do. I usually take it and Blot it on a bit of tissue/paper towel and then blot it on the model. This gives it a more random effect. Here is a couple of pictures to help show what I mean.
With too much you tend to get the plate on the lower left. thick spots and not a mottled effect
Here is a side by side using the same sponges just less and more paint. You want the left VS the right.
As for removal... I use a Very pricey piece of technical equipment that you may not be able to get in the outback....
This way works pretty good for me, but it might not for you. I find the hairspray problematic also, and the Salt I have had mixed success. I like the "control chaos" I have with the mask liquid though.
I will also have to do a side by side using these methods, as this has made me more interested in how to achieve different looks and find a way to suit my style!!
Bartertown Trades:
EBay feedback:
My FAIL Forums:
EBay feedback:
My FAIL Forums:
-
Munkey Joe - Junkie
- Posts: 622
- Joined: Tue Dec 07, 2010 3:05 am
Re: Paint chipping hairspray technique test
![]() by mangozac » Fri Nov 16, 2012 7:30 am
by mangozac » Fri Nov 16, 2012 7:30 am
Yeah I'm sure I did apply too much mask - it was just really hard to tell! At the time it didn't feel like that much! Using the "highly technical" eraser would probably help a lot too 
I've got the two yellow barrels soaking in some simple green now. I'll spray them up and try the hairspray and salt over the weekend - I really think this holds a lot of promise
I've got the two yellow barrels soaking in some simple green now. I'll spray them up and try the hairspray and salt over the weekend - I really think this holds a lot of promise
Oh yeah I can make that....
-
mangozac - Resin Addict Collaborator
- Posts: 4271
- Joined: Fri Oct 16, 2009 3:40 pm
- Location: QLD, Australia
Re: Paint chipping hairspray technique test
![]() by Munkey Joe » Fri Nov 16, 2012 4:30 pm
by Munkey Joe » Fri Nov 16, 2012 4:30 pm
Bartertown Trades:
EBay feedback:
My FAIL Forums:
EBay feedback:
My FAIL Forums:
-
Munkey Joe - Junkie
- Posts: 622
- Joined: Tue Dec 07, 2010 3:05 am
15 posts
• Page 1 of 1
Who is online
Users browsing this forum: No registered users and 7 guests