[phpBB Debug] PHP Warning: in file [ROOT]/includes/bbcode.php on line 483: preg_replace(): The /e modifier is no longer supported, use preg_replace_callback instead
[phpBB Debug] PHP Warning: in file [ROOT]/includes/bbcode.php on line 483: preg_replace(): The /e modifier is no longer supported, use preg_replace_callback instead
[phpBB Debug] PHP Warning: in file [ROOT]/includes/bbcode.php on line 483: preg_replace(): The /e modifier is no longer supported, use preg_replace_callback instead
[phpBB Debug] PHP Warning: in file [ROOT]/includes/bbcode.php on line 483: preg_replace(): The /e modifier is no longer supported, use preg_replace_callback instead
[phpBB Debug] PHP Warning: in file [ROOT]/includes/bbcode.php on line 483: preg_replace(): The /e modifier is no longer supported, use preg_replace_callback instead
[phpBB Debug] PHP Warning: in file [ROOT]/includes/bbcode.php on line 483: preg_replace(): The /e modifier is no longer supported, use preg_replace_callback instead
[phpBB Debug] PHP Warning: in file [ROOT]/includes/bbcode.php on line 483: preg_replace(): The /e modifier is no longer supported, use preg_replace_callback instead
[phpBB Debug] PHP Warning: in file [ROOT]/includes/bbcode.php on line 483: preg_replace(): The /e modifier is no longer supported, use preg_replace_callback instead
[phpBB Debug] PHP Warning: in file [ROOT]/includes/bbcode.php on line 483: preg_replace(): The /e modifier is no longer supported, use preg_replace_callback instead
[phpBB Debug] PHP Warning: in file [ROOT]/includes/bbcode.php on line 483: preg_replace(): The /e modifier is no longer supported, use preg_replace_callback instead
[phpBB Debug] PHP Warning: in file [ROOT]/includes/bbcode.php on line 483: preg_replace(): The /e modifier is no longer supported, use preg_replace_callback instead
[phpBB Debug] PHP Warning: in file [ROOT]/includes/bbcode.php on line 483: preg_replace(): The /e modifier is no longer supported, use preg_replace_callback instead
[phpBB Debug] PHP Warning: in file [ROOT]/includes/bbcode.php on line 483: preg_replace(): The /e modifier is no longer supported, use preg_replace_callback instead
[phpBB Debug] PHP Warning: in file [ROOT]/includes/bbcode.php on line 483: preg_replace(): The /e modifier is no longer supported, use preg_replace_callback instead
[phpBB Debug] PHP Warning: in file [ROOT]/includes/bbcode.php on line 483: preg_replace(): The /e modifier is no longer supported, use preg_replace_callback instead
[phpBB Debug] PHP Warning: in file [ROOT]/includes/bbcode.php on line 483: preg_replace(): The /e modifier is no longer supported, use preg_replace_callback instead
[phpBB Debug] PHP Warning: in file [ROOT]/includes/bbcode.php on line 483: preg_replace(): The /e modifier is no longer supported, use preg_replace_callback instead
[phpBB Debug] PHP Warning: in file [ROOT]/includes/bbcode.php on line 483: preg_replace(): The /e modifier is no longer supported, use preg_replace_callback instead
[phpBB Debug] PHP Warning: in file [ROOT]/includes/bbcode.php on line 483: preg_replace(): The /e modifier is no longer supported, use preg_replace_callback instead
[phpBB Debug] PHP Warning: in file [ROOT]/includes/bbcode.php on line 483: preg_replace(): The /e modifier is no longer supported, use preg_replace_callback instead
[phpBB Debug] PHP Warning: in file [ROOT]/includes/bbcode.php on line 483: preg_replace(): The /e modifier is no longer supported, use preg_replace_callback instead
[phpBB Debug] PHP Warning: in file [ROOT]/includes/bbcode.php on line 483: preg_replace(): The /e modifier is no longer supported, use preg_replace_callback instead
[phpBB Debug] PHP Warning: in file [ROOT]/includes/bbcode.php on line 483: preg_replace(): The /e modifier is no longer supported, use preg_replace_callback instead
[phpBB Debug] PHP Warning: in file [ROOT]/includes/bbcode.php on line 483: preg_replace(): The /e modifier is no longer supported, use preg_replace_callback instead
[phpBB Debug] PHP Warning: in file [ROOT]/includes/bbcode.php on line 483: preg_replace(): The /e modifier is no longer supported, use preg_replace_callback instead
[phpBB Debug] PHP Warning: in file [ROOT]/includes/bbcode.php on line 483: preg_replace(): The /e modifier is no longer supported, use preg_replace_callback instead
[phpBB Debug] PHP Warning: in file [ROOT]/includes/bbcode.php on line 112: preg_replace(): The /e modifier is no longer supported, use preg_replace_callback instead
[phpBB Debug] PHP Warning: in file [ROOT]/includes/bbcode.php on line 112: preg_replace(): The /e modifier is no longer supported, use preg_replace_callback instead
Resin Addict Forum • View topic - Superheavy Assault Walker
ATTENTION: As of March 2017 the Resin Addict Forums are being wound down.
New members are no longer being accepted. Read more about it here.

Superheavy Assault Walker

Discussion of sculpting and scratchbuilding

Moderator: Wardens

Re: Superheavy Assault Walker

Postby mangozac » Tue Nov 10, 2009 3:45 pm

You know, I think you've nailed it Nate!

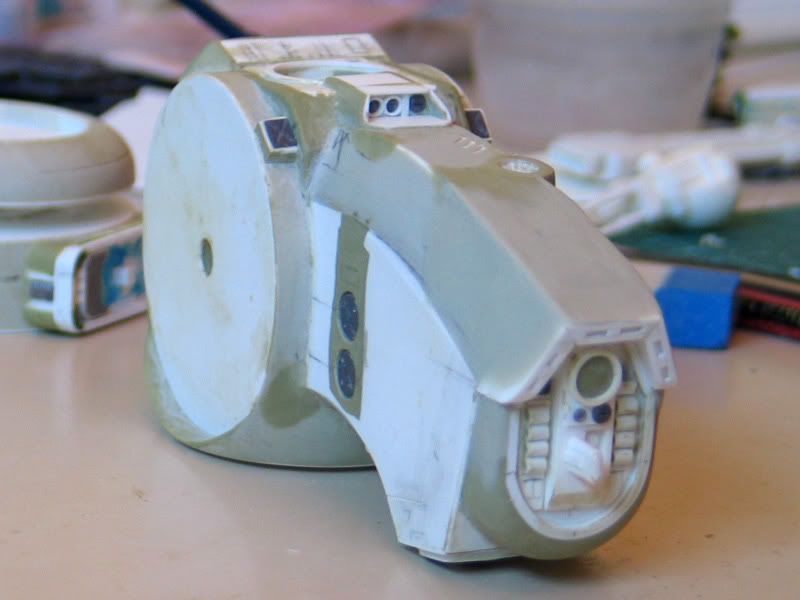
The three discs like that was too much and didn't flow properly with the other lines. I've now gouged out all the putty and rebuilt it with only the lower two discs. There will be some horizontal panel lines running forward to the discs from the railgun rotators. It looks much better!

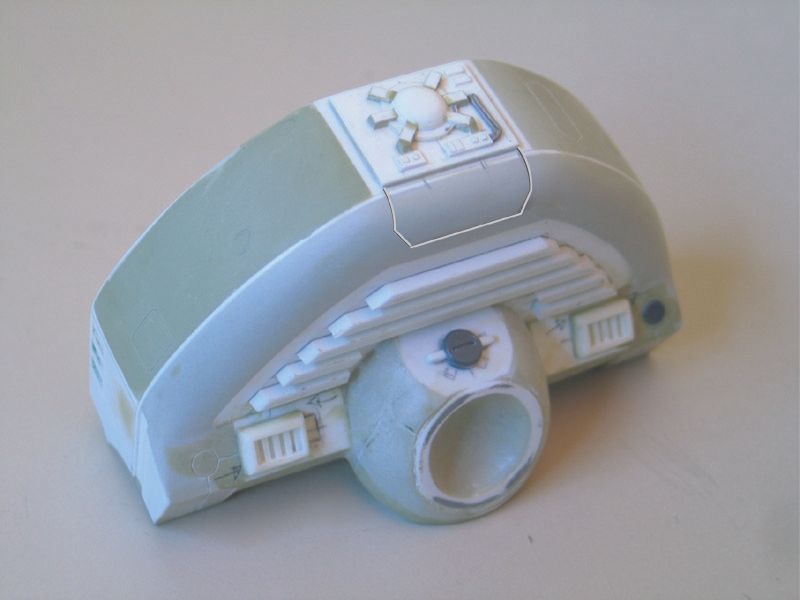
So here's the almost completed rear chassis. All it needs is some final piece of detailing on the underside. I was initially thinking a panel line like this:

Image

But I'm still obsessing about using some of these koto fan bits and thus came up with the following alternative:

Image

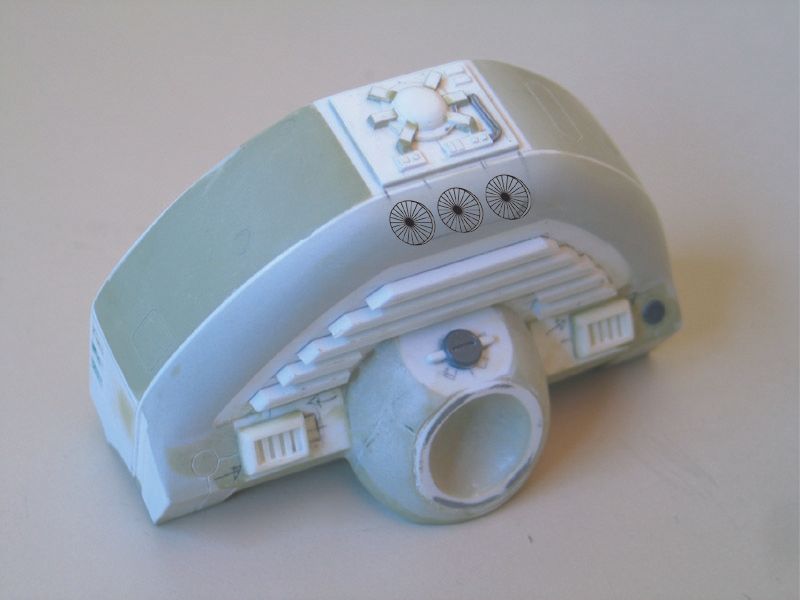
So what do we all think?

Oh BTW, if you notice all the little arrows pencilled in around the place, those are reminders for me. I draw them in when I find spots that need filling with putty so that I remember to do them next time I have some putty mixed ;)
Oh yeah I can make that....
User avatar
mangozac
Resin Addict Collaborator
 
Posts: 4271
Joined: Fri Oct 16, 2009 3:40 pm
Location: QLD, Australia

Re: Superheavy Assault Walker

Postby paulson games » Tue Nov 10, 2009 3:48 pm

I'm not seeing any pictures, the links seem to be broken but older posts are showing up just fine.
User avatar
paulson games
Resin Addict Collaborator
 
Posts: 940
Joined: Wed Oct 21, 2009 8:09 pm

Re: Superheavy Assault Walker

Postby Vaaish » Wed Nov 11, 2009 4:24 pm

To me the three fans you have sketched in there feel out of place. I think the panel line you were originally planning fits better with the aesthetic.
-Vaaish
Vaaish
Junkie
 
Posts: 827
Joined: Sat Oct 31, 2009 7:55 am
Location: Greenville, SC

Re: Superheavy Assault Walker

Postby mangozac » Wed Nov 11, 2009 5:49 pm

Yeah I made the following conclusion and then talking to Warhound last night he reckons I should be putting some panel lines around the sides as well. I'm not so sure of this as that is one section where I feel "less is more". Warhound argues that otherwise it is a large area to be left blank, which is a pain for the painter, whereas I think adding more lines just clutters it up.

Here's a picture of some lines I drew but at this stage I think I'm just going to stick with the original little line underneath that reactor bit.

rear4.jpg
Oh yeah I can make that....
User avatar
mangozac
Resin Addict Collaborator
 
Posts: 4271
Joined: Fri Oct 16, 2009 3:40 pm
Location: QLD, Australia

Re: Superheavy Assault Walker

Postby mangozac » Thu Nov 12, 2009 1:24 pm

This morning I set it upon myself to sort out the cowling over the front sensor suite. As can be seen from older pics, I did have some pretty extensive puttying done but this morning decided that it just wasn't working. So off it all came!

The first step was to make the new cowling and because of the design of the recesses in the end I decided to do it in styrene. 3x1mm sheets were laminated together with the centre sheet inset slightly. Once that was set it was just a matter of chopping to length, getting the join angles right and then gluing little divisors in the recess. I'm very happy with the result, especially with how geometrically true it all is.

Over the course of the chassis construction the top edge that curves down to the cowling had actually ended up with a bit of a taper. To fix that, once the new cowling was in place I slapped on a heap of putty. Once set it will all be sanded smooth and perfect.

I had planned to take pics but by the time I had realised I had just mixed up putty and the clock was ticking!

Image

You can also see the modified side disc arrangement - there is now only two of them and I think it works much better. I'm still contemplating the panel lines around the discs and have sketched in a small access panel just above them.
Oh yeah I can make that....
User avatar
mangozac
Resin Addict Collaborator
 
Posts: 4271
Joined: Fri Oct 16, 2009 3:40 pm
Location: QLD, Australia

Re: Superheavy Assault Walker

Postby Xeones » Thu Nov 12, 2009 1:45 pm

You know, I've been waiting for a long time to see you finish up that front cowl. It looks great --really! the detail is just the right sort to work in that space. Bravo!
Xeones
Resin Addict Collaborator
 
Posts: 143
Joined: Wed Oct 28, 2009 11:48 pm
Location: Greenville, South Carolina

Re: Superheavy Assault Walker

Postby Warhound » Thu Nov 12, 2009 7:01 pm

Aaah, nice work Zac!

Yes it seems you were right about removing one of the disks- that totally frees the area up now to breath- not as claustrophobic.

The front cowling also looks ace- nicely scaled and very tight!

Got to shoot now as am moving and just thought I would have a wee break while having breakfast;-)

cheers
W
My work: http://s198.photobucket.com/albums/aa19 ... und_photo/
My winners: http://demonwinner.free.fr/peintre.php?id_peintre=274
Superglue runs through my veins- what have you ever done for society?
User avatar
Warhound
Resin Addict Collaborator
 
Posts: 230
Joined: Wed Oct 21, 2009 4:13 pm
Location: Peterborough-UK

Re: Superheavy Assault Walker

Postby mangozac » Fri Nov 13, 2009 11:10 pm

You know, that front cowling design is one of those things that as soon as I had the idea I just knew it was going to work well.

Well three hours of pain and exam one of three is down. On the plus side that was the hardest one (Advanced Digital Signal Processing - yes, it's as complex as it sounds) and the next two should be pretty straightforward.

I had to build up the top of the chassis with more putty today. I've switched back to Milliput because I'm scared that the Magic Sculpt isn't setting properly. It's 24 hours since I mixed it and it was gumming up the sandpaper a bit. At this stage there's so much corrective puttying to do - fixing up little faults, nicks and gaps around the place. I also did a bit of sanding (especially on the underside).

Anyway as soon as I've sanded the new layer of putty back smooth I want to get the panel lines done, so tonight I've tried to finalise the design:

chassis_WIP_41.jpg


I'm actually quite happy with it but what do you guys think?

Note also the area between the main hatch and missile bay - I've finalised all of the angles where the two chassis parts join and sitting there temporarily are the three koto vent pieces that will reside there (I can't glue them on until the final detailing stage).

Oh also I hacked off the little sky sensor turret so that I could more easily putty and sand around the top of the chassis. I'll resculpt it again when I do the panel lines.

I'm off to bed now but hoping to do some more serious work tomorrow ;)
Really hoping to get this thing finished in the next week.
Oh yeah I can make that....
User avatar
mangozac
Resin Addict Collaborator
 
Posts: 4271
Joined: Fri Oct 16, 2009 3:40 pm
Location: QLD, Australia

Re: Superheavy Assault Walker

Postby Xeones » Sat Nov 14, 2009 1:04 am

Xeones
Resin Addict Collaborator
 
Posts: 143
Joined: Wed Oct 28, 2009 11:48 pm
Location: Greenville, South Carolina

Re: Superheavy Assault Walker

Postby Wolfs16 » Sat Nov 14, 2009 3:38 am

Very cool mango; you're almost done!

The only thing I was thinking about was the panel lines in the front. I feel like making them more segmented in the standard Tau style would really make it look more Tau and less like a standard scifi walker. What do you think?

User avatar
Wolfs16
Casual
 
Posts: 37
Joined: Tue Oct 27, 2009 8:02 am

Re: Superheavy Assault Walker

Postby mangozac » Sat Nov 14, 2009 7:37 am

Oh yeah I can make that....
User avatar
mangozac
Resin Addict Collaborator
 
Posts: 4271
Joined: Fri Oct 16, 2009 3:40 pm
Location: QLD, Australia

Re: Superheavy Assault Walker

Postby mangozac » Sat Nov 14, 2009 1:20 pm

Well I had a productive morning doing some sanding and panel lining. It's surprising how much better panel lines look when actually done rather than just pencil lines (it's that feeling of depth that they convey). I'm definitely happy with the design.

I said before that the Magic Sculpt isn't setting properly and the panel lines scribed into it are less than perfect. It's just not reaching that final stage of hardness where it scribes nicely. I'm thinking maybe the MS is getting too old (it's probably 2 years old) but in any case I've got some more Milliput on the way and will just use that solely from now on.

chassis_WIP_42.jpg


There's also some new panel lines around the base that you can't see here. Take special note of the completed hemisphere detail.

I photoshopped the two lines between the railgun rotator and the two detail discs. What are our thoughts on this?

A bit of puttying this afternoon and all the major stuff is done! Depending on how motivated I am for study I might even have a go at priming on Monday ;)
Oh yeah I can make that....
User avatar
mangozac
Resin Addict Collaborator
 
Posts: 4271
Joined: Fri Oct 16, 2009 3:40 pm
Location: QLD, Australia

Re: Superheavy Assault Walker

Postby Wolfs16 » Sun Nov 15, 2009 8:58 am

I really like the panel lines near those rotors. It really connects them with the whole design. As for the segmented panels, I totally understand what you mean. I've been lookig at large Tau vehicles like the Manta and it mostly has panel lines to break up the shape. However, the Manta does have some segmented sections: a strip across the top and on the back hatch.

I still think that that is a design that just defines the Tau, so maybe there is a spot you could put some on?

User avatar
Wolfs16
Casual
 
Posts: 37
Joined: Tue Oct 27, 2009 8:02 am

Re: Superheavy Assault Walker

Postby mangozac » Mon Nov 16, 2009 11:31 am

OK I had to help a mate move yesterday and today I've got to get into some study so there's not been much progress - priming will now likely happen on Wednesday ;)

I sculpted a new little sky sensor turret and have been contemplating the extra segmented armour lines as suggested. You can see here pencilled in one extra segment. I think it works ok but more than this one extra is definitely not an option. Let me know if there are any big objections to this. Warhound should be finished moving house and back at work in 8 hours time so we might get some feedback from him then too ;)

chassis_WIP_43.jpg
Oh yeah I can make that....
User avatar
mangozac
Resin Addict Collaborator
 
Posts: 4271
Joined: Fri Oct 16, 2009 3:40 pm
Location: QLD, Australia

Re: Superheavy Assault Walker

Postby Wolfs16 » Mon Nov 16, 2009 1:58 pm

Yay, segments! :D

I like where they are going, but I'm not sure if it works. I'm looking at my Devilfish and I notice that it has one of those types of segments along the nose and then three near the back. What if you just had one larger one in the front?

User avatar
Wolfs16
Casual
 
Posts: 37
Joined: Tue Oct 27, 2009 8:02 am

PreviousNext

Return to Sculpting and Scratchbuilding

Who is online

Users browsing this forum: No registered users and 28 guests