ATTENTION: As of March 2017 the Resin Addict Forums are being wound down. New members are no longer being accepted. Read more about it here.
Resin Addict Forum
A place to talk about your addiction
Centurion Mecha
Moderator: Wardens
Re: Centurion Mecha
![]() by mangozac » Thu Jan 26, 2012 3:55 pm
by mangozac » Thu Jan 26, 2012 3:55 pm
Funnily enough I did think of putting one at the bottom of the front of the groin plate, but decided to stick with something else like an icon 
Oh yeah I can make that....
-

mangozac - Resin Addict Collaborator
- Posts: 4271
- Joined: Fri Oct 16, 2009 3:40 pm
- Location: QLD, Australia
Re: Centurion Mecha
![]() by mangozac » Sun Jan 29, 2012 11:01 am
by mangozac » Sun Jan 29, 2012 11:01 am
Despite the wet weather we've been having I haven't made much modelling progress this weekend. What I have done is begin finalising the pelvis armour. The mounting points for it have been added onto the back (along with my favourite new cast iron texture) and I hit the piece with a layer of Tamiya surface primer from a rattle can to check consistency. It's amazingly symmetric! Some banding (using my scan - Inkscape - CNC router trick) is next on the agenda, along with some other details.
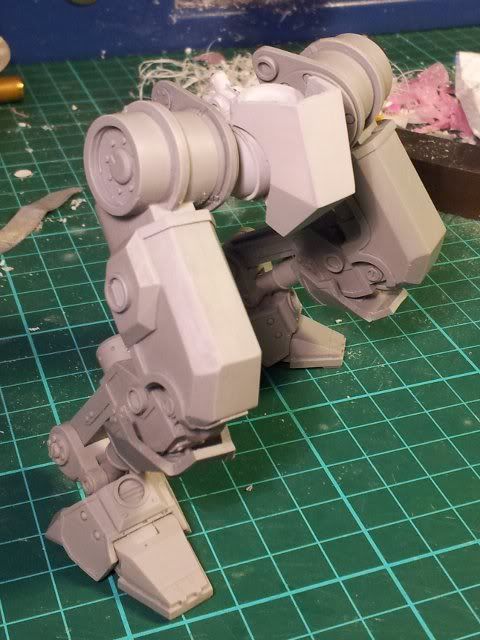
The pelvis is slowly receiving more cleanup but it's pretty much done now. I'll be testing out my new brass etch system in the coming week which will produce the icons I will fit to pieces like the groin armour.
Once the pelvis is done I'll start work on the torso, the first step of which will be coming up with a basic shape. I'll probably start with the back and design the reactor first as that will setup the proportions. Early on I'll have to design the pilot too, although at this stage I'm probably going to spring for a decent figure sculptor to do it for me. With the pilot done the cockpit can be made and then the rest of the torso built up around that. I think I'm going to finally have to start sketching some stuff in planning for these elements...
Oh yeah I can make that....
-
mangozac - Resin Addict Collaborator
- Posts: 4271
- Joined: Fri Oct 16, 2009 3:40 pm
- Location: QLD, Australia
Re: Centurion Mecha
![]() by mangozac » Mon Jan 30, 2012 9:02 pm
by mangozac » Mon Jan 30, 2012 9:02 pm
Quick update for tonight:
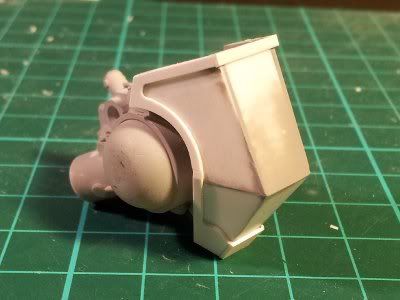
Cut out the banding on the CNC before work this morning. Glued it on, trimmed and have run around with the Tamiya putty since taking the pic. Has turned out pretty nicely. Something is going to be added to the thicker banding on the bottom, I'm just not certain what. Likely a new icon design from brass etch. And maybe another tie down shackle, just to piss off the people who don't like them
Cut out the banding on the CNC before work this morning. Glued it on, trimmed and have run around with the Tamiya putty since taking the pic. Has turned out pretty nicely. Something is going to be added to the thicker banding on the bottom, I'm just not certain what. Likely a new icon design from brass etch. And maybe another tie down shackle, just to piss off the people who don't like them
Oh yeah I can make that....
-
mangozac - Resin Addict Collaborator
- Posts: 4271
- Joined: Fri Oct 16, 2009 3:40 pm
- Location: QLD, Australia
Re: Centurion Mecha
![]() by Fleafa » Mon Jan 30, 2012 10:02 pm
by Fleafa » Mon Jan 30, 2012 10:02 pm
Awesome. Wish I could be more constructive, but I've got nothing!
-

Fleafa - Junkie
- Posts: 835
- Joined: Thu Jul 07, 2011 2:56 am
- Location: Fareham, Hampshire, UK
Re: Centurion Mecha
![]() by blind pig » Mon Jan 30, 2012 11:45 pm
by blind pig » Mon Jan 30, 2012 11:45 pm
Recessed hex bolts/nuts.
You do them well.
You do them well.
- blind pig
- Junkie
- Posts: 581
- Joined: Fri Feb 19, 2010 2:41 am
- Location: Brisbane Australia
Re: Centurion Mecha
![]() by factor40 » Tue Jan 31, 2012 3:57 am
by factor40 » Tue Jan 31, 2012 3:57 am
Holy crap, Zac! How in the world did I miss this thread? Looks awesome!
-

factor40 - Habit
- Posts: 347
- Joined: Tue Apr 26, 2011 5:01 am
- Location: Arlington Heights, IL, USA
Re: Centurion Mecha
![]() by mangozac » Tue Jan 31, 2012 7:43 am
by mangozac » Tue Jan 31, 2012 7:43 am
Thanks guys! No problems about the lack of constructive criticism Ben; gushing is still motivational
Oh yeah I can make that....
-
mangozac - Resin Addict Collaborator
- Posts: 4271
- Joined: Fri Oct 16, 2009 3:40 pm
- Location: QLD, Australia
Re: Centurion Mecha
![]() by Seb » Tue Jan 31, 2012 10:14 am
by Seb » Tue Jan 31, 2012 10:14 am
That CNC machine is earning it's weight in gold for component turnaround.. 
-

Seb - Resin Addict Collaborator
- Posts: 205
- Joined: Wed Oct 21, 2009 2:03 pm
- Location: Escapee
Re: Centurion Mecha
![]() by mangozac » Tue Jan 31, 2012 11:34 am
by mangozac » Tue Jan 31, 2012 11:34 am
Absolutely! It's not so much that it allows you to do anything you can't otherwise do by hand, it just facilitates doing it either more quickly (fiddly stuff) or more accurately (the curved banding sections).
And the more I do the more I have ideas for fabricating other components with it. I've got a cool idea for the shield generators!
And the more I do the more I have ideas for fabricating other components with it. I've got a cool idea for the shield generators!
Oh yeah I can make that....
-
mangozac - Resin Addict Collaborator
- Posts: 4271
- Joined: Fri Oct 16, 2009 3:40 pm
- Location: QLD, Australia
Re: Centurion Mecha
![]() by wormwood » Wed Feb 01, 2012 1:39 am
by wormwood » Wed Feb 01, 2012 1:39 am
That is really nice.
I think it might be better to just continue with edging on the armor plates than to have elaboratae reliefs and insignias molded on. Usually military vehicles use stenciled paint for that sort of thing.
I think it might be better to just continue with edging on the armor plates than to have elaboratae reliefs and insignias molded on. Usually military vehicles use stenciled paint for that sort of thing.
- wormwood
- Casual
- Posts: 22
- Joined: Fri Jan 27, 2012 2:15 am
Re: Centurion Mecha
![]() by mangozac » Wed Feb 01, 2012 4:10 am
by mangozac » Wed Feb 01, 2012 4:10 am
Thanks guys. I know what you mean wormwood, but I guess I was just going for a more ornate feel.
I've been planning my pilot figure, including a little female figure reference sheet. It was nice to have a legitimate reason for searching for pictures of scantily clad women
I'm about to fly out on business for a couple of days so no more updates until the weekend.
I've been planning my pilot figure, including a little female figure reference sheet. It was nice to have a legitimate reason for searching for pictures of scantily clad women
I'm about to fly out on business for a couple of days so no more updates until the weekend.
Oh yeah I can make that....
-
mangozac - Resin Addict Collaborator
- Posts: 4271
- Joined: Fri Oct 16, 2009 3:40 pm
- Location: QLD, Australia
Re: Centurion Mecha
![]() by mangozac » Tue Feb 07, 2012 7:28 pm
by mangozac » Tue Feb 07, 2012 7:28 pm
Sorry there's not been much progress over this last week. This post has no pics so tl;dr version is that I'm making slow progress designing the torso.
My graphics tablet arrived last week and I did some playing around on the weekend, but it didn't confer the amazing drawing skills I'd hoped
Don't get me wrong, I do find it easier than just pencil sketching, it's just that the tablet itself has a little bit of a learning curve, and drawing angled armour (as opposed to curved armour) isn't easy either. I will keep at it but have lowered my expectations to something a little more realistic. I'm always too ambitious ()!
I've had a few more goes at brass etch but just can't get the toner to transfer to the brass properly. Then I remembered the problem which I eluded to much earlier in this thread): I'm printing using a Brother laser printer. Apparently Brother uses a toner which fuses at a much higher temperature with other printers and that would be a good reason as to why even using the proper pren-n-peel film with a high temperature modified laminator I still get poor results. Unfortunately both of our laser printers at work are Brother (other than this we've been very happy with the brand), but a colleague has a Canon one so I have given him a sheet of the press-n-peel and asked him to print out the artwork for me. This will provide me with the sole tiny icon that will mount at the bottom front of the pelvis armour.
Once the brass etch is done the pelvis and its armour will be complete, at which point it will go in for moulding. With the parts duplicated I will then finally be able to start work on the torso!
My plans for the torso require me to first sculpt up the design in plastecine (clay). The idea is to mount the legs and pelvis cast on a board with a stand and armature like you see and then sculpt up the torso mockup on top, supported by the armature. Once I have a sculpt I like I can then proceed with duplicating it in styrene and Milliput.
Lastly, I've made some small progress with the pilot. Progress in that I tried and failed dismally to sculpt it! I was following and they all make sense, but it's not until you have this tiny little armature that you're trying to attach bits of greenstuff and Fimo to that you realise just how difficult it is. So I certainly won't be sculpting any pilot from scratch. I have been in touch with a guy called Wereweevil from Wargamerau who lives nearby (and works literally around the corner from my work) who is pretty good at figure sculpting. We're going to collaborate on something for the pilot.
You'll be pleased to hear though that I've managed to get past the mental block of the pilot so will continue on the cockpit and torso likely before the pilot is even started!
That's all I can think of now. Hopefully my next update will include brass etch
Oh yeah I can make that....
-
mangozac - Resin Addict Collaborator
- Posts: 4271
- Joined: Fri Oct 16, 2009 3:40 pm
- Location: QLD, Australia
Re: Centurion Mecha
![]() by mangozac » Thu Feb 09, 2012 8:56 am
by mangozac » Thu Feb 09, 2012 8:56 am
Brass etch update: we have some success!
Using Canon laser toner certainly helped, but I also after some further reading found that someone was recommending running the brass and press-n-peel sandwich through the laminator 25 to 50(!) times. I settled for around 10 (I didn't actually count) with my modified high temp laminator and that seems to have given a good result. Out of interest though I will try again with the Brother toner and a higher number of passes.
Here's the progress shots. This is the press-n-peel film with the artwork printed onto it, next to a nice clean piece of copper:
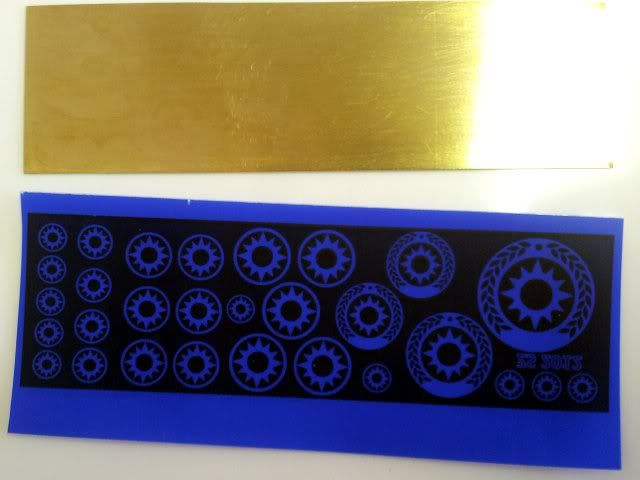
The press-n-peel is then placed on top of the brass sheet and the two run through the lamintor several times. It's then quenched in water and the press-n-peel peeled off. This leaves you with the top half of the next picture:
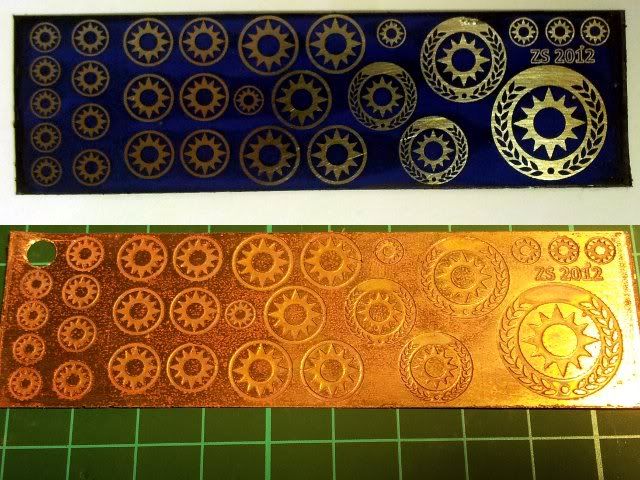
You then cover the back of the brass with something to protect it (I used packing tape which seems to have worked well) and drop it into a bath of etchant (I use ferric chloride). The etchant was a bit old so it took ages (which also adds the danger of over etching parts) but in the end I ended up with the bottom half of the above pic.
That mottled effect of the brass really isn't as pronounced in person and isn't a problem. The etching depth wasn't as deep as I'd have liked so I will test a new piece with fresh etchant to see if I can't get better results. I will hit this piece with some Mr surfacer though (the brass etch is too fine to risk praying anything from a rattle can onto it) and see just how (in)appropriate this depth is.
The really stupid thing is that after all of this, it turns out that the smallest icon size I made is just slightly too big for where I was thinking of fitting it on the pelvis armour! D'oh! I might just stick one of the bigger icons in a different spot...
While I was waiting for the etching process I also built a stand for testing out torso sculpting but I forgot to take a pic. Will do that tonight
Using Canon laser toner certainly helped, but I also after some further reading found that someone was recommending running the brass and press-n-peel sandwich through the laminator 25 to 50(!) times. I settled for around 10 (I didn't actually count) with my modified high temp laminator and that seems to have given a good result. Out of interest though I will try again with the Brother toner and a higher number of passes.
Here's the progress shots. This is the press-n-peel film with the artwork printed onto it, next to a nice clean piece of copper:
The press-n-peel is then placed on top of the brass sheet and the two run through the lamintor several times. It's then quenched in water and the press-n-peel peeled off. This leaves you with the top half of the next picture:
You then cover the back of the brass with something to protect it (I used packing tape which seems to have worked well) and drop it into a bath of etchant (I use ferric chloride). The etchant was a bit old so it took ages (which also adds the danger of over etching parts) but in the end I ended up with the bottom half of the above pic.
That mottled effect of the brass really isn't as pronounced in person and isn't a problem. The etching depth wasn't as deep as I'd have liked so I will test a new piece with fresh etchant to see if I can't get better results. I will hit this piece with some Mr surfacer though (the brass etch is too fine to risk praying anything from a rattle can onto it) and see just how (in)appropriate this depth is.
The really stupid thing is that after all of this, it turns out that the smallest icon size I made is just slightly too big for where I was thinking of fitting it on the pelvis armour! D'oh! I might just stick one of the bigger icons in a different spot...
While I was waiting for the etching process I also built a stand for testing out torso sculpting but I forgot to take a pic. Will do that tonight
Oh yeah I can make that....
-
mangozac - Resin Addict Collaborator
- Posts: 4271
- Joined: Fri Oct 16, 2009 3:40 pm
- Location: QLD, Australia
Return to Sculpting and Scratchbuilding
Who is online
Users browsing this forum: No registered users and 54 guests