ATTENTION: As of March 2017 the Resin Addict Forums are being wound down. New members are no longer being accepted. Read more about it here.
Resin Addict Forum
A place to talk about your addiction
Centurion Mecha
Moderator: Wardens
Re: Centurion Mecha
![]() by mangozac » Mon Jan 23, 2012 9:23 pm
by mangozac » Mon Jan 23, 2012 9:23 pm
Thanks Ben! I've posted on WargamerAU and am getting a lot of positive reaction and discussion there too 
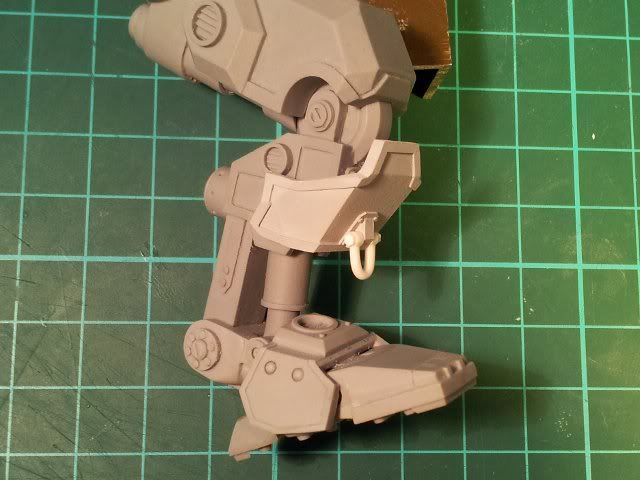
After some discussion with a friend I'm going to add tie down shackles to a few points on the model, most notably the bottom of the knee armour plates to give them that extra bit of interest I felt was lacking. And so the part count of the model continues to climb...
Separate shackles will be the way to go. So basically there will be a sprue of U-shaped pieces that glue onto the intended mounting blocks about the model. I sized up some styrene rod and it looks like I'm going to have to pick up some 1.5mm stuff from Toyworld. I avoid buying the Evergreen styrene from them like the plague, since it's so ridiculously expensive, however for times like this when you don't want to wait around for mail orders it's really the only option.
For the record, I have rod in 0.5, 0.8, 1, 2 and 2.5mm; it's only the 1.5 that I'm missing!
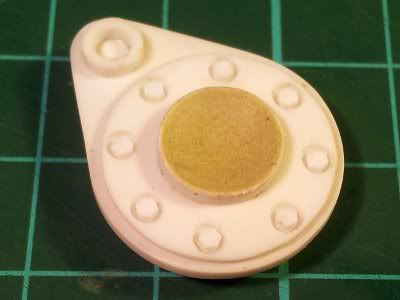
I finished off the waist turntable base tonight by drilling holes and adding the hex rod bolt heads around the circumference of it. The small hex rod bolts look so much better than rivets! I also did a pass of puttying up all of the gaps on the pelvis.
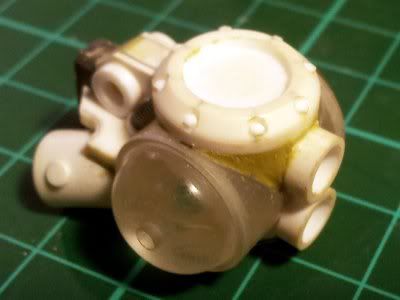
I decided this morning that the cylinder between the hip piece and the ball on the pelvis was too long so I chopped it off and made up a new one about 2/5 of the length, which I think will work much better.
I went to start adding the 1.5mm width hex rod bolt heads to the recessed holes in the hip piece, but the 2mm holes don't leave quite enough gap around the bolt head for my liking. Although I think increasing the holes to 2.5mm diameter will work well, I'd a bit tentative and would like to try 2.2mm first. Unfortunately my new 0.1mm increment drill set is still in the post so I might not have a choice - I'll just do a test mockup on some scrap styrene tomorrow night before committing to the hip piece.
After some discussion with a friend I'm going to add tie down shackles to a few points on the model, most notably the bottom of the knee armour plates to give them that extra bit of interest I felt was lacking. And so the part count of the model continues to climb...
Separate shackles will be the way to go. So basically there will be a sprue of U-shaped pieces that glue onto the intended mounting blocks about the model. I sized up some styrene rod and it looks like I'm going to have to pick up some 1.5mm stuff from Toyworld. I avoid buying the Evergreen styrene from them like the plague, since it's so ridiculously expensive, however for times like this when you don't want to wait around for mail orders it's really the only option.
For the record, I have rod in 0.5, 0.8, 1, 2 and 2.5mm; it's only the 1.5 that I'm missing!
I finished off the waist turntable base tonight by drilling holes and adding the hex rod bolt heads around the circumference of it. The small hex rod bolts look so much better than rivets! I also did a pass of puttying up all of the gaps on the pelvis.
I decided this morning that the cylinder between the hip piece and the ball on the pelvis was too long so I chopped it off and made up a new one about 2/5 of the length, which I think will work much better.
I went to start adding the 1.5mm width hex rod bolt heads to the recessed holes in the hip piece, but the 2mm holes don't leave quite enough gap around the bolt head for my liking. Although I think increasing the holes to 2.5mm diameter will work well, I'd a bit tentative and would like to try 2.2mm first. Unfortunately my new 0.1mm increment drill set is still in the post so I might not have a choice - I'll just do a test mockup on some scrap styrene tomorrow night before committing to the hip piece.
Oh yeah I can make that....
-

mangozac - Resin Addict Collaborator
- Posts: 4271
- Joined: Fri Oct 16, 2009 3:40 pm
- Location: QLD, Australia
Re: Centurion Mecha
![]() by mangozac » Tue Jan 24, 2012 8:45 pm
by mangozac » Tue Jan 24, 2012 8:45 pm
Time for tonight's update!
First up it's some more work on the pelvis. You can see the addition of another little cylindrical nubbin on the rear with a connecting pipe made from 0.75mm solder. I realise now that a lot more detailing is needed before the pelvis comes close to finished. I felt like I was limited in the amount of details I could add to the leg components, but I'm going crazy with them now!
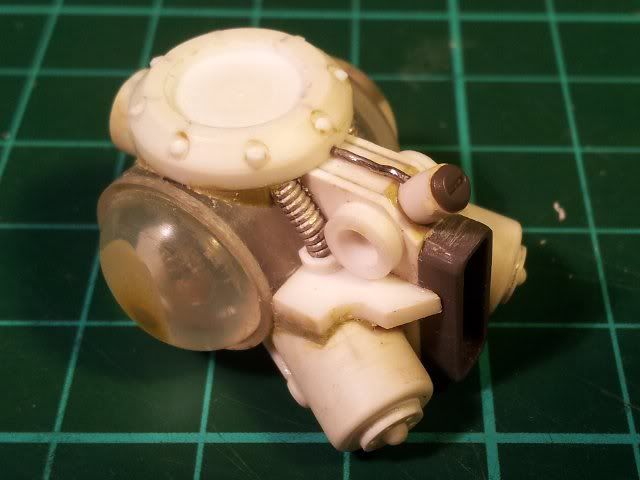
Finally got the hex bolt heads added to the hip after drilling out all of the holes to 2.5mm. I in fact did a little mockup to test out the hole sizes first to determine that 2.5mm would be suitable. There's something I'm still not happy about with the hip piece though and I can't quite put my finger on it. I feel like there is a specific detail that I've forgotten...
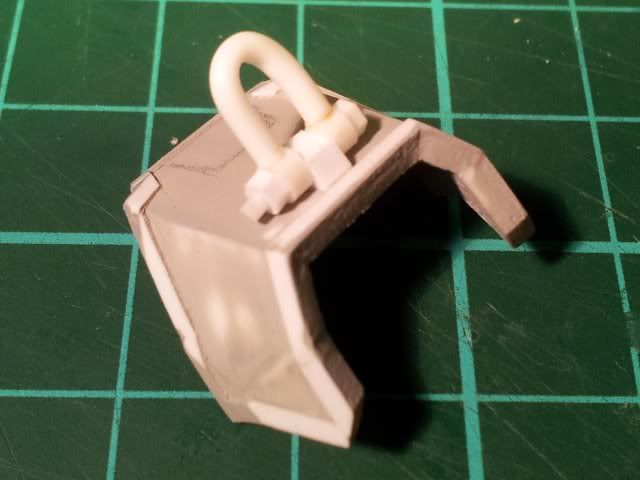
And lastly we have shots of a prototype shackle and its mount on the knee armour. The final design will need to be slightly smaller IMO. The U part of the shackle is 1.6mm diameter but I feel like just slightly smaller like 1.4mm would be better. Unfortunately the next step down is 1.2mm so I might end up trying to shave it down on the lathe.
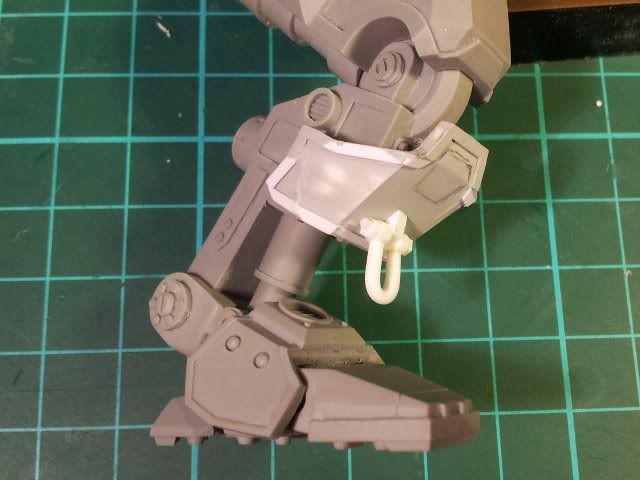
How do you think it looks? I think it works. I'll also add a shackle mount to the bottom of the pelvis (I think it makes sense to put one there).
I contemplated hitting these parts with some Tamiya Surface Primer from a rattle can, but it's not worth the risk of ruining them - it just goes on too uncontrolled for this kind of thing. I'll just have to wait and break out the airbrush and Mr Surfacer on Australia Day
I'm so anxious to get the hips and pelvis cast up so it can finally properly stand on it's feet!
First up it's some more work on the pelvis. You can see the addition of another little cylindrical nubbin on the rear with a connecting pipe made from 0.75mm solder. I realise now that a lot more detailing is needed before the pelvis comes close to finished. I felt like I was limited in the amount of details I could add to the leg components, but I'm going crazy with them now!
Finally got the hex bolt heads added to the hip after drilling out all of the holes to 2.5mm. I in fact did a little mockup to test out the hole sizes first to determine that 2.5mm would be suitable. There's something I'm still not happy about with the hip piece though and I can't quite put my finger on it. I feel like there is a specific detail that I've forgotten...
And lastly we have shots of a prototype shackle and its mount on the knee armour. The final design will need to be slightly smaller IMO. The U part of the shackle is 1.6mm diameter but I feel like just slightly smaller like 1.4mm would be better. Unfortunately the next step down is 1.2mm so I might end up trying to shave it down on the lathe.
How do you think it looks? I think it works. I'll also add a shackle mount to the bottom of the pelvis (I think it makes sense to put one there).
I contemplated hitting these parts with some Tamiya Surface Primer from a rattle can, but it's not worth the risk of ruining them - it just goes on too uncontrolled for this kind of thing. I'll just have to wait and break out the airbrush and Mr Surfacer on Australia Day
I'm so anxious to get the hips and pelvis cast up so it can finally properly stand on it's feet!
Oh yeah I can make that....
-
mangozac - Resin Addict Collaborator
- Posts: 4271
- Joined: Fri Oct 16, 2009 3:40 pm
- Location: QLD, Australia
Re: Centurion Mecha
![]() by Vaaish » Wed Jan 25, 2012 12:10 am
by Vaaish » Wed Jan 25, 2012 12:10 am
The bit you've added on to the shin armor confuses me as to it's purpose. It seems a bit large and awkward with the shapes there. If it's supposed to be a kind of tie down, I would probably see it higher on the mech and attached to the frame rather than the armor so that it wouldn't tear off under stress and keep the mech from toppling over.
The hip is looking interesting though
The hip is looking interesting though
-Vaaish
- Vaaish
- Junkie
- Posts: 827
- Joined: Sat Oct 31, 2009 7:55 am
- Location: Greenville, SC
Re: Centurion Mecha
![]() by Fleafa » Wed Jan 25, 2012 2:13 am
by Fleafa » Wed Jan 25, 2012 2:13 am
I agree with Vaaish. Surely any load it bears would be a little like using a jack on your car's bodywork?
-

Fleafa - Junkie
- Posts: 835
- Joined: Thu Jul 07, 2011 2:56 am
- Location: Fareham, Hampshire, UK
Re: Centurion Mecha
![]() by mangozac » Wed Jan 25, 2012 8:45 am
by mangozac » Wed Jan 25, 2012 8:45 am
Fair point guys and that did occur to me at first. But I guess I'm just approaching it more aesthetically than practically so unless you've got any other suggestions for what to put there I don't have any other options! In my defence, the armour mounts to the leg directly behind the shackle, so it's not as weak a point as one would think.
I guess they are intended as transport tie-downs and there will be more of them around so it's not like the whole thing will be relying on just the two knee shackles.
I made a resized shackle before bed last night (sans the hex pieces). Old on the left, new on the right:
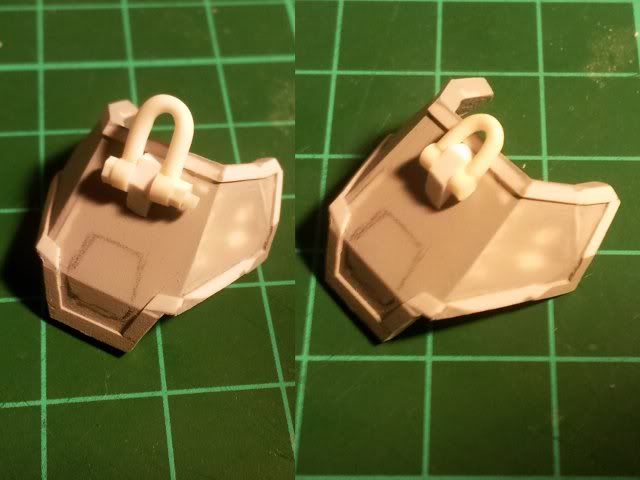
The smaller size is much better! The smaller shackle design may also help with the perceived strength issue by not looking as heavy duty.
I guess they are intended as transport tie-downs and there will be more of them around so it's not like the whole thing will be relying on just the two knee shackles.
I made a resized shackle before bed last night (sans the hex pieces). Old on the left, new on the right:
The smaller size is much better! The smaller shackle design may also help with the perceived strength issue by not looking as heavy duty.
Oh yeah I can make that....
-
mangozac - Resin Addict Collaborator
- Posts: 4271
- Joined: Fri Oct 16, 2009 3:40 pm
- Location: QLD, Australia
Re: Centurion Mecha
![]() by blind pig » Wed Jan 25, 2012 10:02 am
by blind pig » Wed Jan 25, 2012 10:02 am
Honestly?
I'd cut them off If/when I bought one......
I'd cut them off If/when I bought one......
- blind pig
- Junkie
- Posts: 581
- Joined: Fri Feb 19, 2010 2:41 am
- Location: Brisbane Australia
Re: Centurion Mecha
![]() by mangozac » Wed Jan 25, 2012 10:20 am
by mangozac » Wed Jan 25, 2012 10:20 am
That's the beauty of it I guess - since the shackle is a separate piece then cutting off the shackle mount is simple enough.
According to a friend of mine posting over on WAU who is into dirt bikes and stuff that point on the knee (along with the proposed points under the pelvis) is exactly where you would tie down something like this. Having no experience with tying down equipment (and knowing that this guy does know what he's talking about) I have to agree with him.
But the bottom line is this: with the smaller shackle I like it and if buyers don't they don't have to fit it!
Oh yeah I can make that....
-
mangozac - Resin Addict Collaborator
- Posts: 4271
- Joined: Fri Oct 16, 2009 3:40 pm
- Location: QLD, Australia
Re: Centurion Mecha
![]() by mangozac » Thu Jan 26, 2012 11:11 am
by mangozac » Thu Jan 26, 2012 11:11 am
I did some priming this morning. It's always a mixed emotion afterwards: it's very cool to see the parts in a uniform grey colour to get a sense of what they really look like, but it also shows up very single tiny little flaw (such as the tiny bits of leftover Milliput and stuff like that). So the next step will simply be running around with some sandpaper to clean it all up once the primer has cured nicely.
Finally I have the knee armour finished with its shackle mount. I gave it another primer coat just to be 100% certain that all was good, so now it just needs a light sanding and it'll be ready to cast. Same with the hip piece - hopefully I'll get them moulded this afternoon.
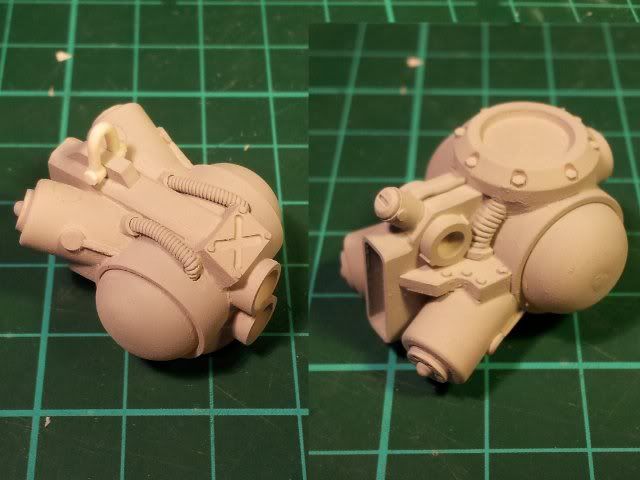
Before I can complete the pelvis I need to sort out the groin armour plate. I've been trying out a few ideas in clay but still nothing has grabbed me. I need to keep pouring through my mecha inspiration folder (there's hundreds of images in there) looking at mecha groins
Finally I have the knee armour finished with its shackle mount. I gave it another primer coat just to be 100% certain that all was good, so now it just needs a light sanding and it'll be ready to cast. Same with the hip piece - hopefully I'll get them moulded this afternoon.
Before I can complete the pelvis I need to sort out the groin armour plate. I've been trying out a few ideas in clay but still nothing has grabbed me. I need to keep pouring through my mecha inspiration folder (there's hundreds of images in there) looking at mecha groins
Oh yeah I can make that....
-
mangozac - Resin Addict Collaborator
- Posts: 4271
- Joined: Fri Oct 16, 2009 3:40 pm
- Location: QLD, Australia
Re: Centurion Mecha
![]() by paulson games » Thu Jan 26, 2012 2:17 pm
by paulson games » Thu Jan 26, 2012 2:17 pm
-

paulson games - Resin Addict Collaborator
- Posts: 940
- Joined: Wed Oct 21, 2009 8:09 pm
Re: Centurion Mecha
![]() by mangozac » Thu Jan 26, 2012 2:46 pm
by mangozac » Thu Jan 26, 2012 2:46 pm
I think you meant to say Deviantart is full of sexual perverts 
In all seriousness though, there is some cool stuff on that site once you wade through all of the crap (and erotica).
I guess this tie down thing is marking a new direction in my hobby life. This model is now being approached with a purely hobby point of view - its use gaming isn't getting much consideration, other than it's automatic suitability due to the fact it's a mecha with guns. So things like the tie downs I'm really happy with. It's bridging the gap and taking it into a slightly more plausible style.
Coming up with interesting groin armour has been a bit more difficult than I'd expected. I tried a few things in clay, but once I cut out some styrene it was looking too much like a super low poly count 3D model curved surface.
I've some up with something I think I'm happy with. Obviously it's just rough but you get the idea. The very front plates are a bit too wide compared to the clay mockup but I think the overall shape works (importantly tying in with the knee armour style). It was really hard to find a good angle to photograph it
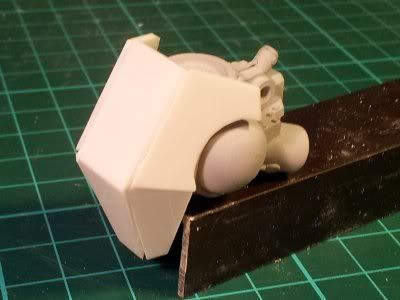
The knee armour and hip piece are all setup ready for moulding, so I'm off to pour some silicone!
In all seriousness though, there is some cool stuff on that site once you wade through all of the crap (and erotica).
I guess this tie down thing is marking a new direction in my hobby life. This model is now being approached with a purely hobby point of view - its use gaming isn't getting much consideration, other than it's automatic suitability due to the fact it's a mecha with guns. So things like the tie downs I'm really happy with. It's bridging the gap and taking it into a slightly more plausible style.
Coming up with interesting groin armour has been a bit more difficult than I'd expected. I tried a few things in clay, but once I cut out some styrene it was looking too much like a super low poly count 3D model curved surface.
I've some up with something I think I'm happy with. Obviously it's just rough but you get the idea. The very front plates are a bit too wide compared to the clay mockup but I think the overall shape works (importantly tying in with the knee armour style). It was really hard to find a good angle to photograph it
The knee armour and hip piece are all setup ready for moulding, so I'm off to pour some silicone!
Oh yeah I can make that....
-
mangozac - Resin Addict Collaborator
- Posts: 4271
- Joined: Fri Oct 16, 2009 3:40 pm
- Location: QLD, Australia
Re: Centurion Mecha
![]() by paulson games » Thu Jan 26, 2012 2:59 pm
by paulson games » Thu Jan 26, 2012 2:59 pm
Have you looked at any of the privateer warjacks?
A few of them have a simular overall look in the hip piece and thigh armor, not spot on but a general feel. A few of them even have tie down rings on the sholders and thigh plates. Take a look at the cygnar & khador stuff.
A few of them have a simular overall look in the hip piece and thigh armor, not spot on but a general feel. A few of them even have tie down rings on the sholders and thigh plates. Take a look at the cygnar & khador stuff.
-
paulson games - Resin Addict Collaborator
- Posts: 940
- Joined: Wed Oct 21, 2009 8:09 pm
Re: Centurion Mecha
![]() by mangozac » Thu Jan 26, 2012 3:09 pm
by mangozac » Thu Jan 26, 2012 3:09 pm
Yeah I've taken a lot of inspiration from Warjack designs. The Khador groin armour is all pretty boring looking like a flat diamond shaped plate. The Cygnar stuff is all too curved. Good point about them having tie down rings though!
Oh yeah I can make that....
-
mangozac - Resin Addict Collaborator
- Posts: 4271
- Joined: Fri Oct 16, 2009 3:40 pm
- Location: QLD, Australia
Re: Centurion Mecha
![]() by paulson games » Thu Jan 26, 2012 3:24 pm
by paulson games » Thu Jan 26, 2012 3:24 pm
I was just looking at the new plastic kit for cygnar and they have a tie down ring on the groin, lol.
-
paulson games - Resin Addict Collaborator
- Posts: 940
- Joined: Wed Oct 21, 2009 8:09 pm
Return to Sculpting and Scratchbuilding
Who is online
Users browsing this forum: No registered users and 60 guests